How to Clean Cricut Matts
Are you tired of your Cricut mats losing their stickiness after just a few uses? Don’t worry, you’re not alone. Many Cricut users face this issue and it can be frustrating when your project is ruined because the material won’t stay in place on the mat.
Cricut mats are essential for crafters, providing a sticky surface with materials in place during cutting and other crafting activities. Over time, these mats accumulate dust, debris, and residue from various materials, which can diminish their effectiveness. Proper cleaning and maintenance of your Cricut mats can extend their lifespan and ensure optimal project performance.
In this guide, we will explore the best methods of how to clean Cricut matts, helping you restore their stickiness and keep them in top working condition.
What Will You Need?
Before we dive into the cleaning process, make sure you have the following items on hand:
- Mild dish soap or Cricut Cutting Mat Wash
- Soft bristle brush or lint roller
- Clean towels or paper towels
- Rubbing alcohol or adhesive remover (optional)
It’s essential to use mild cleaning agents and avoid harsh chemicals as they can damage your mat. Now, let’s move on to the cleaning methods.
10 Easy Steps on How to Clean Cricut Matts
Step 1. Gather Your Materials:
Before you begin cleaning your Cricut mats, having all necessary materials ready and within reach is crucial. Start by selecting a mild dish soap or, if preferred, a specialized cleaning solution such as Cricut Cutting Mat Wash. You’ll need a soft bristle brush or a lint roller to remove any particles and debris without damaging the mat’s surface. A clean towel or paper towel will help dry the mat thoroughly after washing.
If your mat has stubborn residue, you might opt to have some rubbing alcohol or adhesive remover on hand, but remember to use these sparingly and only if needed. Ensuring you’re well-prepared will make cleaning smoother and more effective.
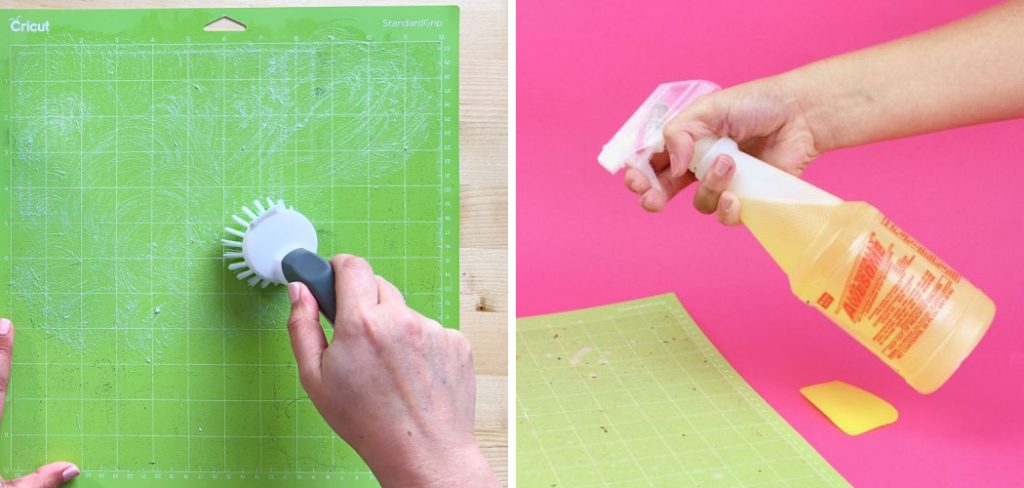
Step 2. Remove Loose Debris:
Begin the cleaning process by removing any loose debris from your Cricut mat. Use a soft bristle brush or a lint roller to gently sweep across the surface of the mat. This step is essential for eliminating dust, scraps, and other particles that have accumulated and ensuring that you’re not rubbing dirt into the mat during the wash. Be thorough but gentle, as excessive pressure can damage the sticky surface.
Step 3. Prepare Your Cleaning Solution:
Once the loose debris has been removed, it’s time to prepare your cleaning solution. Mix a few drops with warm water in a bowl or basin if you’re using mild dish soap. If you opted for Cricut Cutting Mat Wash, follow the instructions on the packaging for the appropriate dilution. It’s important to avoid too much soap, as it may leave a residue on the mat. Stir the solution gently to create suds, ensuring it’s mixed well but not overflowing. This mixture will help lift any remaining grime while being safe for your Cricut mat.
Step 4. Wash the Mat:
With your cleaning solution prepared, it’s time to wash the mat. Dip your soft bristle brush into the soapy water, allowing it to absorb some of the solution. Start gently scrubbing the mat’s surface in circular motions, focusing on areas with grime and built-up residue. Be sure not to use too much pressure, which could compromise the adhesive layer. Rinse the brush frequently to remove dirt and avoid reapplying it onto the mat. Continue this process until the entire surface has been cleaned, leaving your mat fresh and ready for use.
Step 5. Rinse the Mat:
After thoroughly washing the mat, the next step is to rinse it to remove any soap residue. Carefully run the mat under cool water, ensuring it’s not submerged completely, as this can affect the adhesive layer.
Use your hand to gently wipe away any remaining suds, taking care not to scrub harshly, which could damage the surface. Rinse until the water runs clear, indicating that all cleaning agents have been removed. Once rinsed, gently shake off any excess water to prepare the mat for drying.
Step 6. Dry the Mat:
Once the mat has been rinsed thoroughly, it’s essential to dry it properly to restore its stickiness and prevent any moisture damage. Place the mat flat on a clean, dry towel or paper towel, remaining completely stretched without any folds. Avoid using heat sources such as hairdryers or direct sunlight, which can warp the mat.
Allow the mat to air dry for several hours or until it feels scorched. This step is vital, as any remaining moisture can affect the mat’s adhesive properties and overall performance during your next crafting session.
Step 7. Check Adhesive Quality:
Once the mat is fully dry, it’s essential to assess the quality of the adhesive. Gently touch the mat’s surface with your fingertips to gauge its stickiness. If the adhesive feels tacky and holds onto your materials, your cleaning process has been successful. However, if the mat still lacks stickiness, consider repeating the cleaning process or applying a light layer of adhesive spray specifically designed for cutting mats, following the manufacturer’s instructions carefully. Ensuring your mat retains its adhesive quality is crucial for optimal performance in future crafting projects.
Step 8. Store the Mat Properly:
Proper storage of your Cricut mat is essential to maintaining its condition and longevity. Once your mat is clean, dry, and has checked its adhesive quality, store it flat or hanging in a cool, dry place away from direct sunlight and extreme temperatures. If you have multiple mats, consider using a protective sleeve or a dedicated mat storage container to prevent them from bending or getting damaged. Avoid stacking heavy items on top of the mats, as this can lead to unwanted creases or loss of adhesive quality.
Step 9. Regular Maintenance:
To ensure the longevity and effectiveness of your Cricut mats, incorporate regular maintenance into your crafting routine. Depending on how frequently you use your mats, plan to clean them every few uses or as soon as you notice a decline in stickiness. Also, avoid using highly sticky materials or ones that leave a heavy residue, which can cause build-up and reduce the mat’s lifespan.
Checking for wear and tear regularly can help identify when to replace a mat rather than waiting until it’s unusable. Committing to regular maintenance will keep your Cricut mats in prime condition and ready to assist in your creative projects.
Step 10. Troubleshooting Common Issues:
Even with careful cleaning and maintenance, you may encounter some common issues with your Cricut mat. If the mat is not holding materials as effectively as before, try gently cleaning the surface to remove any lingering residue. In cases where the mat is excessively sticky, it might be beneficial to lightly dust it with cornstarch or baby powder to balance the adhesive. If there are noticeable cuts or deep scratches on the mat’s surface, it may be time to consider replacing it, as these imperfections can impede cutting accuracy. Regularly checking your mat for these issues and addressing them promptly will help ensure optimal performance during crafting sessions.
By following these simple steps, you can effectively clean and maintain your Cricut cutting mats, extending their lifespan and ensuring they perform at their best for all your crafting needs.
5 Things You Should Avoid
- Using Harsh Chemicals: Avoid cleaning products that contain bleach or strong solvents, as these can damage the adhesive layer and overall integrity of the mat. Stick to gentle, soapy solutions that are safe for usage on crafting materials.
- Excessive Scrubbing: While it’s vital to remove grime, scrubbing too hard can wear down the mat’s surface and affect its adhesive properties. Instead, use gentle, circular motions with a soft bristle brush to clean effectively without causing damage.
- Soaking the Mat: Never fully submerge your Cricut mat in water. Soaking can saturate the adhesive layer, leading to a loss of stickiness and potential warping. Always keep it flat and wipe it clean instead of washing it.
- Using Heat Sources to Dry: To speed up the drying process, avoid using hairdryers, heaters, or placing the mat in direct sunlight. High temperatures can warp the mat, compromising its functionality and lifespan.
- Neglecting Regular Maintenance: Don’t wait until the mat is filthy or no longer sticky to clean it. Incorporate a regular cleaning schedule to keep your mats in optimal condition and avoid heavy build-up that can be harder to clean later.
Conclusion
Maintaining your Cricut mats’ cleanliness and adhesive quality is vital for achieving precise and successful crafting results.
By following the steps outlined in this guide on how to clean cricut matts—from proper cleaning techniques to regular maintenance practices—you can significantly extend the lifespan of your mats and enhance their performance. Remember to approach cleaning with suitable materials, avoid harsh chemicals, and store your mats safely to prevent damage. Regular checks for wear and adjusting your practices will ensure that your Cricut mats are always ready to support your creative projects efficiently.
With a bit of care and attention, your mats will continue to deliver exceptional results time after time.
Elizabeth Davis
Elizabeth is a creative writer and digital editor based in the United States. She has a passion for the arts and crafts, which she developed from a young age. Elizabeth has always loved experimenting with new mediums and sharing her work with others. When she started blogging, she knew that DIYquickly would be the perfect platform to share her tutorials and tips. She's been writing for the blog from the beginning, and her readers love her helpful advice and easy-to-follow instructions. When she's not writing or editing, Elizabeth enjoys spending time with her family and friends.