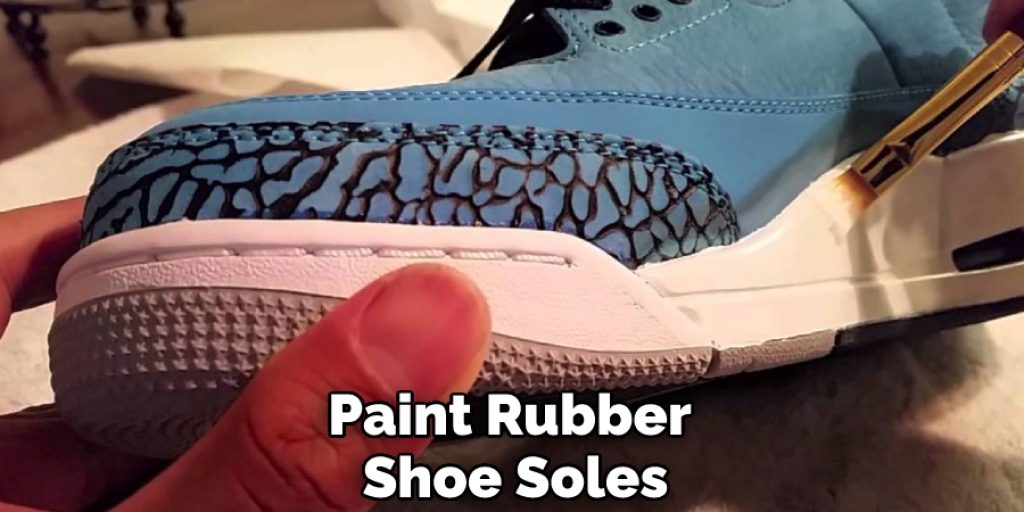
How to Paint Rubber Soles on Sneakers
Sneakers are known to be the most common and comfortable daily footwear. Just because you wear sneakers casually does not mean that your sneakers have to look shabby and out of style. You can always do some DIY on your sneakers to make them fashionable and trendy. One of the ways of doing it is by coloring the soles of your sneakers. The good thing about coloring your sneaker soles is that you can be as creative as you want and customize the colors according to your taste. There are a lot of different ways of coloring your sneaker soles.

It is a way to make them change the outlook and, if your sneakers’ soles are worn out, you can paint them to look fresh. So, if you want to know how to paint rubber soles on sneakers, keep reading ahead. To paint rubber soles, you need to prepare the area properly. You will also require a few other things to complete the process.
Summary: To paint rubber soles on sneakers, first clean the sneakers with a mild soap and water. Then use a cloth or paper towel to dry the sneakers. Next, paint the sides of the sneakers with a light coat of white paint. Once the paint is dry, use a black paint to create the outline of the rubber soles. Finally, add the color of your choice to the rubber soles.
DIY: How to Paint Rubber Soles on Sneakers
Having everyday sneakers will do your regular work, but if you could use some funkiness into your ordinary life and maintain the same comfort, then why not give a little effort to achieve that! While many people will suggest that you can learn how to paint rubber soles on sneakers by using a marker, you should not do that. The marker’s color is not sustainable, and it could lead up to have the wrong color on the shoes forever.
The marker will usually have a thinner coloring. You can add as many coats as you want, but it will not have the same effect as using acrylic paint. In the case of acrylic paints, you can use one coat and have satisfying coloring. And with a few coats, the color will be more vibrant. However, the best part of using acrylic paint is that it will last for a long time. And if you use a primer base with the paint, the paint will remain the original color of your bought sneaker.
To make a better painting on your sneakers’ soles, you will only need a few materials that will give you a much better and close to a professional result. A pencil or pen will help you draw the design you want. Different colors of paint are used to paint shoes. If you don’t have these, you can use acrylic paints.
Materials You Need
There are only a few things you need for this project, and you can get them around the local stores in your city. The items you will need are-There are only a few things you need for this project, and you can get them around the local stores in your city. The items you will need are-

- Paint, Shoe, Brush
- Rubbing alcohol
- Painter’s tape
- Mod podge
- Acrylic paint
- Brush
With these few items, you will be able to turn your favorite sneakers’ soles into the color of your desire.
11 Step-by-step Guidelines on How to Paint Rubber Soles on Sneakers:
Step 1: Preparing the Area
Before you start painting, it is important to prepare the area properly to ensure a smooth and clean application of the paint. Start by cleaning the sneakers with a mild soap and water solution. Use a cloth or paper towel to dry the sneakers completely. You want to make sure there is no dust, dirt, or debris on the soles before you start painting.

The next step is to apply the painter’s tape or masking tape around the edges of the rubber soles. This will prevent any paint from getting onto other parts of the sneakers. You can also use petroleum jelly or lip balm to cover the edges of the soles if you don’t have tape.
Step 2: Protecting the Surface
Place some paper towels or a cloth under the sneakers to protect them from any accidental paint spills. You can also use newspapers or plastic sheets for this purpose. It is important to protect the surface you are working on as well. The last thing you want is to damage your floor or table with paint. It is also a good idea to work in a well-ventilated area to avoid inhaling fumes from the paint.
You can now begin the painting process. It is recommended to start with a light coat of white paint. This will act as a base for the other colors and help them stand out more. The paint should be applied evenly with a flat brush.
Step 3: Taping the Edges
Use painter’s tape or masking tape to cover the edges of the soles and any other areas you don’t want to be painted. This will ensure clean lines and a professional-looking finish. You can also use tape to create a design or pattern on the soles. But make sure the tape is well-adhered to the surface to prevent paint from leaking underneath. It is also important to remove the tape while the paint is still wet for a clean finish.

But if you want to use a different color for the edges of the soles, skip this step and move on to the next. You can always go back and paint the edges with a different color once the main body of the sole is dry.
Step 4: Painting the Sides
Start by painting the sides of the sneaker soles with a light coat of white paint. This will act as a base for the other colors and make them stand out more. Use a flat brush to ensure an even application of the paint. You can also use spray paint if you prefer, but make sure to follow the instructions on the can and work in a well-ventilated area. You may need to apply multiple coats for a more opaque finish.
It is important to let the paint dry completely between coats to avoid any smudging or smearing. You can use a hairdryer on a low heat setting to speed up the drying process. The paint should be completely dry before moving on to the next step.
Step 5: Painting the Outline
Once the white paint is dry, use black paint to create the outline of the rubber soles. You can do this freehand or use a stencil if you want precise lines. Again, use a flat brush and apply thin coats of paint for best results. You can also use a smaller brush to add more details or patterns to the outline. The black outline will make the colors of the rubber soles pop and give a more defined look to your sneakers. It is important to let the paint dry completely before moving on to the next step.
But if you want to skip this step, you can always use a black permanent marker or fabric marker to create the outline after the paint has dried. You can also use a white paint marker for a more subtle effect.
Step 6: Choosing the Colors
Now comes the fun part – choosing the colors for your rubber soles! You can use any acrylic paint or specialty shoe paint in the color of your choice. Make sure to mix or shake the paint well before using it. You may also want to test the colors on a piece of paper or cloth before applying them to the sneakers. But don’t worry; if you make a mistake or don’t like the color, you can always paint it white and start again.

Although there are no rules for choosing the colors, it is important to use complementary or contrasting colors to create a visually appealing design. You can also use multiple shades of the same color for a more vibrant and dimensional look.
Step 7: Painting the Rubber Soles
Once you have chosen your colors, use a flat brush to apply them on the rubber soles. You can use one color for each sole or create a gradient effect by blending two or more colors. You can also use a different color for the heel of the soles to add some contrast. Remember to apply thin coats and let the paint dry before adding another layer. This will prevent clumping and give a smoother finish. It may take a few coats to achieve the desired color, but be patient and let the paint dry completely between each coat.
You can also use a small brush for more intricate designs or patterns. Just make sure to let the paint dry completely before moving on to the next step. It is also important to clean the brush thoroughly before switching to a different color. The last thing you want is to mix the colors unintentionally.
Step 8: Adding Details
Once you have painted the entire sole, you can add additional details with smaller brushes or toothpicks. You can create pattern stripes or even write a message on the soles using different colors. Get creative and have fun with this step! You can also use metallic or glitter paint for a more eye-catching look. Just make sure to let the paint dry completely before moving on to the next step. The more layers you add, the longer it will take for the paint to dry.

You can also use stencils or stamps to add designs and patterns if you are not confident in your freehand painting skills. Just make sure to secure the stencil or stamp firmly on the sole before applying the paint to avoid any smudging.
Step 9: Sealing the Paint
To protect your hard work and ensure the paint stays on for a long time, it is important to seal the soles with a clear coat. You can use Mod Podge or any other sealant specifically made for shoes. Use a clean brush to apply an even layer of the sealant on the painted areas of the soles. This will prevent chipping and fading of the paint and make your sneakers look like new again. Let the sealant dry completely before wearing or handling your sneakers.
But before sealing the paint, make sure you are happy with the design and colors. Once sealed, it will be difficult to make any changes or fix any mistakes. It is always better to take your time and make sure everything looks perfect before sealing the paint.
Step 10: Removing the Tape
Once the sealant is dry, carefully remove the tape from the edges and any other areas you covered earlier. Make sure to slowly peel off the tape to avoid damaging the paint. If there are any spots where paint has leaked underneath, use a cotton swab dipped in rubbing alcohol to clean them up. You can also use an eraser to remove any pencil or stencil marks from the outline. You should now have a clean and well-painted pair of sneakers!
The final step is to let the paint and sealant cure for at least 24 hours before wearing the sneakers. This will ensure that the paint has fully adhered to the rubber soles and will last longer. You can also add a second layer of sealant after 24 hours for extra protection.
Step 11: Finishing Touches
Now that your rubber soles are painted and sealed, you can add some finishing touches to make them look even more stylish. You can use fabric markers or acrylic paint to add designs or patterns on the sides of the soles. You can also use a white paint pen to write your name, a quote, or any other message on the black outline. Let your imagination run wild, and personalize your sneakers to make them one-of-a-kind!
It is important to note that painted rubber soles may not be as durable as the original ones and may wear off over time. The paint may also crack or peel if not sealed properly or if exposed to harsh conditions. But with proper care and maintenance, you can enjoy your custom-painted rubber soles for a long time.
Following these simple steps on how to paint rubber soles on sneakers, you can easily transform your old and boring sneakers into a vibrant and unique pair. You can experiment with different colors, designs, and patterns to create endless possibilities. Not only is this a fun DIY project, but it also allows you to give a new life to your old shoes without spending too much money.
Frequently Asked Questions
What Kind of Paint Do You Use on Rubber Shoes?
If you’re using rubber shoes, water-based paint is the way to go. If you have any other questions about what kind of paint to use on your rubber shoes, don’t hesitate to contact us.
Can You Paint Rubber Shoe Soles?
You can paint rubber shoe soles, but it is not easy. It takes a lot of time and effort to do so.
The process of creating the perfect paint mixture starts with adding the right amount of paint to a bucket and slowly adding small amounts of additional paint to prevent any bubbles from forming. You should also be careful when applying the paint to avoid any damage to your shoes from the chemicals.
After you have painted your shoes, allow them to dry for several hours before wearing them again.
Will Acrylic Paint Peel Off Rubber?
Acrylic paint will not peel off the rubber. However, it is possible that the paint may come off if you use a plastic scraper or sharp object to remove the paint from the surface of the rubber. To prevent this from happening, it is important to properly seal the painted rubber soles with a clear coat.
Is Acrylic a Good Type of Paint for Sneakers?
Acrylic paint is a type of paint that has been used for decades. It is durable and easy to clean up.
It can be applied on most surfaces, including plastic, metal, paper, canvas, wood, and more. It also dries quickly, so it’s ideal for DIY projects where you need quick results.
Final Thoughts
That was all for how to paint rubber soles on sneakers. With these simple steps, you can create the designs and change the color of your sneakers as you like them. You can color them to match your outfit for a particular event or follow the trend that is going on. Once your sneakers are done, you will have lots of fun wearing them outside and be different than others. You May Read Also – How to Make Witch Shoes Out of Duct Tape
Elizabeth Davis
Elizabeth is a creative writer and digital editor based in the United States. She has a passion for the arts and crafts, which she developed from a young age. Elizabeth has always loved experimenting with new mediums and sharing her work with others. When she started blogging, she knew that DIYquickly would be the perfect platform to share her tutorials and tips. She's been writing for the blog from the beginning, and her readers love her helpful advice and easy-to-follow instructions. When she's not writing or editing, Elizabeth enjoys spending time with her family and friends.