
How to Crochet a Pencil Pouch
Are you looking for a fun and creative way to store your pencils and pens? Look no further!
How to crochet a pencil pouch is a delightful and practical project that combines creativity with functionality. Whether you’re a seasoned crocheter or a beginner eager to learn, making a pencil pouch offers an excellent opportunity to practice your skills while creating a valuable accessory for school, work, or crafts. With a few basic crochet stitches, some colorful yarn, and a bit of patience, you can design a personalized pouch that not only holds your writing instruments but also showcases your unique style.
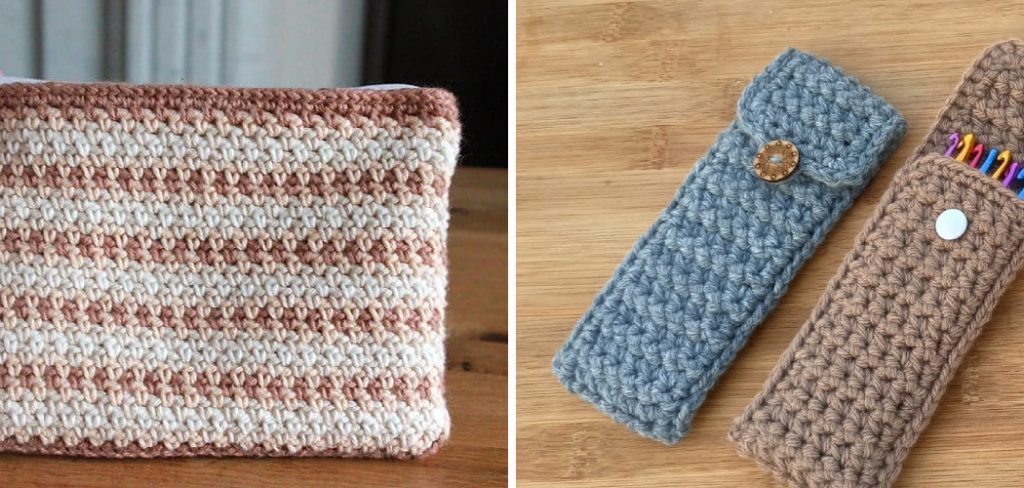
In this guide, we’ll walk you through the steps to create your own crochet pencil pouch, providing tips and techniques to ensure your project is enjoyable and successful.
What Will You Need?
Before we get started, let’s go over the materials you will need for this project:
- Yarn: Choose a yarn suitable for crochet and comes in your desired colors.
- Crochet Hook: The size of the hook will depend on the thickness of your yarn. A 3.5mm to 4mm hook is a good size.
- Scissors: For cutting your yarn.
- Stitch Markers: These will help you track where you are in your pattern.
- Tapestry Needle: This will be used to weave in any loose ends.
- Zipper or Drawstring Closure: Add a zipper or drawstring closure to your pouch for added functionality.
Once you have all your materials gathered, it’s time to get started on your crochet pencil pouch!
8 Easy Steps on How to Crochet a Pencil Pouch:
Step 1: Start with a Slip Knot
To begin crocheting your pencil pouch, you’ll first need to create a slip knot. This is the foundation for your project, and getting it right is essential for a smooth start. Here’s how to do it:
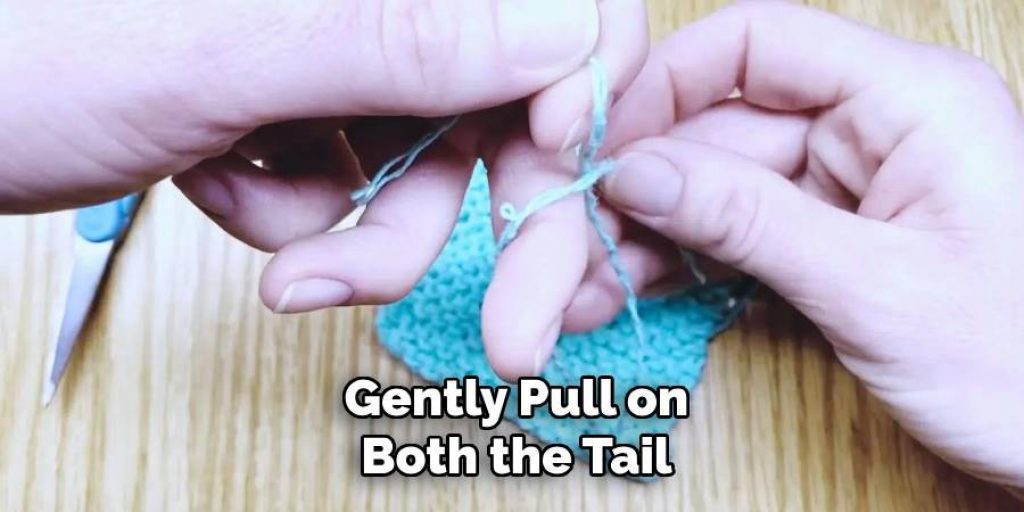
- Take a length of yarn about 6-8 inches long and create a loop, leaving a tail of yarn.
- Hold the loop with your thumb and forefinger, and use your other hand to take the working yarn (the yarn connected to the ball) and wrap it around the loop.
- Pull this working yarn through the loop, creating another loop.
- Now, gently pull on both the tail and the working yarn to tighten the knot. Make sure it’s snug but not too tight, as you must slide it onto your crochet hook.
- Place the slip knot onto your crochet hook and tighten it to ensure it grips securely but allows you to remove it if necessary easily.
Congratulations! You’ve successfully created your slip knot. This will serve as the starting point for the base of your pencil pouch, allowing you to begin working in the round or rows, depending on your chosen pattern. Once you’re ready, you can dive into the next steps, using your crochet hook to create beautiful stitches that will form the body of your pouch.
Step 2: Create the Foundation Chain
Now that your slip knot is ready, it’s time to create the foundation chain for your pencil pouch. This chain will determine the width of your bag, so make it as long as you desire. Here’s how to do it:
- Yarn Over: Begin by wrapping the working yarn from the ball around the hook (called “yarn over”).
- Pull Through: Use the hook to pull the yarn through the slip knot on your hook. You now have one chain stitch.
- Repeat: Continue yarn over and pull through to create additional chain stitches. Aim for around 20-25 stitches for a standard-sized pouch, but feel free to adjust based on your preference.
- Check Your Chain: Once you have your desired length, ensure that your stitches are even and tension-free.
Step 3: Begin Crocheting the Body of the Pouch
With your foundation chain completed, it’s time to start crocheting the body of your pencil pouch. You will work in rows or rounds depending on your chosen design. Here’s how to begin:
- Join the Chain: If you’re working in the round, slip the stitch into the first chain stitch to form a circle. For rows, you can just proceed with the following stitch without joining.
- Choose Your Stitch: Double or single crochet stitches work well for a simple pencil pouch. If you’re new to crocheting, a single crochet is an excellent choice as it creates a tighter fabric.
- Crochet into Each Stitch: Move from the starting stitch and insert your hook into each chain, working your chosen stitch. Ensure that you maintain even tension.
- Continue Rows/Rounds: For rows, chain one at the end of each row and turn your work to start in the next row. For rounds, simply continue in a circular motion without turning. Keep crocheting until the body of your pouch reaches your desired height, usually around 5-7 inches.
Step 4: Shaping the Pouch
You may want to shape the top edge to give your pencil pouch a more tailored look. Here’s how:
- Decide on the Shape: Create a straight edge or have the pouch taper slightly towards the top.
- Decrease Stitches (optional): To achieve a tapered effect, decrease your stitches by skipping one stitch every few rows.
- Work to the Desired Height: Continue crocheting until you reach the desired height, ensuring the shape remains consistent throughout.

Step 5: Add Closure
Finishing your pencil pouch would only be complete with a closure to keep your items secure. Here’s how to add a zipper or drawstring:
- Zipper Closure: If using a zipper, secure it along the top edges of your pouch and crochet around it to attach. Ensure it is sewn in securely, allowing smooth movement.
- Drawstring Closure: If you opt for a drawstring, create a series of stitch holes along the top edge that you can weave your yarn through later.
- Tidy Up: Check your stitches and adjust once your closure is attached.
Step 6: Weave in Ends
Weaving in the ends is a crucial finishing touch to ensure your crochet pencil pouch looks polished and stays intact. Here’s a detailed method to effectively weave in those loose ends:
- Identify Loose Ends: After completing your crochet work, you will likely have some yarn tails at the beginning and end of your project, as well as any color changes if applicable. Make sure to leave a tail of about 6 inches for easy manipulation.
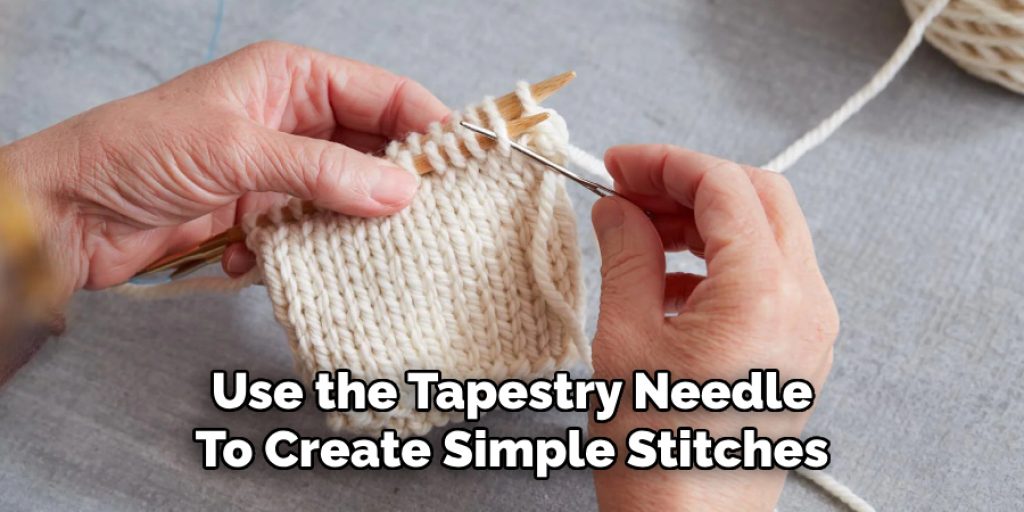
- Thread the Tapestry Needle: Take your tapestry needle and thread it with one of the loose ends. If the yarn is thick, you may need to fold it over a few times for easier threading.
- Weave Through Stitches: Begin weaving the yarn tail through the stitches of your crochet work. Move back and forth through several adjacent stitches, going in different directions. This will help secure the tail and prevent it from unraveling. Try to weave it through stitches of the same color for a more seamless appearance.
- Trim Excess Yarn: Once you have woven the tail in securely, pull it through and trim any excess yarn, keeping a small margin if you’re concerned about unraveling. Ensure the cut isn’t too close to your weaving to avoid fraying.
- Repeat for All Ends: Continue this process for any other loose ends, ensuring each is secured and hidden within your work.

By properly weaving in ends, you enhance the durability and aesthetic of your pencil pouch, making it both functional and pleasing to the eye. Now that your pencil pouch is complete, you can take pride in your creation, ready to hold your writing instruments in style!
Step 7: Add Decorative Elements
Consider adding some decorative elements to personalize your pencil pouch and make it truly unique. Here’s how you can enhance your creation:
- Choose Decorative Items: Look for buttons, patches, or appliqués that complement your pouch’s design. For a more artistic touch, you can also use embroidery or fabric paint.
- Attach Embellishments: If using buttons or patches, sew them securely onto your pouch using a needle and thread. For embroidery, use the tapestry needle to create simple stitches or more intricate designs, depending on your skill level.
- Consider a Lining (optional): You may also want to line your pencil pouch for added durability and finish. Cut a piece of fabric to match the pouch’s dimensions, sew it into place along the inner edges, and secure it all the way around.
- Final Touches: After all decorations are applied, inspect your pouch for security and make any necessary final adjustments.
Step 8: Care Instructions
To keep your crochet pencil pouch looking fresh and vibrant, follow these care instructions:
- Cleaning: Hand wash your pouch with mild soap and lukewarm water. Avoid using harsh detergents that could damage the fibers. Rinse thoroughly and gently squeeze out excess water—do not wring or twist.
- Drying: Lay your pouch flat on a towel to dry, reshaping it as needed. Avoid hanging it up, as this may distort its shape.
- Storage: Store your pouch in a cool, dry place when not in use. Avoid direct sunlight, which can fade the colors over time.
By following these final steps, your pencil pouch will be beautifully crafted, well-maintained, and ready for use!
Conclusion
In summary, how to crochet a pencil pouch is a rewarding project that combines creativity with practicality.
By following the outlined steps—from selecting materials and shaping the pouch to adding closures and decorative elements—you can craft a personalized accessory that serves a functional purpose and showcases your style. Remember to care for your pouch correctly to maintain its appearance and durability. With patience and attention to detail, your finished pencil pouch will be a delightful addition to your supplies and a testament to your crochet skills.
Enjoy the process, and don’t hesitate to experiment with colors, patterns, and embellishments to make your pouch uniquely yours!
Elizabeth Davis
Elizabeth is a creative writer and digital editor based in the United States. She has a passion for the arts and crafts, which she developed from a young age. Elizabeth has always loved experimenting with new mediums and sharing her work with others. When she started blogging, she knew that DIYquickly would be the perfect platform to share her tutorials and tips. She's been writing for the blog from the beginning, and her readers love her helpful advice and easy-to-follow instructions. When she's not writing or editing, Elizabeth enjoys spending time with her family and friends.


