How to Make Dress Bigger at Bust
Are you struggling with a dress that fits perfectly at the waist but is too tight in the bust area? Or have you found a gorgeous dress that’s just a bit too small for your chest? Don’t worry, we’ve all been there.
How to make dress bigger at bust can be an essential alteration for achieving a comfortable and flattering fit. Whether you’ve purchased a dress that’s slightly too snug or wish to modify an existing piece for better proportions, understanding the proper techniques can make all the difference. This guide will explore various methods to effectively enhance the bust area, ensuring your dress fits beautifully while maintaining its original style.

With the right tools and patience, you can transform a dress that no longer meets your fit needs into a personalized garment you’ll love to wear.
What Will You Need?
Before we discuss the alteration techniques, you should have a few essential tools on hand. It’s always better to gather your supplies before starting any project to ensure a smooth and efficient process.
- Seam Ripper: This tool will help remove stitches without damaging the fabric.
- Scissors: A good pair of sharp scissors is crucial for this task.
- Extra Fabric or Lace Material: You’ll need additional fabric or lace material to insert into the dress for added volume at the bust area.
- Sewing Machine or Needle and Thread: Depending on your sewing skills, you can use either a sewing machine or hand sewing for this alteration.
You’re ready to get started once you have all the necessary supplies.
10 Easy Steps on How to Make Dress Bigger at Bust
Step 1. Try on the Dress:
Begin by putting on the dress in front of a mirror. As you wear it, note how it feels in the bust area. Is it uncomfortably tight or restrictive? Check for any pulling or stretching of the fabric, especially around the seams. It’s important to identify the exact points where the dress needs more room. This initial fitting will provide a clear understanding of the adjustments required and help you envision how the dress will look after alterations. Be sure to assess the fit from different angles, as this will inform your next steps and guide you in choosing the best method for making the dress larger at the bust.

Step 2. Mark the Areas Needing Adjustment:
Once you’ve identified the tight spots, it’s time to mark those areas for alteration. Use a fabric chalk or removable marker to outline where you want to create more room. Focus on the side seams or the center front, which are often the most effective adjustment locations. Be sure to mark evenly on both sides for a symmetrical fit. This step is crucial to ensure precision in your alterations and to help you visualize the final adjustments before you begin cutting or sewing.
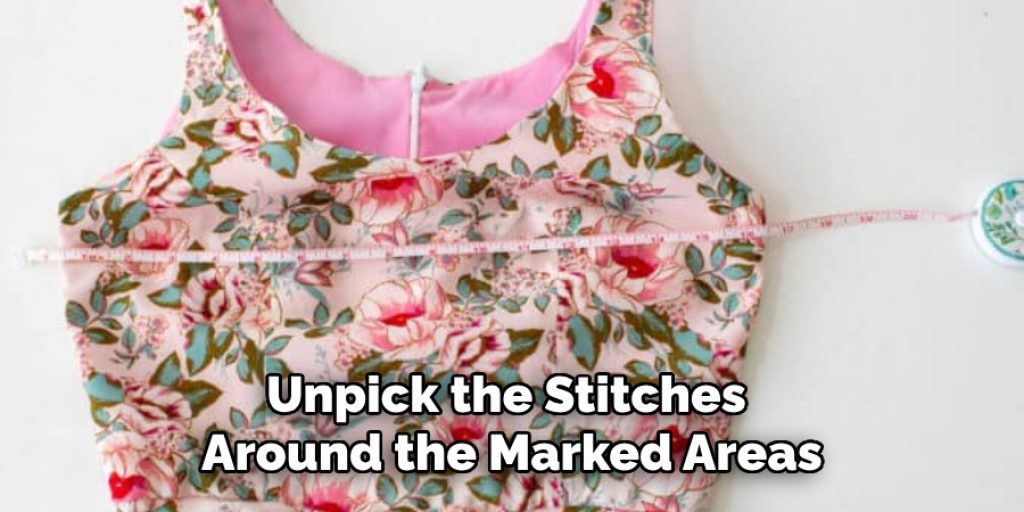
Step 3. Unpick the Stitches:
Using the seam ripper, carefully unpick the stitches around the marked areas. Focus on the seams you’ve identified for adjustment while being cautious not to damage the fabric. Take your time with this step to avoid creating additional holes in your garment. Removing the stitches will give you the flexibility to add more fabric or lace and ensure the dress can be appropriately altered.
Step 4. Prepare Additional Fabric or Lace:
Once the seams are opened, measure and cut the extra fabric or lace material to your desired size. When choosing fabric, consider the texture and color to ensure it blends seamlessly with your dress. If using lace, ensure it is stretchy enough to accommodate the bust area. This piece will serve as the insert, so ensure it matches or complements your dress to maintain its aesthetic appeal.
Step 5. Pin the Fabric or Lace. Insert:
With your additional piece ready, pin it between the seams where you made adjustments. Ensure that the insert lies flat and is evenly distributed on both sides of the dress. Use enough pins to secure the fabric, allowing for a smooth and stable foundation while you sew. This step is vital to prevent any shifting while you work.
Step 6. Sew the Insert in Place:
Stitch the fabric or lace insert into the dress along the seams you previously opened using either a sewing machine or needle and thread. Ensure your stitches are secure but not overly tight, which could lead to puckering. Once sewn, remove the pins carefully to avoid damaging the fabric.
Step 7. Try on the Dress Again:
Once you’ve completed the sewing, put the dress back on to assess the fit at the bust. This is your chance to determine whether the alterations achieved the desired effect. Take note of how the dress feels and ensure no awkward bulges or looseness. Adjustments may be necessary, so don’t hesitate to refine if needed.

Step 8. Finalise the Hemming:
After ensuring that the insert has provided the desired fit at the bust, it’s time to address the hem of the dress. If the alteration has added length to the bodice or changed the overall silhouette, you may need to adjust the hem to maintain a professional and polished appearance. Begin by trying on the dress again and checking how the alteration affects the overall length. If the hemline needs adjustment, measure the amount that should be taken up, ensuring it’s even all around.
Carefully mark the new hemline with fabric chalk, then fold the edge under for a clean finish. Pin or baste it in place to secure the fold, and use a sewing machine or hand stitching to stitch the hem down, taking care to ensure your stitches are neat and unobtrusive. Finally, press the hem with an iron to set the stitches and achieve a crisp finish. This step ensures that your dress not only fits beautifully at the bust but also looks seamless and professionally tailored all around.
Step 9. Press the Dress:
After you have completed the hemming and any additional adjustments, it’s essential to press the dress carefully. Using a steam iron, gently press the seams and the hem to ensure everything lies flat and looks polished. To prevent damage, be cautious with the heat, especially around the new fabric or lace insert. Pressing will enhance the appearance of your alterations and help set the stitches, giving your dress a well-finished look. Remember to steam the fabric from the inside when possible to preserve its integrity and avoid any shiny marks. This final touch will ensure your altered dress looks as good as new.
Step 10. Final Inspection:
Conduct a thorough final inspection after pressing the dress and ensuring all alterations are complete. Check for any uneven seams, loose threads, or other imperfections needing attention. Pay close attention to the newly added fabric or lace insert to ensure it seamlessly blends with the rest of the dress. If you find any areas that require finishing touches, take the time to rectify them. This step is essential to guarantee that your dress not only fits correctly but also looks professionally tailored, ensuring you feel confident and comfortable when wearing it.

By following these steps, you can easily alter a dress to fit your bust size, allowing you to wear and enjoy it confidently.
5 Things You Should Avoid
- Ignoring Fabric Type: Avoid choosing materials that do not stretch or suit the dress’s style. Fabrics that lack elasticity can cause discomfort and an unnatural fit after alterations.
- Overstretching Seams: Be careful not to overstretch the seams while pinning or sewing the insert. This can lead to distorted shapes and puckering, compromising the overall appearance.
- Neglecting Symmetry: Don’t forget to check for symmetry in your alterations. Uneven inserts can result in an awkward fit, so always carefully measure and pin both sides.
- Skipping Inspections: Avoid the temptation to skip trying on the dress between steps. Regular fittings are crucial to ensure that each adjustment achieves the desired outcome.
- Rushing the Process: Take your time with each alteration. Rushing can lead to mistakes, such as cutting too much fabric or making uneven hems, which ultimately detracts from the quality of your final result.
By avoiding these common mistakes, you can achieve a well-fitted, professionally altered dress that looks and feels great. Remember to follow the steps carefully and take your time to achieve the best results possible.
Conclusion
In conclusion, altering a dress to better fit at the bust can enhance comfort and confidence in your attire. By carefully selecting the appropriate fabric for inserts, meticulously pinning and sewing, and paying close attention to details like hemming and pressing, you can transform a garment that may have felt unflattering into one that accentuates your best features.
To attain optimal results, remember to take your time, perform regular fittings, and ensure symmetry throughout the process. With these strategies in hand, you can create a bespoke fit that enhances your appearance and revitalizes your love for the piece.
Hopefully, the article on how to make dress bigger at bust has been informative and helpful. With these tips, you can confidently alter your dresses to fit your unique body shape, giving new life to your wardrobe. Happy sewing!

