
How to Check Gauge Crochet
Checking gauge is a fundamental step in crochet that can significantly influence the outcome of your projects. Gauge refers to the number of stitches and rows per inch, and achieving the correct gauge ensures that your finished piece matches the intended size and fit as outlined in the pattern. Without a proper gauge, you might end up with a garment that is too small or too large, resulting in frustration and wasted materials.
This guide will provide you with essential steps on how to check gauge crochet effectively. You will learn how to create a gauge swatch, accurately measure your stitches and rows, and make necessary adjustments. By mastering the art of gauge checking, you’ll enhance your crocheting skills and achieve successful results in your projects.
Understanding Gauge
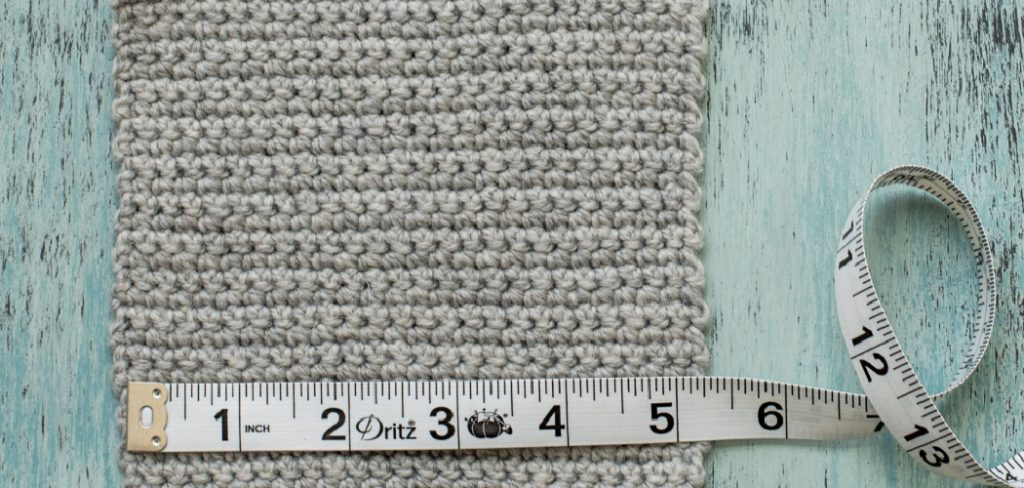
Gauge in crochet refers to the number of stitches and rows per inch within a given pattern. It allows crocheters to create pieces of the correct size and fit, ensuring that the finished project aligns with the designer’s intentions. To measure the gauge, take a ruler or a specialized gauge tool and count the number of stitches and rows in a 4-inch square of your swatch. This measurement clearly explains how your work compares to the recommended gauge in the pattern.
Achieving the correct gauge is crucial for project accuracy because variations can lead to significant discrepancies in size. If your gauge is too tight, your piece may end up smaller than intended; conversely, a loose gauge can lead to a much larger item. These inconsistencies can result in garments that don’t fit properly or accessories that lack the desired shape.
Therefore, understanding how to check gauge crochet is not just a recommendation—it is essential for successfully completing your projects. By paying attention to gauge, you can ensure that your hard work results in beautiful, well-fitting creations.
Materials and Tools Needed
To check gauge effectively, you will need some specific materials and tools. First, gather your yarn and the crochet hook designated for your project. A ruler or tape measure will be essential for measuring your swatch accurately. A gauge ruler or swatch gauge tool can be very helpful for more precise measurements.
Additionally, consider having a calculator handy to assist in making adjustments to patterns whenever necessary. Having these materials ready will streamline checking your gauge and help ensure project success.
How to Check Gauge Crochet: Creating a Gauge Swatch
1.Choosing the Right Yarn and Hook
The appropriate yarn and crochet hook are crucial for achieving the correct gauge. Always base your selection on the specifications of the pattern you follow. Each pattern will indicate the weight of yarn and the size of the hook needed, as these factors directly influence the stitch tension and the overall outcome of your project.
Different materials might yield inconsistent results, leading to an off-gauge. Therefore, sticking to the recommended materials ensures that you can successfully replicate the intended measurements and characteristics of the finished piece.
2.Crocheting the Swatch
To create your gauge swatch, begin by crocheting a square that measures approximately 4×4 inches. Working in the same stitch pattern as specified in your project is advisable, as this will give you the most accurate representation of how your stitches will behave in the finished item. Crochet a little more than the required size to account for any potential tightening or curling at the edges.
Once your swatch is complete, allow it to relax for at least 15 minutes before measuring; this helps to ensure that your stitches are not distorted. After it has settled, use your ruler or gauge tool to measure the number of stitches and rows in a 4-inch section, confirming that you’re achieving the correct gauge. If adjustments are needed, you can modify your yarn or hook size accordingly.
Measuring the Gauge
Measuring Stitches Per Inch
To accurately measure stitches per inch, start by laying your gauge swatch on a flat surface, ensuring that it is completely relaxed without any lumps or distortions. Measure a 4-inch section of your swatch using a ruler or dedicated gauge tool. Count the number of stitches within that section; this will give you the number of stitches per inch.
For the most accurate results, counting the stitches in the middle of the swatch is often helpful to avoid any edge curling that may affect the count. Repeat your measurements a couple of times to confirm consistency, as ensuring accuracy is key to achieving the correct gauge.
Measuring Rows Per Inch
Measuring the number of rows in a 4-inch section follows a similar approach. Lay your swatch flat and make sure it is free from any creases. Using the same ruler or gauge tool, measure a vertical 4-inch section of your swatch. Count the number of completed rows within that segment. It is essential to observe the row height; for accurate measuring, ensure that you are counting from the top of one row to the top of the next. As with stitches, double-check your counts to verify consistency, as this will ensure that your finished project will meet the intended dimensions.
Adjusting Gauge
Adjusting your yarn or hook size is essential to achieving the correct fit when your initial gauge swatch does not match the required measurements. If your gauge is too tight, consider switching to a larger crochet hook or using a thicker yarn. Conversely, if your gauge is too loose, opt for a smaller hook or a finer yarn. Adjustments should be made methodically, ensuring you maintain the integrity of the original pattern.
In addition to changing your materials, it’s important to remember that tension can also play a role in gauging discrepancies. Practicing a few rows with your new setup allows you to adapt to the different textures and feel of the yarn and hook combination. This may involve crocheting a bit more loosely or tightly to match the specified gauge effectively.
After adjusting, create a new gauge swatch following the procedures previously outlined. Allow the new swatch to relax before measuring, ensuring more accurate results. Verify that your new stitch and row counts align with the recommended gauge in the pattern. By taking the time to properly adjust and verify your gauge, you can enhance the quality of your crocheting projects and achieve the desired outcomes without compromising on design.
Troubleshooting Common Gauge Issues
Achieving the correct gauge can sometimes be challenging, leading to common issues like working too tight or too loose. If you find your gauge is too tight, this often results in a smaller-than-intended project. Try using a larger crochet hook or consciously loosening your grip as you work to correct this. Additionally, take breaks to relax your hands, which can help alleviate tension.
On the other hand, if your gauge is too loose, your fabric may appear floppy and fail to hold its shape. Switching to a smaller hook is a good starting point in such cases. You might also check if the yarn is slipping; using a more textured yarn might provide the necessary grip to maintain the correct tension.
Practice is essential when adjusting your tension. Work a few rows to get accustomed to the new yarn and hook combination before re-checking your gauge. If you struggle to achieve the desired gauge, seek advice from more experienced crocheters. Joining a local crochet group or engaging with online communities can provide valuable insights and tips tailored to your specific issues. Remember, learning to adjust the gauge is a skill that improves with time and practice.
Frequently Asked Questions (FAQs)
1. Why Is Gauge Important in Crocheting?
Gauge is crucial because it determines the size and fit of your finished project. If your gauge is incorrect, the item may end up too small or too large, leading to disappointment. Following the gauge ensures that your piece matches the intended measurements in the pattern.
2. What Should I Do if My Gauge Swatch Doesn’t Match the Required Measurements?
If your gauge swatch doesn’t align with the required measurements, you can adjust your materials by changing your yarn thickness or using a different hook size. Additionally, practice with your new hook and yarn combination to help achieve the desired tension.
3. How Can I Avoid Curling at The Edges of My Gauge Swatch?
To prevent curling, make sure to crochet your swatch a bit larger than the required size before measuring. Additionally, working with a looser tension can help reduce the tendency for the edges to curl.
4. Can I Use Any Type of Yarn for My Projects, or Should I only Stick to Specific Recommendations?
While you can experiment with different types of yarn, it is best to stick to the recommended yarn specified in your pattern, especially when initially learning. Different yarn materials can yield varied results in texture, drape, and gauge, which can ultimately affect the outcome of your project.
Conclusion
In conclusion, checking the gauge is a crucial step in the crochet process that can significantly impact the success of your projects. By accurately determining how to check gauge crochet, you ensure that your finished items match your patterns’ intended dimensions and characteristics. Practicing and refining your gauge-checking skills is essential, as this knowledge becomes second nature over time, making your crocheting experience more enjoyable and rewarding.
Remember that an accurate gauge enhances the quality and fit of your work and prevents unnecessary frustration and waste of materials. Take the time to understand your tension and make necessary adjustments, as the benefits of achieving the correct gauge are far-reaching—leading to beautifully crafted pieces you’ll be proud to share and showcase. Embrace the journey of honing this skill, and watch your crochet projects flourish!
Elizabeth Davis
Elizabeth is a creative writer and digital editor based in the United States. She has a passion for the arts and crafts, which she developed from a young age. Elizabeth has always loved experimenting with new mediums and sharing her work with others. When she started blogging, she knew that DIYquickly would be the perfect platform to share her tutorials and tips. She's been writing for the blog from the beginning, and her readers love her helpful advice and easy-to-follow instructions. When she's not writing or editing, Elizabeth enjoys spending time with her family and friends.


