
How to Make a Fairy Door
Are you looking for a fun and creative DIY project? Why not try making a fairy door! These whimsical little doors are perfect for adding a touch of magic to your home or garden.
How to make a fairy door is a delightful way to invite a touch of magic into your home or garden. These miniature portals serve as whimsical entrances for fairies and other mythical creatures, sparking imagination and storytelling for children and adults alike. Whether you want to enhance your outdoor space or add a charming detail inside your home, making a fairy door is a fun and creative project.
This guide will walk you through the steps needed to craft a unique fairy door, including gathering materials, designing your door, and decorating it to suit your whimsical aesthetic. Get ready to unleash your creativity and bring a little enchantment into your life!
What Will You Need?
Before you begin crafting your fairy door, it is crucial to gather all the necessary materials. Here are some items you will need:
- Wood or cardboard (for the base of the door)
- Craft paper or fabric (for decorating)
- Glue
- Scissors
- Paint and paintbrushes (optional)
- Decorative elements such as small figurines, beads, and ribbons (optional)
Feel free to use any additional materials that inspire you. The beauty of making a fairy door is that there are no rules – just let your imagination run wild!
10 Easy Steps on How to Make a Fairy Door
Step 1: Design Your Door Shape and Size
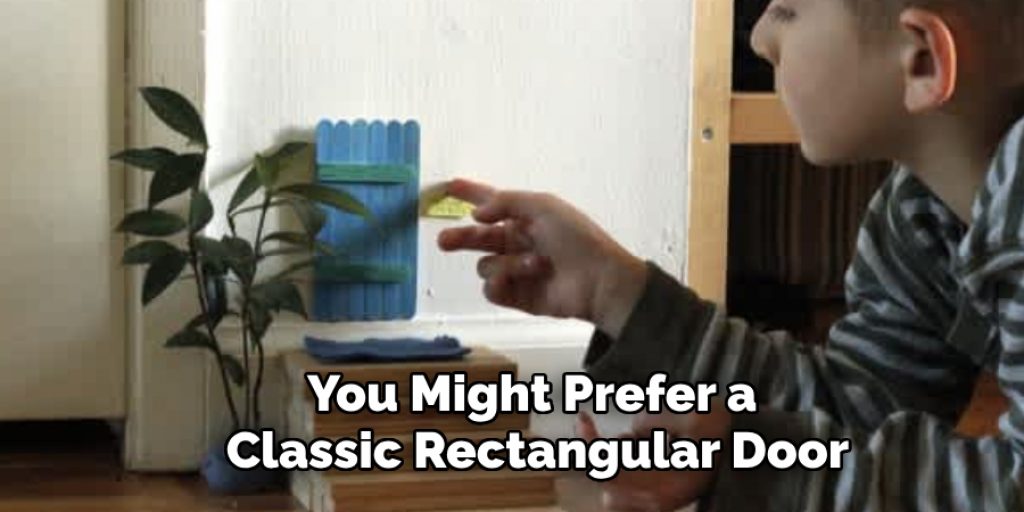
Start by deciding on the overall shape and size of your fairy door. This is where your creativity can shine! You might prefer a classic rectangular door or something more whimsical, like a rounded or arched shape. Sketch a few designs on paper, considering how big you want your door to be concerning the surrounding environment. Fairies are known for their enchanting habitats, so think about how your door will fit into your garden or home decor. Once you’re satisfied with your design, you can transfer it to your chosen material, whether wood or cardboard, ensuring you measure accurately to achieve the desired size.
Step 2: Cut Out the Door Shape
Once you have your design sketched out and transferred onto your chosen material, it’s time to cut out the shape of your fairy door. Use sharp scissors for cardboard or a small saw for wood, carefully following the lines closely. If you’ve added details like windows or a doorknob in your design, take your time to ensure these sections are cut accurately. After cutting, you may want to lightly sand the edges of the wood to create a smooth finish, which will help give your fairy door a polished look. After this step, you should have a beautifully shaped door ready for decoration!
Step 3: Paint the Base Color
Now that your door shape is cut out, it’s time to add some color! Choose a paint color that resonates with your fairy tale vision—soft pastels, vibrant hues, or even natural wood tones can all work beautifully. Use a paintbrush to apply the paint evenly, covering the entire surface with a base layer. If you desire a distressed or weathered look, consider applying multiple thin coats of different shades or lightly sanding the edges after the initial coat dries. Allow the paint to dry completely before moving on to the next step, ensuring a smooth surface for your decorations.
Step 4: Add Decorative Elements
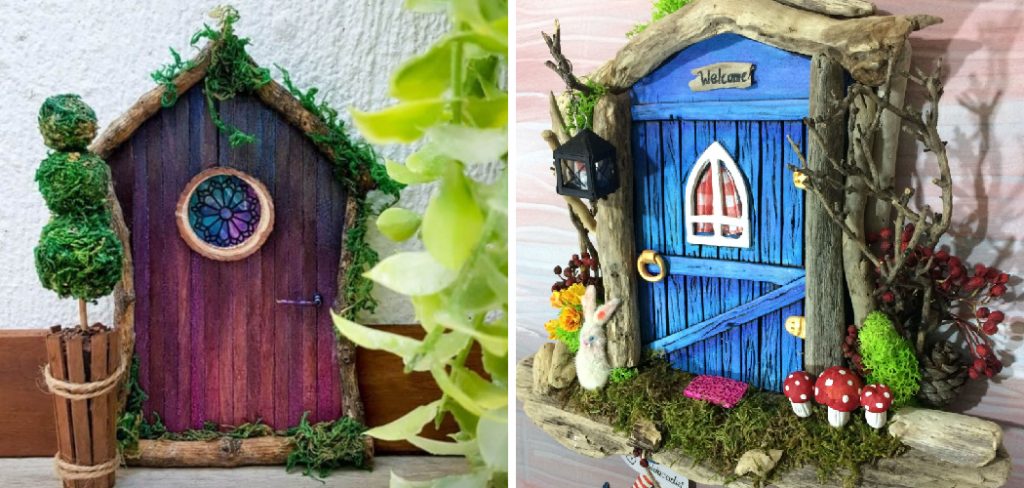
With your base color dry, it’s time to bring your fairy door to life with embellishments! This is where you can let your creativity soar. Gather small decorative items like buttons, beads, ribbons, or nature-inspired elements such as twigs and flowers. Using glue to attach these decorative pieces to your door creates a whimsical and inviting appearance. You can add a tiny wreath of twine or faux flowers, paint some intricate patterns, or even place a small sign next to the door. The goal is to infuse your fairy door with personality and charm, making it a magical entrance that sparks joy and imagination in anyone who sees it.

Step 5: Create a Threshold and Garden Accessories
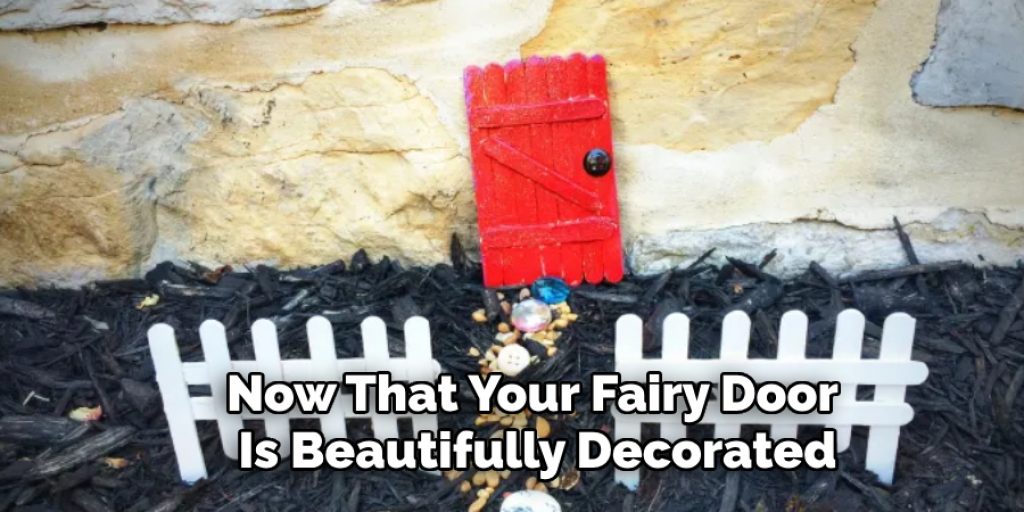
To enhance the charm of your fairy door, consider adding a threshold or step that leads up to it. This can be made from small stones, popsicle sticks, or painted wood. Arrange these materials before your door to create a welcoming entryway for your fairies. Additionally, consider incorporating garden accessories like mini toadstools, tiny lanterns, or decorative pebbles around the door to create a whimsical setting. These details can bring your fairy door to life, making it a delightful feature in your garden or home.
Step 6: Final Touches and Placement
Now that your fairy door is beautifully decorated, it’s time to add the final touches and find the perfect spot. Inspect your door for any last-minute embellishments or adjustments; perhaps a sprinkle of glitter will add some sparkle or a final coat of sealant will protect your creation from the elements. Once you’re satisfied, choose a location that complements the door’s enchanting design—be it nestled among the flowers in your garden, attached to a tree, or placed in a cozy corner of your home. Secure your fairy door, ensuring it’s stable yet subtly integrated into the surroundings.
Step 7: Invite the Fairies
Now that your fairy door is complete and beautifully placed, it’s time to invite the fairies to visit! Create an inviting atmosphere by leaving small offerings near the door, such as tiny pieces of fruit, flower petals, or even handwritten notes asking the fairies to come and explore. You might also consider setting up a little “fairy mailbox” to leave messages for them. This enhances the whimsical experience and fosters a sense of wonder and enchantment in children and adults alike. Encourage your family and friends to join in on the fun, celebrating the magic of fairies and making the fairy door a focal point of creativity and imagination.
Step 8: Observe and Maintain
Once your fairy door is established and fairies have been invited, take some time to observe the area. Notice how it interacts with the surrounding environment and any changes that occur. Regular maintenance is key to keeping the magic alive; check for weather-related wear and tear, and clean or refresh decorations as needed. Change the offerings periodically to keep things interesting for the fairies. Creating a routine around your fairy door—noting its importance in your home or garden—can deepen the enchantment and joy it brings to everyone who encounters it. Keep your imagination flowing and nurture this whimsical space, allowing it to evolve with your creativity.
Step 9: Share the Magic
Consider sharing the magic with others once your enchanting fairy door is complete and thriving! Invite friends, family, or neighbors to see your creation and describe the whimsical journey of crafting it. You might even host a small gathering where everyone can create their own fairy doors, fostering a community of creativity and imagination. Capturing photos of the fairy door in various seasons will help document its charm over time, which can be shared on social media or in a scrapbook. Let your fairy door inspire others to embrace their creativity and create their own little worlds of wonder.
Step 10: Create Fairy Stories
Encourage storytelling as a part of your fairy door experience! Write little tales about the fairies visiting your door, share them with children, or create a storybook with illustrations and adventures. Every time someone passes by the fairy door, it can spark imagination and inspire new stories, making it a decorative feature and a source of endless creativity. Setting up storytelling sessions around the door can enhance the experience, building connections and letting the magic flourish.
By following these steps and infusing your creativity, you can create a delightful fairy door that adds enchantment and inspiration to any space. So gather your supplies, let your imagination run wild, and welcome the fairies into your world!
5 Things You Should Avoid
- Avoid Overcomplicating the Design: While adding numerous intricate details is tempting, a cluttered design can detract from the whimsical charm of the fairy door. Focus on a few key embellishments to keep the overall look cohesive and magical.
- Don’t Use Toxic Materials: When creating your fairy door, steer clear of toxic paints, adhesives, or decorations, especially if it’s placed outdoors. Fairies are supposed to be a source of joy and wonder, so ensure your creations are safe for the environment and any visiting wildlife.
- Refrain from Neglecting Maintenance: Regular upkeep is essential after crafting your fairy door. Neglecting maintenance can lead to wear and tear that diminishes its charm. Check on your door periodically, clean it, and refresh any decorations as needed to keep the magic alive.
- Avoid Important Omission of Placement: When placing your fairy door, don’t overlook the importance of location. An out-of-sight or inappropriate setting might diminish its enchantment. Select a spot where it can be easily seen and appreciated, ensuring it becomes a charming focal point.
- Resist Ignoring the Fairy Experience: Creating your fairy door should be a joyful and imaginative experience. Avoid taking it too seriously or rigidly adhering to instructions. Instead, let your creativity flow, embracing the whimsical spirit of fairies by having fun with the process!

Conclusion
How to make a fairy door is a delightful way to spark creativity and imagination, infusing your space with a touch of magic.
By following the steps outlined, from selecting the suitable materials and decorations to inviting fairies and maintaining the door, you can establish a whimsical focal point that captivates the hearts of children and adults alike. Remember, the process should be as enjoyable as the final product; let your creativity shine through, and don’t hesitate to adapt each step to reflect your unique vision.
Ultimately, your fairy door is more than just a decorative piece; it serves as an invitation for storytelling, community engagement, and a reminder of the joy that creativity can bring to our lives. So gather your supplies, embrace the enchantment, and enjoy every moment of crafting your magical entrance into a world of fairies!
Elizabeth Davis
Elizabeth is a creative writer and digital editor based in the United States. She has a passion for the arts and crafts, which she developed from a young age. Elizabeth has always loved experimenting with new mediums and sharing her work with others. When she started blogging, she knew that DIYquickly would be the perfect platform to share her tutorials and tips. She's been writing for the blog from the beginning, and her readers love her helpful advice and easy-to-follow instructions. When she's not writing or editing, Elizabeth enjoys spending time with her family and friends.


