How to Make a Lei With Greenery
How to make a lei with greenery is a beautiful and traditional craft that celebrates nature and creativity. Leis are often associated with Hawaiian culture but have roots in various cultures around the world, symbolizing love, friendship, and welcome.
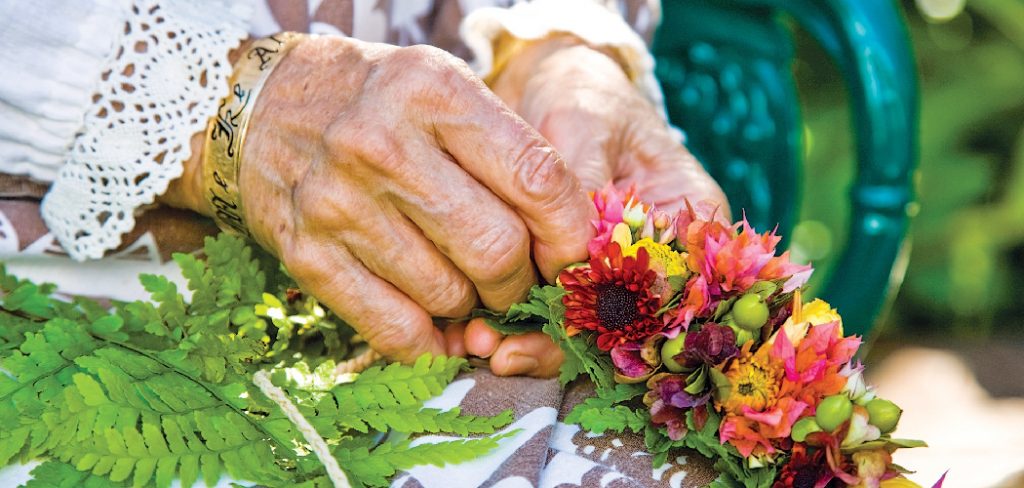
This guide will provide step-by-step instructions on selecting the right greenery and creating a stunning lei that can be used for special occasions or simply to adorn yourself. Whether you’re looking to incorporate fresh leaves, fragrant herbs, or lush foliage, making a lei is not only a rewarding activity but also a wonderful way to connect with the natural beauty around you.
Get ready to dive into the art of lei-making and bring a touch of greenery into your life!
What Will You Need?
Before we begin, gather the following materials:
- The greenery (such as leaves, herbs, or flowers)
- Scissors
- String or ribbon
- A needle (optional)
You can use any type of greenery you like, but it’s best to choose something flexible and durable. Some popular options include ti leaves, ferns, jasmine flowers, eucalyptus, and rosemary. If you’re unsure about what greenery to use, ask your local florist for recommendations.
10 Easy Steps on How to Make a Lei With Greenery
Step 1: Prepare Your Greenery
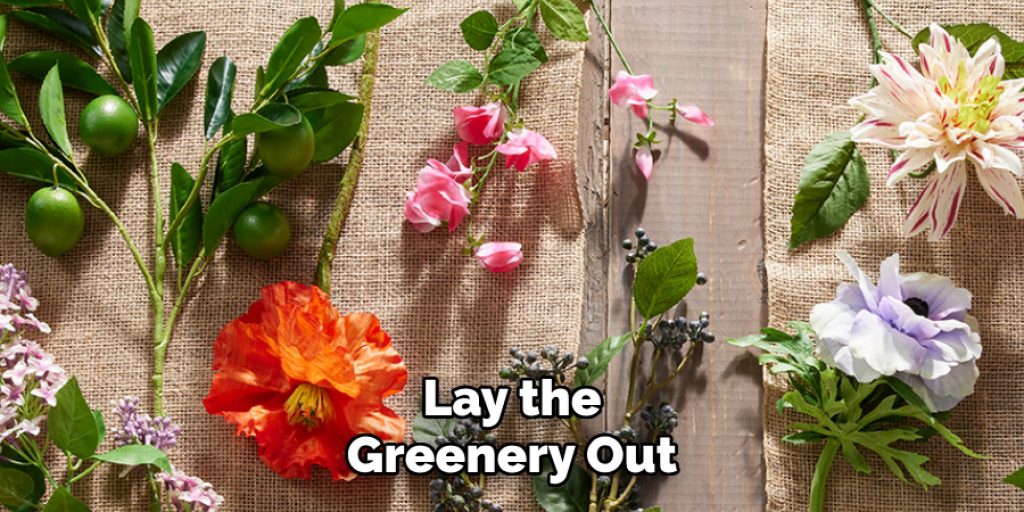
Start by thoroughly washing your chosen greenery to remove any dirt or residue. Once clean, trim the leaves or stems to your desired length, keeping in mind that they should be manageable and easy to work with. It’s advisable to select pieces that are around 4 to 6 inches long for a balanced and visually appealing lei. After trimming, lay the greenery out to allow it to dry a bit while you prepare the next steps. This will help ensure that your lei will stay fresh and vibrant longer.
Step 2: Choose Your Base
Decide on the string or ribbon you will use as the base for your lei. A strong yet flexible material is essential—natural fiber twine, fishing line, or satin ribbon are great options. The base should be approximately three times the desired length of the finished lei, allowing enough room for knots and wrapping. If you’re using a thicker material, adjust the length as necessary to ensure the final product fits comfortably around your neck.
Step 3: Create the Foundation
If you’re using a needle, thread it with your chosen string or ribbon, tying a knot at one end to secure the greenery as you add it to the base. If you’re working without a needle, simply lay the first piece of greenery on the string and hold it in place with your fingers, which is equally effective. It’s essential to keep a consistent pattern, layering the pieces to create a beautiful visual flow.
Step 4: Add the Greenery
Begin by placing your first piece of greenery under the string or ribbon and wrapping the base around it to secure it. Continue adding greenery this way, overlapping each subsequent piece slightly onto the previous one. This will create fullness in your lei and ensure the greenery is securely placed. You may also alternate between different types of greenery for varied textures and shades throughout your design.
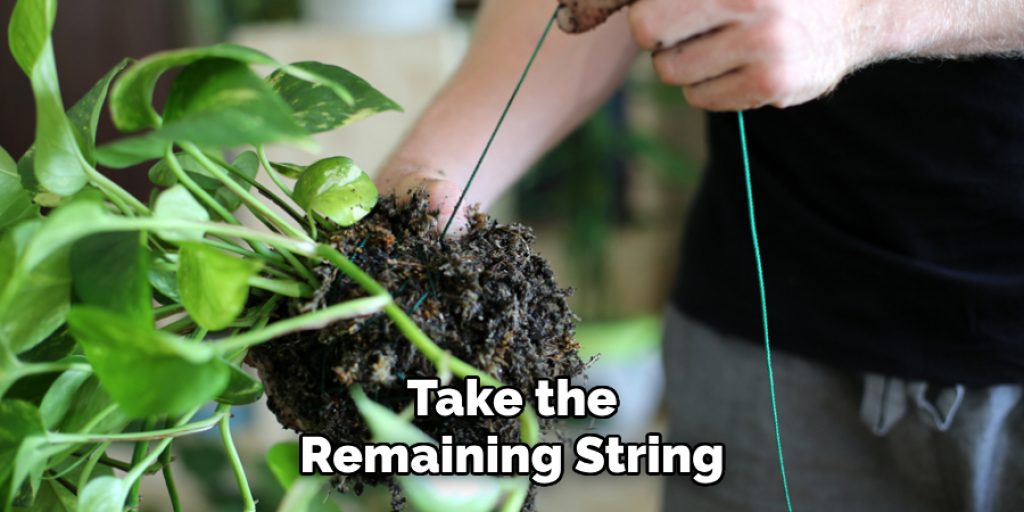
Step 5: Secure the Ends
Once you’ve added enough greenery to achieve your desired length and fullness, it’s time to secure the ends of your lei. To do this, carefully gather the final pieces of greenery and ensure they are neatly aligned. Take the remaining string or ribbon and tie a sturdy knot around the ends of the greenery, ensuring it’s tight enough to hold everything together without damaging the delicate leaves and stems.
You can tie a bow to create a decorative finish using a thicker ribbon, such as satin. For an added touch of elegance, consider adding small embellishments such as beads or shells along the string before finishing with the knot. This enhances the visual appeal and personalizes your lei, making it a unique creation that reflects your style. Remember to check your lei for loose pieces and adjust as needed to maintain a cohesive look. Your beautiful handiwork is almost complete!
Step 6: Final Adjustments and Presentation
Before wearing or presenting your lei, take a moment to give it a final inspection. Gently fluff the greenery to ensure it has a full and vibrant appearance. If you notice any pieces that seem loose or uneven, you can carefully adjust them to create a balanced look. Once satisfied with the arrangement, consider any additional decorations you might want to add, such as small flowers or decorative elements that align with the occasion.
This adds a personal touch and makes your lei even more special. Finally, when it’s time to wear your lei, drape it gracefully around your neck, allowing the greenery to cascade beautifully. Remember, a lei is not just an accessory; it’s a heartfelt symbol of connection and celebration!
Step 7: Caring for Your Lei
Once you have crafted your beautiful lei, it’s essential to take proper care of it to preserve its freshness and vibrancy. Store your lei in a cool, dry place away from direct sunlight to prevent wilting. If you plan to wear it later, consider placing it in a plastic bag with a damp paper towel to maintain moisture. It’s also best to wear your lei soon after making it, as freshness is key to fully enjoying its aromatic and visual beauty.
Remember that leis made from delicate flowers or herbs may have a shorter lifespan than those made from sturdier greenery, so plan your timing accordingly for events or gatherings. If you notice any wilted pieces, gently remove them to keep your lei looking its best.
Step 8: Presenting the Lei
When presenting your lei, the moment is just as unique as the creation. If you’re giving it as a gift or using it for a ceremonial occasion, consider the significance of the presentation. Place the lei on a decorative plate or hang it from a stand, allowing its beauty to shine. You should also add a personal note expressing your sentiments, which adds a heartfelt touch.
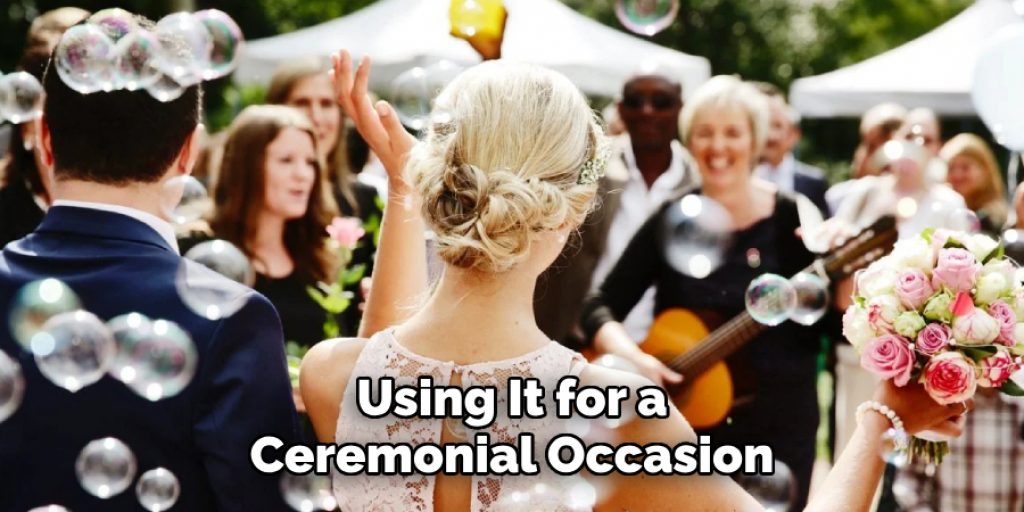
When placing the lei around someone’s neck, approach from behind for an element of surprise, and drape it gently, allowing the greenery to fall into place naturally. This tradition, often associated with Hawaiian culture, fosters a connection and appreciation between the giver and receiver. Always remember, the joy of a lei extends beyond its visual appeal; it embodies love, friendship, and celebration in every woven strand!
Step 9: Enjoying the Experience
After creating and presenting your lei, take a moment to truly enjoy the experience and the connections formed through this time-honored tradition. Whether worn during a special event, a celebration, or simply as a beautiful accessory, your lei serves as a reminder of the love and care that went into its creation.
Engage with others by sharing the story behind your lei, discussing the types of greenery and decorations used, and talking about the significance of the occasion it represents. This enhances your appreciation for the artistry involved and creates lasting memories with family and friends. Remember, every time you wear or gift a lei, you share a piece of culture and tradition that celebrates connection, joy, and the beauty of nature.
Step 10: Reflecting on Your Craft
Once you’ve had the chance to wear or present your lei, take some time to reflect on its entire creation process. Consider the thoughts and feelings that emerged during crafting – the meditative moments spent arranging the greenery, the joy of selecting personal elements, and the excitement of the final presentation. This reflective practice deepens your connection to the lei and enhances your skills for future creations.
Think about what worked well and what you might like to change next time, whether experimenting with different types of greenery or incorporating new decorative features. Embrace the journey of learning and creativity, as each lei you craft can be a unique expression of you and your experiences.
By following these simple steps, you can create a beautiful lei embodying the spirit of connection and celebration.

5 Things You Should Avoid
- Using Wilted or Damaged Greenery: Always ensure the greenery you select is fresh and vibrant. Wilted or bruised materials can spoil the appearance of your lei and may not hold up well over time.
- Overcrowding the Design: While it may be tempting to pack your lei with as much greenery and embellishment as possible, overcrowding can make it look messy and less appealing. Aim for a balanced arrangement that allows each piece to shine.
- Neglecting to Bind Securely: Failing to tie the greenery securely can lead to an unstable lei quickly falling apart. Ensure your knots are tight enough to keep everything together while being gentle on the delicate materials.
- Ignoring Personal Preferences: A lei should reflect the personality and taste of the person who will wear it. Avoid sticking strictly to traditional styles; feel free to incorporate unique elements that resonate with you or the recipient.
- Forgetting About Delivery Considerations: If you plan to transport or gift the lei, neglecting how it will be presented can lead to a wilted or damaged product. Always plan how to keep the lei fresh during transport and choose an appropriate moment for gifting.
Conclusion
In conclusion, how to make a lei with greenery is a delightful and meaningful process that connects you with nature and cultural traditions.
Each step, from selecting fresh and vibrant materials to presenting your finished work, enhances your appreciation for this unique art form. Following the outlined steps and being mindful of the tips to avoid common pitfalls, you can create a stunning lei reflecting personal sentiment and creativity.
Remember, the true essence of a lei lies not just in its beauty but also in the love and connections it represents, making it a cherished symbol for both the creator and the recipient. Whether for a special occasion or a heartfelt gift, a well-crafted lei will always carry the spirit of connection and celebration.
Elizabeth Davis
Elizabeth is a creative writer and digital editor based in the United States. She has a passion for the arts and crafts, which she developed from a young age. Elizabeth has always loved experimenting with new mediums and sharing her work with others. When she started blogging, she knew that DIYquickly would be the perfect platform to share her tutorials and tips. She's been writing for the blog from the beginning, and her readers love her helpful advice and easy-to-follow instructions. When she's not writing or editing, Elizabeth enjoys spending time with her family and friends.