
How to Make Dry Fruit Garland
Dry fruit garlands have long been cherished as a beautiful and fragrant decorative element for homes and celebrations. These unique adornments are visually appealing and carry historical and cultural significance, often used in festivals and ceremonial occasions to symbolize abundance and prosperity.
Creating a dry fruit garland is a delightful process that combines artistic expression with traditional crafting techniques. In this guide, we will explore how to make dry fruit garland using various dried fruits, spices, and natural decorations. You can create an eye-catching garland that brings warmth and charm to any space by following simple steps.
Materials and Tools Needed
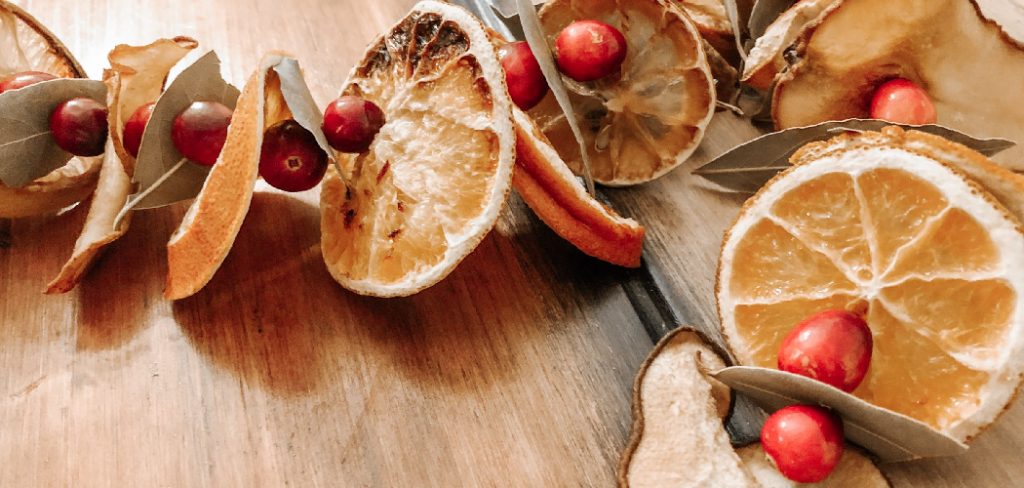
To craft your dry fruit garland, you’ll need a selection of dried fruits such as oranges, apples, and cranberries, which contribute both vibrant colors and delightful scents. Other decorative elements can include cinnamon sticks, bay leaves, and star anise, adding variety and a rustic touch. Essential tools for this project include a large needle, strong thread or twine, scissors, a baking sheet, and parchment paper for drying.
Safety gear like gloves and an apron are recommended to keep you clean and protected while handling materials. With these supplies, you’re ready to embark on the joyful journey of creating your own stunning dry fruit garland!
Preparing the Dried Fruit
Choosing the Fruits
When selecting fruits for your dry fruit garland, aim for varieties that retain their shape and flavor well during drying. The best types include oranges, apples, peaches, and cranberries. Opt for ripe yet firm fruits, as overripe fruits may lose structural integrity and become mushy during drying. Look for bright colors and avoid any signs of bruising or blemishes, which could lead to spoilage. Freshly harvested fruits will also bring the best aroma to your garland.

Drying the Fruits
To achieve consistent drying, slice the fruits evenly, aiming for slices around 1/4 inch thick. This uniformity ensures that all pieces dry simultaneously, preventing some from becoming overly dried while others remain wet. Once sliced, arrange the fruit pieces on a baking sheet lined with parchment paper to prevent sticking. Preheat your oven to 200°F (93°C) for oven drying and place the baking sheet inside. Depending on the thickness of your fruit slices, this process can take 4 to 6 hours. Check periodically, flipping the slices halfway through for even drying.
Alternatively, air drying is a more natural method that requires hanging the fruit slices in a well-ventilated, dry environment. You can hang the slices on a string or lay them flat on a drying rack. Air drying may take several days, but it’s an energy-efficient method that captures the essence of the fruit. Throughout this process, maintaining low heat and ensuring good airflow will yield the best results, allowing you to create beautifully dried fruits that will enhance your garland and preserve its freshness.
How to Make Dry Fruit Garland: Assembling the Garland
1.Preparing the Materials
Before you start crafting your dry fruit garland, gathering all your materials and arranging them in an organized manner is essential. This includes your dried fruit slices, decorative elements like cinnamon sticks and bay leaves, and any additional embellishments you may wish to incorporate. Next, cut a length of strong thread or twine that will allow you to create the desired length of the garland, remembering to leave extra for knotting at both ends.
2.Stringing the Garland
To begin stringing your garland, thread a large needle with the cut length of twine. Starting with a piece of decorative element, gently insert the needle through the center, ensuring it is secure. Follow this by adding your first dried fruit slice, ensuring that the slice is oriented and displays its vibrant color. As you add more pieces, alternate between different fruits and spices, creating a visually appealing sequence that provides depth and variety to your garland.

It’s important to ensure even spacing between each item, which enhances aesthetics and prevents slipping. Pull the thread taut between each element without making it too tight to achieve this, as this can cause the items to break. Continue this process until you reach your desired length, and finish with a decorative piece to complement the overall design.
3.Adding Finishing Touches
Once your garland is fully strung, it’s time to add those final touches. Using the excess thread or twine, create loops at both ends of the garland. These loops will facilitate easy hanging, whether on a door, wall, or mantelpiece. If you want to enhance your garland further, consider adding small ornaments or ribbons regularly. These additional elements not only contribute to a festive appearance but also showcase your personal style, making the garland a unique creation.
Preserving and Storing the Garland
Proper preservation and storage are essential to ensure that your dry fruit garland retains its beauty and aroma for an extended period. Begin by allowing the garland to cool completely after the assembly process; this helps prevent moisture buildup, which can lead to spoilage. Once cool, consider spraying a light mist of hairspray or a non-toxic fixative to help seal in the colors and aromas while offering a layer of protection against dust and pests.
When it comes to storage, choose a cool, dry location away from direct sunlight, which can fade the vibrant colors of your garland. Ideally, store it in a breathable fabric bag or a cardboard box, allowing for some air circulation while shielding it from dust. If your garland has been adorned with additional ornaments or embellishments, ensure they are secured to avoid damage.
If you plan to display your garland for special occasions, avoid prolonged exposure to heat or humidity, as this can result in fading or mold growth. To refresh the fragrance before displaying, gently shake or lightly warm the garland. With these care tips, your dry fruit garland can be cherished for years to come, enhancing your celebrations and home decor with its charm and unique character.

Uses and Display Ideas
A dry fruit garland is a beautiful decorative piece and serves multiple purposes in your home. It can be used as a charming centerpiece for festive gatherings, enhancing the atmosphere of any occasion with its vibrant colors and pleasant aroma. Drape it over a mantelpiece or hang it across a doorway to create a warm and inviting ambiance. For those with a creative flair, the garland can also be integrated into seasonal decorations, transitioning seamlessly from autumn festivities to winter holidays.
In addition to their aesthetic appeal, dry fruit garlands can be used to infuse subtle scents into your space. Placed near heat sources, such as a fireplace or radiator, the warmth will release fruity aromas, refreshing the air in your home. Add small sachets of spices, such as cloves or cinnamon, to enhance the aromatic experience.
For an added touch of whimsy, you can hang the garland in the kitchen or dining area, creating a delightful thematic link to the flavors of your culinary creations. Be creative with display options, such as wrapping the garland around a vase or using it to embellish table settings for special occasions. Overall, a dry fruit garland provides endless decoration and sensory enhancement possibilities in your home.
Troubleshooting Common Issues
Creating a dry fruit garland can be rewarding, but there may be some common issues to address along the way. One frequent problem is the fruit slices becoming overly dry, resulting in brittleness. To avoid this, ensure you’re monitoring the drying process carefully, as different fruits can have varying moisture content. Adjust the drying time and method based on your observations to balance dryness and pliability.
Another issue may arise with threading the fruit slices onto the twine. If the slices feel too flimsy or start to tear, consider reinforcing them with a small piece of clear tape or using a larger needle to make the holes more accommodating. To prevent slipping or misalignment while stringing, ensure you pull the thread taut without making it too tight, which risks breaking the slices.
Additionally, if your garland is losing its colour or fading quickly, it may be due to exposure to sunlight or excessive humidity. Store your garland in a cool, dark place, and consider using a protective spray to help maintain its vibrancy. You can create a stunning dry fruit garland that lasts throughout the seasons by troubleshooting these issues.
Frequently Asked Questions (FAQs)
1. How Long Does a Dry Fruit Garland Last?
A well-made dry fruit garland can last for several months to a year, depending on the storage conditions and drying method used. To extend its lifespan, keep it in a cool, dry place away from direct sunlight and humidity.

2. Can I Use Fresh Fruit Instead of Dried Fruit?
Fresh fruit is not recommended for garlands, as it contains moisture that can lead to spoilage and mold growth. It’s best to use dried fruits that have been properly dehydrated to ensure longevity and prevent any issues.
3. How Can I Refresh the Scent of My Dry Fruit Garland?
To refresh the aroma of your garland, gently shake it or place it near a heat source, such as a fireplace or radiator. The warmth will help release the embedded fragrances. Additionally, consider adding small sachets of spices to enhance the scent further.
Conclusion
Creating a dry fruit garland is an enjoyable craft and a splendid way to bring warmth and vibrancy into your home. By following the step-by-step instructions on how to make dry fruit garland, you can produce a beautiful decorative piece that reflects your personal style. With its stunning colors and natural aroma, this garland serves as a perfect reminder of seasonal changes, allowing you to celebrate different occasions and add a touch of charm throughout the year. Moreover, crafting together can forge lasting memories, making it an enriching and worthwhile project for everyone involved.
Elizabeth Davis
Elizabeth is a creative writer and digital editor based in the United States. She has a passion for the arts and crafts, which she developed from a young age. Elizabeth has always loved experimenting with new mediums and sharing her work with others. When she started blogging, she knew that DIYquickly would be the perfect platform to share her tutorials and tips. She's been writing for the blog from the beginning, and her readers love her helpful advice and easy-to-follow instructions. When she's not writing or editing, Elizabeth enjoys spending time with her family and friends.


