How to Make Snow Tex
Snow-Tex is a versatile crafting material used to create realistic snow effects for various projects, including holiday decorations, dioramas, and theatrical displays. This textured medium not only mimics the appearance of fresh snowfall but also adds depth and dimension to your creations.
In this guide on how to make snow tex, we will explore the simple steps to make your own Snow Tex, allowing you to bring a touch of winter wonder to your artistic endeavors without needing access to real snow. Whether you’re an experienced crafter or a beginner looking to experiment, this DIY project is both enjoyable and rewarding.
What is Snow Tex?
Snow-Tex is a brand name for a specific type of textured medium used to create snow effects. It is made from small, plastic flakes that resemble real snow and can be applied to various surfaces to simulate the look of fresh or packed snow. This product comes in a white, paste-like form and dries clear, making it ideal for use on a variety of materials, including wood, paper, and foam.
Other similar products may be referred to as “snow paste” or “dimensional snow,” but Snow Tex remains a popular choice among crafters due to its ease of use and realistic results.
Materials Needed
To make your own Snow Tex, you will need the following materials:
White Acrylic Paint:
This will serve as the base color for your Snow-Tex. You can use any brand of white acrylic paint, but make sure it is water-based and non-toxic.
White School Glue:
The glue will help give your Snow Tex its texture and hold everything together. Similar to the paint, you can opt for any brand of white school glue.
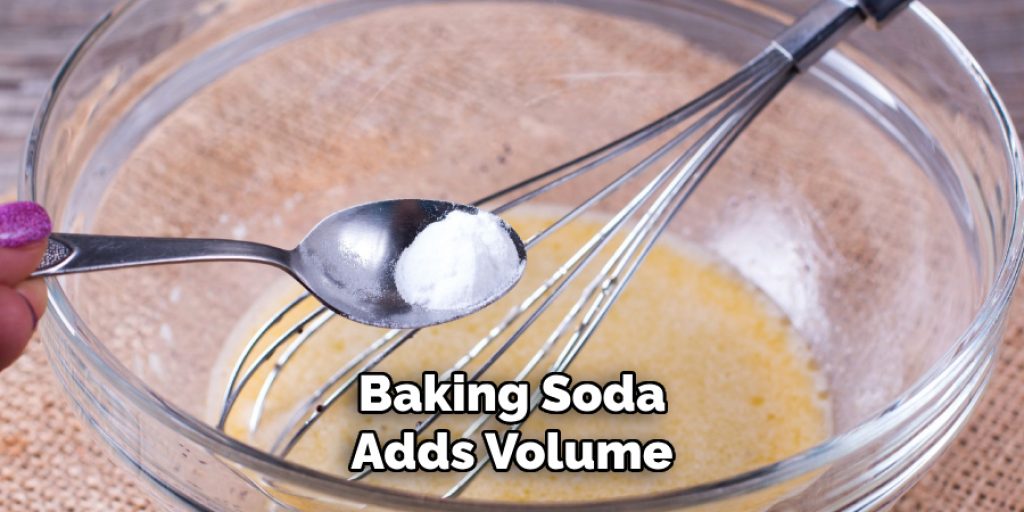
Baking Soda:
Baking soda adds volume and gives your Snow Tex a powdery feel. It is also safe to use and readily available in most households.
7 Step-by-step Guidelines on How to Make Snow Tex
Step 1: Prepare Your Workspace
Before you begin creating your Snow Tex, it’s essential to set up a clean and organized workspace. Clear a flat surface, such as a table or countertop, where you can easily access all your materials. Lay down some newspaper or a drop cloth to protect the area from spills and stains.
Gather all the required materials, including the white acrylic paint, white school glue, baking soda, and any additional tools you may need, such as mixing bowls, spoons, or spatulas. Ensuring your workspace is tidy and well-prepared will enhance your crafting experience and make the process smoother.
Step 2: Mix the Paint and Glue
In a mixing bowl, combine equal parts of white school glue and white acrylic paint. The amount you use will depend on how much Snow Tex you want to make. Generally, one cup of each should be enough for most projects.
Mix the two substances together until they are well-blended, creating a thick, paste-like consistency. You can add more or less glue or paint to achieve your desired texture.
Step 3: Add Baking Soda
Once your paint and glue mixture is well-blended, it’s time to incorporate the baking soda. Gradually add one cup of baking soda to the mixture while continuously stirring. This will introduce a fluffy, textured quality to your Snow Tex, enhancing its snow-like appearance. Mix thoroughly until the baking soda is fully integrated and the texture becomes thicker and more consistent.
If you desire a greater volume or a coarser texture, feel free to adjust the amount of baking soda accordingly. The goal is to achieve a paste that resembles the look and feel of real snow.
Step 4: Test the Consistency
Before you begin applying your Snow Tex, it’s essential to test its consistency. Take a small amount of the mixture and apply it to a scrap piece of paper or cardboard. If the texture is too thick, add more glue or paint to thin it out if it’s too runny, mix in more baking soda.
It may take a few tries to get the right consistency, but with practice, you will learn how to make adjustments and perfect your Snow Tex mixture.
Step 5: Apply Your Snow Tex
Once you are satisfied with the consistency of your Snow Tex, it’s time to apply it to your chosen surface. Using a spoon or spatula, scoop up some of the mixture and spread it onto your desired area in thin layers. You can also use a brush or your fingers to create realistic snow drifts and mounds.

Apply more layers for a thicker snow effect or leave some areas bare for a lighter dusting of snow. Remember to work quickly as the Snow-Tex will begin to dry within 15-20 minutes.
Step 6: Add Finishing Touches
While your Snow-Tex is still wet, you can add additional elements to enhance its appearance. Sprinkle on some glitter for a glistening effect or use a toothpick to create footprints or tracks in the snow. You can also mix in different shades of acrylic paint to create a more realistic and dynamic snowscape.
You can also experiment with different textures by adding sand, small beads, or even shredded paper to your Snow Tex mixture. This will give your snow a unique and multi-dimensional look.
Step 7: Let It Dry
Once you have completed applying your Snow Tex and any additional finishing touches, allow it to dry completely. This could take a few hours depending on the thickness of your layers. You can use a hairdryer on a low setting to speed up the drying process if needed.
As it dries, the Snow-Tex will harden and become clear, leaving behind a realistic snow effect that is ready for display! Following these simple steps, you can create your own Snow Tex and add a touch of winter wonderland to any crafting project. So gather your materials, let your creativity flow, and have fun bringing the magic of snow to life with Snow Tex!
Do You Need to Use Professionals?
While crafting your own Snow Tex can be a rewarding and easy DIY project, there may be instances where enlisting professional help is advisable. If your project requires a high level of detail, such as large-scale displays or intricate designs, professional crafters can offer expertise and techniques that may enhance the overall aesthetic.
Additionally, in scenarios involving events or installations that demand a quick turnaround, professionals often have access to advanced tools and materials that can save time and guarantee a polished result. Ultimately, whether to go DIY or hire a professional will depend on your specific goals, desired quality, and the scope of the project.

Frequently Asked Questions
Q: Is Snow Tex Safe to Use?
A: Yes, Snow Tex is non-toxic and safe for all ages. It is water-based and does not contain any harmful chemicals. It is essential to follow the instructions and avoid ingesting or getting the mixture in your eyes.
Q: Can I Use Snow Tex on Any Surface?
A: Yes, Snow Tex works well on a variety of surfaces such as wood, paper, foam, and even glass. It is especially popular for creating snow effects on holiday decorations and crafts. There may be some surfaces that are not suitable for Snow Tex, so it’s best to do a small test patch before applying it to the entire surface.
Q: Is Snow Tex Waterproof?
A: No, Snow Tex is not waterproof. However, once it has dried completely, it can withstand light moisture without losing its texture or appearance. The best way to ensure its longevity is to display it indoors and avoid exposing it to water or extreme temperatures.
Q: Can I Remove Snow Tex Once It Has Dried?
A: Yes, you can remove dried Snow-Tex by gently scraping it off with a stiff brush or using warm water and soap. However, keep in mind that once removed, the surface may be left with some residue, so it’s best to use it on surfaces that you don’t mind being slightly altered.
Following these tips and frequently asked questions on how to make snow tex, you can now confidently create your own Snow Tex and add a touch of winter magic to your crafting projects. Whether you choose to go the DIY route or enlist professional help, have fun and let your creativity shine! Happy crafting!

Conclusion
Making your own Snow-Tex is an enjoyable and cost-effective way to add a snowy touch to your DIY projects. With just a few simple materials and steps on how to make snow tex, you can create realistic snow effects on various surfaces, making it perfect for holiday decorations, winter-themed crafts, or even movie prop designs. So why wait? Get crafting and let it snow with Snow Tex! SowTex” or “dimensional snow,” but Snow Tex remains a popular choice among crafters due to its ease of use and realistic results.
Elizabeth Davis
Elizabeth is a creative writer and digital editor based in the United States. She has a passion for the arts and crafts, which she developed from a young age. Elizabeth has always loved experimenting with new mediums and sharing her work with others. When she started blogging, she knew that DIYquickly would be the perfect platform to share her tutorials and tips. She's been writing for the blog from the beginning, and her readers love her helpful advice and easy-to-follow instructions. When she's not writing or editing, Elizabeth enjoys spending time with her family and friends.