How to Take Apart Ge Dryer to Clean Lint
There are several reasons why you may need to know how to take apart your GE dryer to clean lint. First and foremost, lint buildup can be a fire hazard if left unchecked. Additionally, a clogged dryer vent can decrease the efficiency of your dryer and increase drying times, leading to higher electricity bills.
The main advantage of knowing how to take apart your GE dryer to clean lint is that it helps maintain the safety and efficiency of your appliance. By regularly cleaning lint buildup, you can prevent potential fire hazards and keep your dryer running at optimal levels. This not only saves you money on electricity bills but also extends the lifespan of your dryer. In this blog post, You will learn in detail how to take apart ge dryer to clean lint.
Tools You Will Need
- Screwdriver
- Pliers
- Vacuum cleaner with hose attachment
- Dryer vent brush or lint trap cleaning tool
- Duct tape
- Cleaning cloth
- Work gloves
- Safety goggles
- Garbage bag for disposing of lint and debris
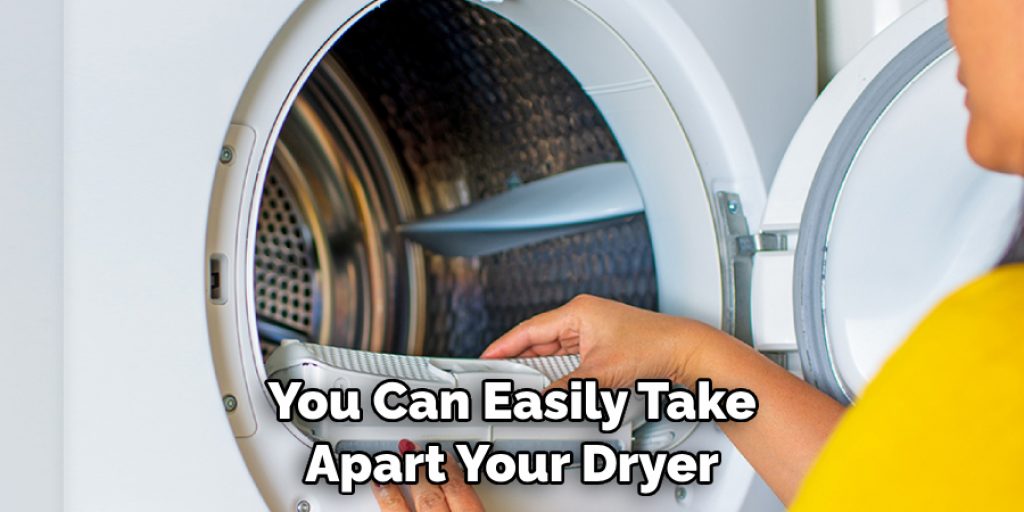
Step-by-step Instructions for How to Take Apart Ge Dryer to Clean Lint
Step 1: Inspect the Dryer
Before you begin taking apart your GE dryer, make sure it is completely unplugged and turned off. Inspect the outside of the dryer for any visible lint or debris.
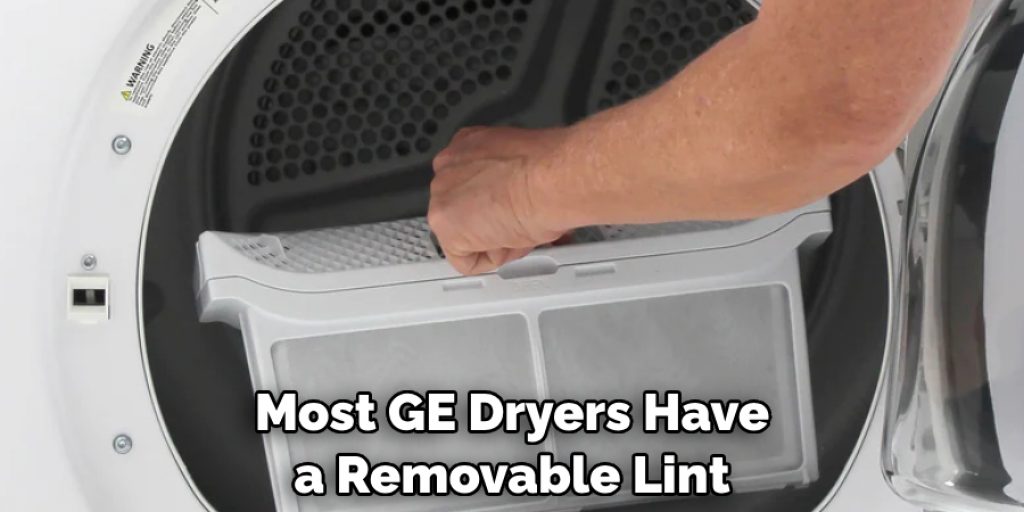
Step 2: Remove the Lint Trap
Most GE dryers have a removable lint trap located on top of the dryer. Pull out the trap and remove any visible lint by hand. Using a screwdriver, remove the screws holding the lint trap housing in place. Once removed, set aside and clean any excess lint from the housing.
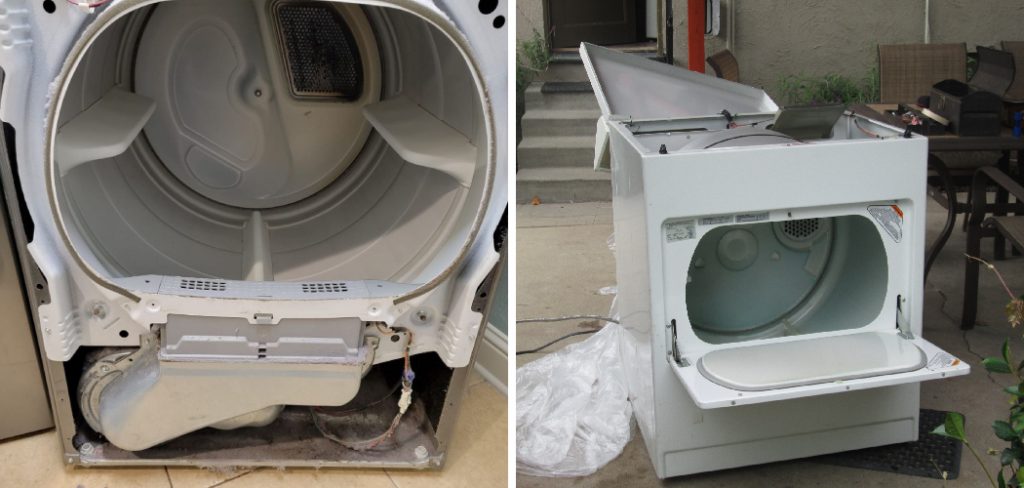
Step 3: Remove the Top Panel
Locate and remove the screws at the back of the dryer that hold the top panel in place. Lift up and slide out to remove the panel. Using a putty knife, release the clips on the top corners of the front panel. Once released, lift up and pull forward to remove.
Step 4: Disconnect the Door Switch
Locate and disconnect the electrical connector for the door switch. This will allow you to fully remove the front panel from the dryer. Using a belt tensioner tool, release the belt from the drive motor and take off the drum. This will expose the lint buildup inside the dryer.
Step 5: Clean Inside of Dryer
Use a vacuum or lint brush to clean any visible lint or debris from inside the dryer. Pay close attention to areas around the drum and the lint trap housing. Remove any lint or debris from the drum using a damp cloth. This will prevent any buildup from transferring back into the dryer.
Step 6: Reassemble Dryer
Once everything is cleaned, reattach the drum and front panel in reverse order of removal. Make sure to reconnect the door switch. Slide the top panel back into place and secure with screws at the back of the dryer.
Step 7: Clean Lint Trap Housing
Finally, clean any remaining lint from the lint trap housing and reattach to the top of the dryer. Regularly cleaning lint buildup from your GE dryer is essential for both safety and efficiency.
By following these step-by-step instructions, you can easily take apart your dryer to clean lint and keep it running smoothly. Remember to always unplug the dryer before attempting any maintenance or repairs.
Safety Tips for How to Take Apart Ge Dryer to Clean Lint
- Always unplug the dryer before attempting any disassembly or cleaning.
- Wear protective gear, such as gloves and safety glasses, to protect yourself from sharp edges or debris.
- Keep children and pets away from the work area to prevent accidents.
- Follow all manufacturer instructions and warnings when working on your GE dryer.
- Use caution when handling any electrical components. If you are unsure, it is best to consult a professional.
- Make sure the area where you are working is well-lit and free of clutter to prevent any accidents or injuries.
- Take your time and carefully remove each part, keeping track of where they go for reassembly.
By following these safety tips, you can ensure a safe and successful cleaning of your GE dryer. Remember, proper maintenance and cleaning of your appliances not only improves their functionality but also helps prevent potential hazards.
How Often Should the Lint Trap Be Cleaned?
Ideally, you should clean the lint trap after every load of laundry. This will prevent any buildup from occurring and keep your dryer running smoothly. However, if your household does not do laundry every day, cleaning the lint trap once a week should suffice.
If you notice that your dryer is taking longer than usual to dry clothes or there is an excessive amount of lint in the trap, it may be a sign that you need to clean it more frequently. It’s also important to note that certain types of fabrics produce more lint, so if you regularly dry those types of clothes, you may need to clean the lint trap more often.
What is the Best Way to Access and Clean the Lint Trap?
There are a few different ways you can access and clean the lint trap in your GE dryer. Each method has its own advantages and disadvantages, so it’s important to know which one is best for you. The first option is to use a vacuum cleaner.
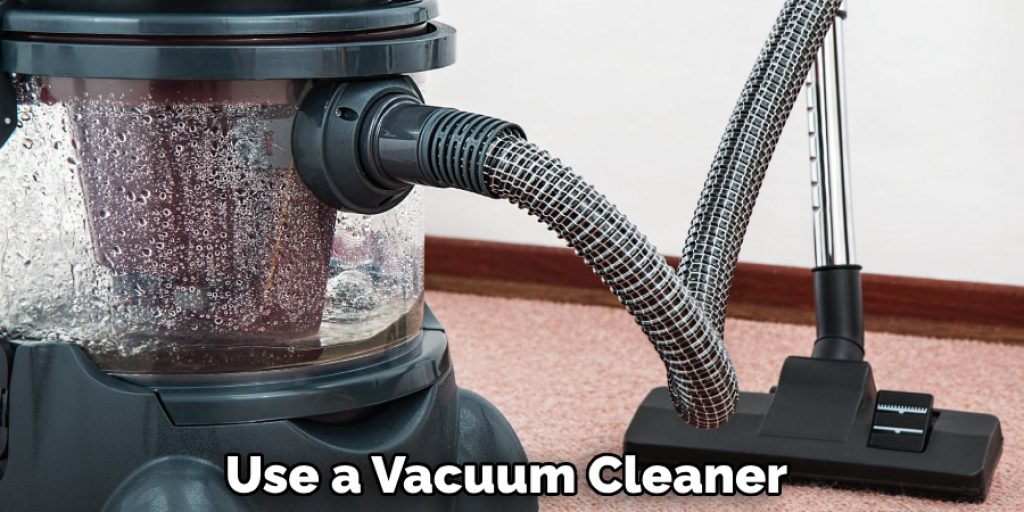
This is probably the easiest way to get rid of lint in your dryer. Simply detach the hose from your vacuum cleaner and use it to suck up all of the lint from the lint trap. This method is quick and effective, but it may not get all of the lint out from deep inside the trap.
Another option is to use a dryer lint brush. This tool is specifically designed for cleaning out lint traps in dryers. It has a long handle with stiff bristles that can reach deep into the trap to remove any built-up lint.
This method may take a bit longer than using a vacuum, but it is more thorough and can prevent any clogs in your dryer’s venting system. If you have a flexible dryer vent cleaning brush, you can also use this to clean out the lint trap. Simply insert the brush into the trap and rotate it to loosen and remove any lint. This method is similar to using a dryer lint brush, but it may be easier to maneuver the flexible brush.
What Are Some Common Signs That Indicate a Buildup of Lint in a Ge Dryer?
Lint buildup is one of the most common maintenance issues that can occur in a Ge dryer. It not only affects the performance of your dryer, but it also poses a fire hazard if left unchecked. To prevent these issues, regular cleaning and maintenance of your dryer are crucial. Here are some common signs that indicate a buildup of lint:
- Clothes Take Longer to Dry: If you notice that your clothes are taking longer than usual to dry, this could be a sign of lint buildup in your dryer. The accumulation of lint obstructs the airflow, making it harder for the hot air to circulate and dry your clothes effectively.
- Burning Smell: A strong burnt smell coming from your dryer is a clear indication of lint buildup. As lint accumulates, it can come into contact with the heating element and catch fire, causing a burning smell.
- Excessive Heat: If you notice that your dryer is becoming unusually hot to the touch, this could be a sign of lint obstruction. The buildup of lint prevents proper ventilation, causing the dryer to overheat.
- Visible Lint: If you can see visible lint on the outside of your dryer or around the lint trap, it’s time for a cleaning. This is an apparent sign of excessive buildup and should not be ignored.
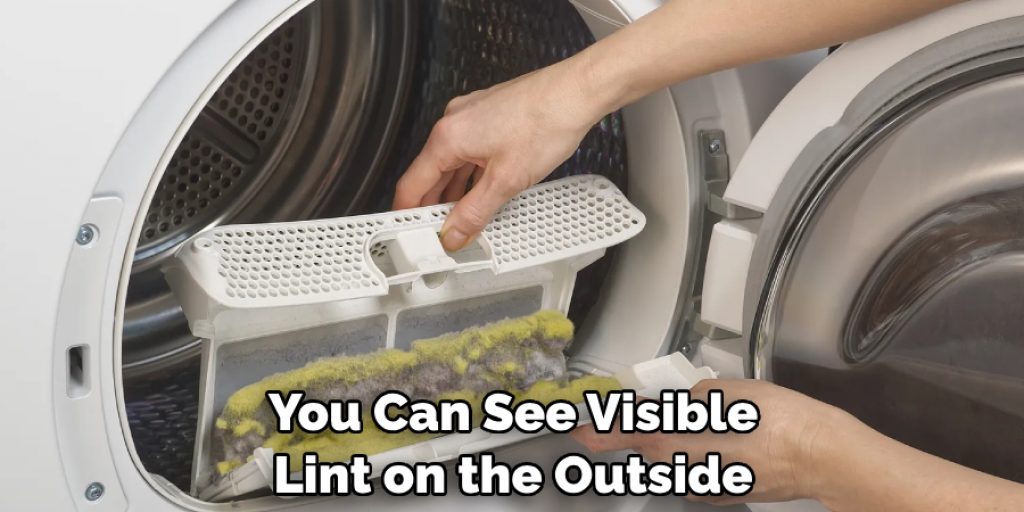
By keeping an eye out for these signs, you can catch lint buildup in your Ge dryer before it becomes a bigger problem.
Conclusion
In conclusion, learning how to take apart your GE dryer to clean the lint is not only a good way to keep your dryer running efficiently, but it can also prevent potential fire hazards and extend the lifespan of your appliance. By following the steps outlined in this blog post, you will be able to properly and safely take apart your GE dryer, clean out all the built-up lint, and put it back together in no time.
It is important to remember that regular maintenance and cleaning of your dryer should be a part of your household routine. This will not only save you money on potential repairs, but it will also ensure that your dryer is running at its best capacity, therefore saving you time and energy. I hope this article has been beneficial for learning how to take apart ge dryer to clean lint. Make Sure the precautionary measures are followed chronologically.
Angela Ervin
Angela is the executive editor of DIY quickly. She began her career as an interior designer before applying her strategic and creative passion to lifestyle and home. She has close to 15 years of experience in creative writing and online content strategy for housekeeping, home decorations as well as other niche efforts. She loves her job and has the privilege of working with an extraordinary team. She lives with her husband, two sons, and daughter in Petersburg. When she's not busy working she spent time with her family.