How to Clean Microwave Vent
Do you have a microwaved filled with splatters and crumbles but are unsure of how to give it the deep clean it needs? You’re not alone – many people know how to use their microwaves for basic tasks but may not be familiar with the steps needed for a thorough cleaning.
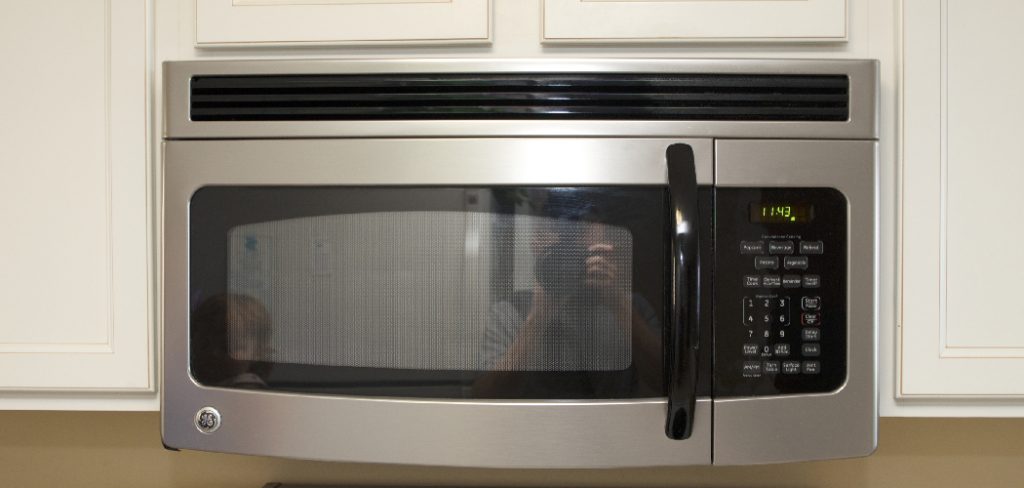
In this blog post, we will discuss all the important details on how to clean microwave vent so that you can enjoy delicious meals without worrying about any mess or debris left over from previous cooking sessions.
We’ll cover everything that goes into deep cleaning the vent: materials, tools needed, and step-by-step instructions that are easy enough that even beginners can tackle this project! With these tips in hand, you’ll soon have sparkling vents – giving your kitchen more orderliness and safety during meal preparation times.
10 Methods How to Clean Microwave Vent
1. Use a Vacuum Cleaner
One of the easiest ways to clean your microwave vent is to use a vacuum cleaner. Simply attach the vacuum cleaner hose to the exhaust vent and turn on the vacuum. Run the vacuum for a few minutes to remove any dirt, dust, or debris that may be clogging the vent.
You can also use a brush attachment to help agitate the dirt or debris and make sure all of it is removed. If the dirt or debris is too stubborn, you can use a damp cloth to wipe down the inside of the vent. Although it might take a bit longer, this will ensure that the vent is completely clean.
2. Use Baking Soda
Baking soda is a natural cleaning agent that can be used to clean your microwave vent. Simply mix one tablespoon of baking soda with two cups of water and use a cloth or sponge to scrub the vent. Rinse the area with clean water and dry it with a towel.
Baking soda is a natural deodorizer, so this will help to eliminate any unpleasant smells that may be coming from the vent. Additionally, baking soda is non-toxic and safe to use around food products. Though it is effective at removing grease and grime, baking soda can scratch some surfaces, so always test in an inconspicuous spot before beginning.
3. Use Vinegar
Vinegar is another natural cleaning agent that can be used to clean your microwave vent. Simply mix one cup of vinegar with two cups of water and use a cloth or sponge to scrub the vent. Rinse the area with clean water and dry it with a towel. Vinegar is great for removing dirt, grime, and stubborn grease from the vent.

It can also help eliminate odors and leave your microwave smelling fresh. For even better results, add a few drops of essential oils like lemon or rosemary to the vinegar solution for extra cleaning power. However, be sure to use a diluted solution, as the acidic nature of vinegar can damage certain surfaces.
4. Use Lemon Juice
Lemon juice is another natural cleaning agent that can be used to clean your microwave vent. Simply mix one cup of lemon juice with two cups of water and use a cloth or sponge to scrub the vent. Rinse the area with clean water and dry with a towel.
This method is especially effective in removing grease and grime from the vent. When cleaning the vent, make sure to use caution and avoid getting any of the liquid in other components of your microwave such as electrical parts. It is also important to make sure the vent is completely dry before operating the microwave.
5. Use Ammonia
Ammonia is a strong cleaning agent that should only be used if other methods have failed. Simply mix one cup of ammonia with two cups of water and use a cloth or sponge to scrub the vent. Rinse the area with clean water and dry it with a towel.
Be sure to open windows and doors while using ammonia, as it can be harmful if inhaled in large quantities. If you have a strong smell of ammonia after cleaning, air out the area until it’s gone. While ammonia is a great way to remove stubborn dirt and grime, it can also damage certain surfaces, so it’s important to test on a small area first.
6. Use Dish soap
Dish soap is another cleaning agent that can be used to clean your microwave vent. Simply mix one cup of dish soap with two cups of water and use a cloth or sponge to scrub the vent. Rinse the area with clean water and dry it with a towel. You may need to repeat the process if there are tough stains that won’t come off.

Make sure to change out the soapy water often as it can become murky and ineffective after a few uses. Keep in mind that dish soap can leave behind a residue, so use it sparingly. If you need a stronger cleaner, use an all-purpose cleaner instead. After scrubbing, be sure to wipe away all traces of soap with clean water.
7. Use Hydrogen Peroxide
Hydrogen peroxide is another cleaning agent that can be used to clean your microwave vent. Simply mix one cup of hydrogen peroxide with two cups of water and use a cloth or sponge to scrub the vent. Rinse the area with clean water and dry it with a towel.
This method is especially effective for removing tough stains and stuck-on debris that can be difficult to remove with soap and water alone. Additionally, hydrogen peroxide is a powerful disinfectant and antibacterial agent, so it will help to kill any germs or bacteria that may be present in the vent.
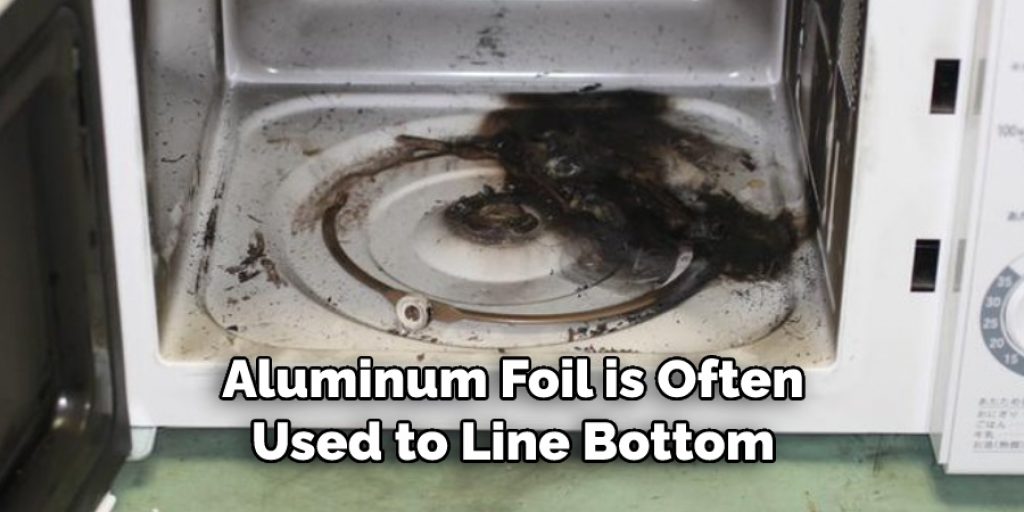
8. Use Aluminum Foil
Aluminum foil is often used to line the bottom of a microwave and can also be used to clean the vent. Simply place a sheet of aluminum foil in the middle of the vent and run the microwave on its lowest setting for 15 minutes. The heat produced by the microwave will cause grease and grime to loosen and will be absorbed by the foil.
Afterward, you can carefully remove the foil and throw it away. Be sure to use caution when handling hot objects in your microwave. If desired, you can also wipe down the vent with a damp cloth to remove any remaining residue. To avoid any potential hazards, do not use the aluminum foil that is too thick or larger than the vent opening.
9. Use a Toothbrush
Finally, if all other methods fail, you can use a toothbrush to scrub the vent. Simply dip a soft-bristled toothbrush in a solution of warm water and dish soap, and use it to scrub away at any stubborn dirt or buildup. A toothbrush is also great for getting into hard-to-reach places.
Once you’ve finished scrubbing, rinse off the vent with clean water and dry it thoroughly before putting your appliance back together. With these tips, you can get your microwave vent looking and smelling like new again. It’s a simple process that should only take a few minutes of your time — but it will make a big difference in the look and functionality of your appliance.
10. Wipe Down
Once you have finished cleaning your microwave vent, use a clean cloth or paper towel to wipe down the area. This will remove any. Debris or grime that may have been left behind. Be sure to remove any buildup of dirt or dust, as this can cause the vent to become clogged, and it could even lead to a fire hazard.
Once you have completed wiping down the area, your microwave vent should be clean and ready for use again. Follow these simple steps next time you need to clean your microwave vent, and you can have a safe and clean kitchen.
Some Common Things to Consider When Cleaning Microwave Vent
1. Remove the Vent Grille
Depending on your model, you might need to unscrew the cover of the microwave vent before cleaning. Once it is removed, take a damp cloth to clean all of the dirt and dust that has accumulated in between the grille.
2. Clean the Vent Fan
The vent fan helps circulate air through the microwave, so it can accumulate a lot of dust over time. To remove built-up debris, use an all-purpose cleaner and a gentle brush to scrub away any residue. Make sure to rinse off any remaining product before reattaching the grille.
3. Wipe Down Surfaces
After cleaning out your microwave vent, take a damp cloth and wipe down every surface inside and outside the appliance. Remove any food or oil splatters on the floor beneath your oven as well as around your sink area if applicable.
4. Vacuum Around the Vent
Use a vacuum to suck up any debris that may have escaped from your vent during the cleaning process. Make sure to cover as much area as possible, including behind and beneath your appliance.

Conclusion
All in all, cleaning your microwave vent is essential for keeping your kitchen running efficiently and safely. You can watch how-to videos online or use a professional cleaning service, but ultimately the best way to increase peace of mind and convenience is to commit to regular cleanings.
Don’t forget that having a clean microwave vent means fewer burnt odors and less fire risk in the home. The bottom line is that taking proper care of your microwave helps protect both people and things within your kitchen. After following these steps, you should now know exactly how to Clean Microwave Vent.
Angela Ervin
Angela is the executive editor of DIY quickly. She began her career as an interior designer before applying her strategic and creative passion to lifestyle and home. She has close to 15 years of experience in creative writing and online content strategy for housekeeping, home decorations as well as other niche efforts. She loves her job and has the privilege of working with an extraordinary team. She lives with her husband, two sons, and daughter in Petersburg. When she's not busy working she spent time with her family.