
How to Fill a Calligraphy Pen Nib
Introduction:
Calligraphy is a type of art that involves creating lettering with brush and ink. To create elaborate calligraphy, you will need pens or nibs to make the letters. For Japanese calligraphy, there are three types of pen or nib: Horse hairbrush, which provides flexibility; Ryuga, made from deer’s hair; and Chung Ryuga.
A calligraphy pen is a pen that has its front end in an oblong or point-like form. This kind of pen allows the artist to apply ink in different thicknesses and sizes of strokes. The user can control these by holding them properly on the hand, allowing it to produce various styles of writing depending upon the creative strokes made, which are usually dependent on how the brush is held, tilted, and pressed when writing. In this article, I will discuss how to fill a calligraphy pen nib. So let us get started.
More About a Calligraphy Pen:
These pens come in different shapes, contents, and sizes for beginners who wish to use them as learning tools before using their own hands. There may be no need for calligraphy pens for some experts at all because they have mastered such skill and craftsmanship that they could masterfully draw lines with just paper (or canvas) and a brush in their hands.
But there are still many novices who wish to learn the art of writing by hand with a nib pen; calligraphy pens help them get into this nifty little hobby enjoyably.
Some professions require such exceptional skill from an expert professional on the go, say, for example, lawyers and doctors (whose handwriting needs to be clear and legible) or even principals, professors and instructors of educational institutions, students, and business owners (who need paper works done). It is very fulfilling to master this skill as it adds more flair to our own artistic capabilities.
Step-wise Guide on How to Fill a Calligraphy Pen Nib:
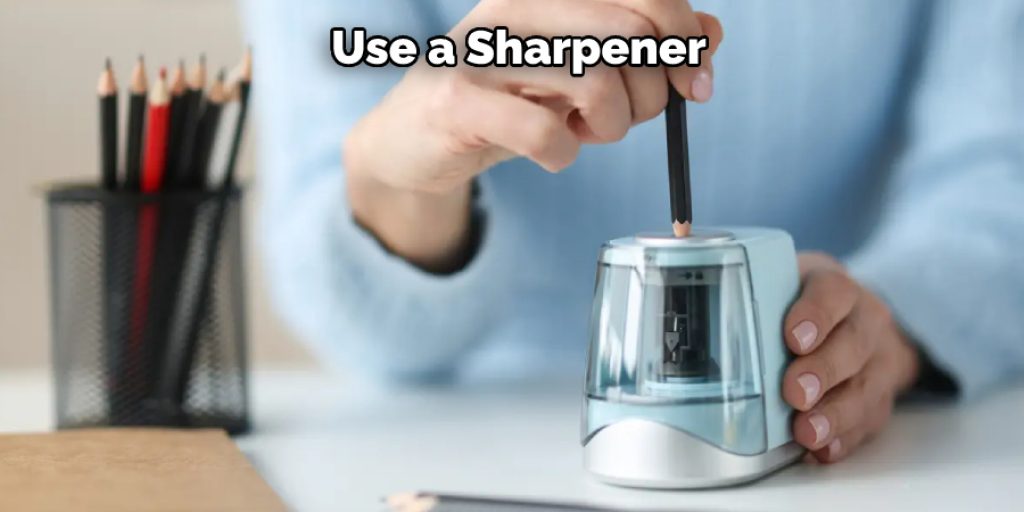
#1. Sharpening the Nib:
Use a sharpener to sharpen your calligraphy nib until it reaches an angle of about 30 degrees. Be careful not to over-sharpen, which can damage the tip of your pen and make it too thin (and unusable).
#2. Applying India Ink:
Dip the tip of your calligraphy pen in Indian Ink until it is covered with stain, then leave it to sit for about 4 hours for it to dry up completely. Only fill a calligraphy pen when you’re ready to start writing, as the ink will drip out before you use it and ruin your paper!
#3: Washing in Water:
Next, wash off all excess ink from your calligraphy nib by using a bath of warm water. This will help to get rid of any pigment clogged at the tip of your nib, which can cause blocked-up lines.
#4: Writing Practice:
Write for 10 minutes without stopping to fill your pen again until all the ink has dried up. Do this each day, and you’ll start seeing improvements in your writing straight away!
#5: Using Distilled Water:
Buy some distilled water, soak your calligraphy pen in the water for 5 minutes, then dry it under a fan so that none of the excess moisture is left in the barrel of your nib. This reduces the risk of ink-blotting on your paper when you’re writing.
#6: Inking up:
The most important part of learning how to fill a calligraphy pen nib is inking up, which is simply filling the barrel of your calligraphy pen with ink so that it’s ready for use! Once you’ve dipped your calligraphy nib into some Indian Ink, inspect it and stir the reservoir by twisting your calligraphy pen around in small circles until it’s full and there are no empty patches.
If any areas are still left uncovered, take your finger and wipe them off. Make sure that you keep turning till all parts are filled; this helps thicken lines by ensuring they have equal ink flow while you write.
#7: Caring for Your Nib:
If you want to take good care of your calligraphy pen, wash the ink off with warm water after every use. Also, remember that it takes a while for the reservoir of your calligraphy pen to dry up, so be patient and wait a few hours before using it again!

#8: Cleaning the Pen Handle:
Your last step is to rinse out any remaining writing fluid from inside the barrel of your calligraphy pen by using lukewarm water then leaving it open on some paper towels so that excess water can drain away. If you don’t do this, your next attempt at writing will find all sorts of liquid running onto your page, making keep your calligraphy pen nib with you in a case to stop ink seeping into the barrel while it’s not being used.
Conclusion:
Calligraphy pens are portable and convenient writing tools for those who would like to learn how to write but cannot find the time or interest in actually learning. Calligraphy nibs have various tips that allow people who use them to write with various widths of lines and ink flow control. Some calligraphy nibs even provide different sizes of the tip, which help beginners draw more elaborate letters!
It is an art form that requires some patience and practice to master the basic strokes and create nice artwork on any paper. I hope this article has been beneficial for learning how to fill a calligraphy pen nib. Thank you and have a nice day!
Also Check our article How to Make a Gel Pen Work


