How to Glue Paper to Glass
If you’re looking for a way to display your favorite photos without the hassle of framing them, then this is the perfect solution. This blog post will instruct you on how to glue paper to glass and frame it elegantly and affordably.

For your project not to turn out sloppy, ensure that you have all of the materials needed ahead of time, so there are no delays or other problems down the line. It would be best to take care when applying glue so read through this step-by-step blog post before starting anything else. In addition, if you want your design to look more symmetrical, feel free to use a protractor.
Why Use Paper and Glass Instead of a Traditional Frame?
There are several reasons. First, it’s cost-effective as you won’t have to spend money on a frame or matting. It also allows more versatility in terms of design, as you can choose different types of paper and experiment with various layouts. Additionally, the glass provides a sleek and modern look that can make your photos or artwork pop.
You can also choose to use this method for other decorative purposes, such as creating a unique and personalized glass-covered tray or coaster. But before we get to that, let’s dive into the step-by-step process of how to glue paper to glass.
Supplies and Materials You’ll Need:
Plain White Document Paper or Regular Printer Paper:
For this project, you will need plain white document paper or regular printer paper. It is important to use thin and lightweight paper for this project, as thicker papers may not adhere well to the glass surface.
Glass:
The type of glass you use depends on your personal preference and the size of your project. You can use picture frame glass, transparent plastic sheeting, or even glass from old picture frames. Just ensure that the glass is clean and free of any scratches.
Scissors:
To cut the paper to fit perfectly onto your chosen piece of glass, you will need a pair of scissors. Make sure they are sharp so that you can get clean and precise cuts on your paper.
Glue:
For this project, you will need white school glue or any other type of clear-drying paper glue. Avoid using superglue or hot glue as they may not work well with the glass surface.
Paintbrush:
A small paintbrush will be used to apply the glue onto the glass surface and paper.
Ruler (Optional):
If you want to achieve a more symmetrical design, you may use a ruler to measure and mark the placement of your paper on the glass.
Steps To Follow: How to Glue Paper to Glass
Step 1:
Clean your glass piece thoroughly with soap and water to remove any dirt or oil present. This will help the glue stick better to the surface without leaving any residue behind. Then, allow it to dry completely. The cleaner the glass, the better your project will turn out. It is also advisable to wear gloves while handling the glass to avoid leaving fingerprints on it. The oils from your skin can interfere with the adhesion of the glue.
Step 2:
Use a ruler to measure out where you will be gluing your paper, and then use painter’s tape to secure the sheet in place on the glass. Leave an excess of a few inches around each edge. This is important for removing the tape after the glue has dried since it will leave a light and tape to place over your lines to create your pattern. If the colors in the paper you are using are not straight, use a ruler and sharpie to trace out where exactly you will be placing your tape to line up with the real design in your paper when complete.
Step 3:
Once all of your pieces of tape are in place, use a craft knife to cut through your paper and tape on the glass carefully. Make sure you are only cutting the paper and not the tape and not scratching up your piece of glass. The tape will be used as a guide for placing your paper correctly on the glass later. You will have a lot of sheets to cut, so it may be helpful to do one at a time. It’s best not to put the paper on the glass until you are ready.
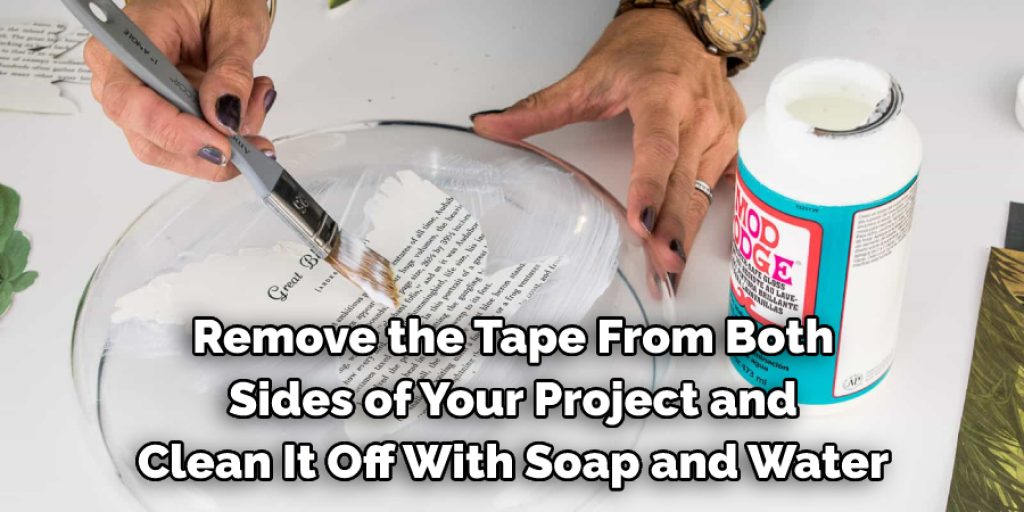
Step 4:
Once all of the lines have been cut out, remove the tape from both sides of your project and clean it off with soap and water to get rid of any stuck-on pieces of paper or extra glue. Ensure that your project is completely dry before moving on to the next step. The paper is fragile, so make sure not to scratch or bend it while removing the tape. You can reuse the tape if you want to create more designs later on. Although it may take some time to get all the glue off, you can simply use a damp cloth to remove any residue.
Step 5:
Use a few more pieces of tape to mark out where you will be applying your glue for your project. Make sure it is the same size as the piece of glass to which you are trying to attach it. If you are using an already cut image with white on it for this portion, make sure you line the tape up with the part of the image that has white in it, or else your paper will not be centered. Then, use the paintbrush to apply a thin layer of glue onto the glass surface where you will be attaching your paper.
Step 6:
Flip the glue around after all of your pieces are lined in place so the white side is facing up. Carefully remove an inch or two of the blue protective sheet so the glue is exposed. Make sure you peel it off slowly to avoid ripping your glued paper. You will cover the entire side of the paper with glue once it is lined up in its exact position. Once you are satisfied that everything lines up, press down gently on the glued portion so that it adheres to the glass surface.
Step 7:
Carefully place the glass on top of the glued paper and secure it with a few pieces of tape around each edge. Then, flip it over and place something heavy on top, like books or canned goods, until it has dried. This will help the glue adhere to the glass surface evenly. The drying time can vary depending on the type of glue used, so check the instructions on your bottle for specific drying times. Typically, it takes around 24 hours for the glue to dry completely.
Step 8:
Once the glue has dried, carefully remove the tape from around the edges of your project. Then, use a craft knife to trace where your paper meets the glass so you can easily go back over it with paint for an extra polished look. You can also use a white eraser to remove any pencil marks from the glass surface. And that’s it! Your beautiful paper-glued glass project is now complete! The possibilities for what you can create with this technique are endless, so let your creativity run wild and have fun!
Step 9:
Your glued paper project is now complete! You can add additional decorations such as stickers, glitter, or sequins to personalize it further. Once dry, you can display your project on a stand or frame for everyone to admire. Congrats on creating your very own unique and beautiful glass art!
Following these steps will ensure that your paper stays securely attached to the glass surface for years to come. Experiment with different types of paper, colors, and designs to create a variety of stunning pieces. Get creative and have fun with this project! Happy crafting!
What Type of Glue to Use?
To attach the paper to the glass, you will want a glue that dries clear and is flexible. Super Glue or Crazy Glue is not suitable for this project because it is dry, hard and brittle, which would cause the paper to crack over time.
Hot glue has a chemical makeup similar to rubber cement which is flexible enough to hold the paper to glass. You can purchase a small hot glue gun from any craft or hardware store for under $10 that conveniently heats and applies the glue for you.
The best option for this project is to use a specialized glass glue, such as E6000 or Aleene’s Glass and Bead Adhesive. These glues are specifically designed for bonding paper to glass and will provide a strong bond without yellowing over time. They can also be easily found in most craft stores.
Experiment with different types of glue to achieve the desired look and durability for your project. Always make sure to follow the instructions on the glue bottle carefully and work in a well-ventilated area.
Some Tips and Tricks:
- When you are ready to glue the glass, put a strip of tape around the rim, the paper side facing outward. This will prevent any excess glue from getting on your counter or tabletop.
- Use very little glue! The less you use, the easier it is to peel off later. Of course, you can always reapply more if needed.
- Use a toothpick to sweep away the excess glue that seeped out from under the paper.
- If you are reusing glass jars, it’s best to clean them before gluing down the new paper. Not only will this make for an easier peel-off later, but cleaning off any dust or dirt particles makes for a nicer-looking jar.
- Wait until the glue is completely dry before peeling off the tape and paper.
- If you are covering a light-colored glass jar or bottle, black ink designed for rubber stamping will work well as it will absorb into the paper instead of lying on top, which would show through once it’s peeled away. Wait until the glue is dry before stamping and wait a few minutes after you’ve stamped to let it set.
- If you are using an image with text, make sure to flip it on your computer horizontally before printing. This way, once you glue it down, the text will be readable from the outside of the jar.
- For a more elegant look, try using patterned scrapbook paper or tissue paper instead of plain colored paper. This will add some texture and interest to your project.
- Have fun with different shapes and sizes of glass containers for a variety of looks. You can also mix and match different papers to create unique designs.
- Don’t be afraid to make mistakes! Part of the fun of crafting is experimenting and learning from your mistakes. So don’t get discouraged if your first attempt doesn’t turn out perfectly. Keep practicing and have fun with it! Happy crafting!
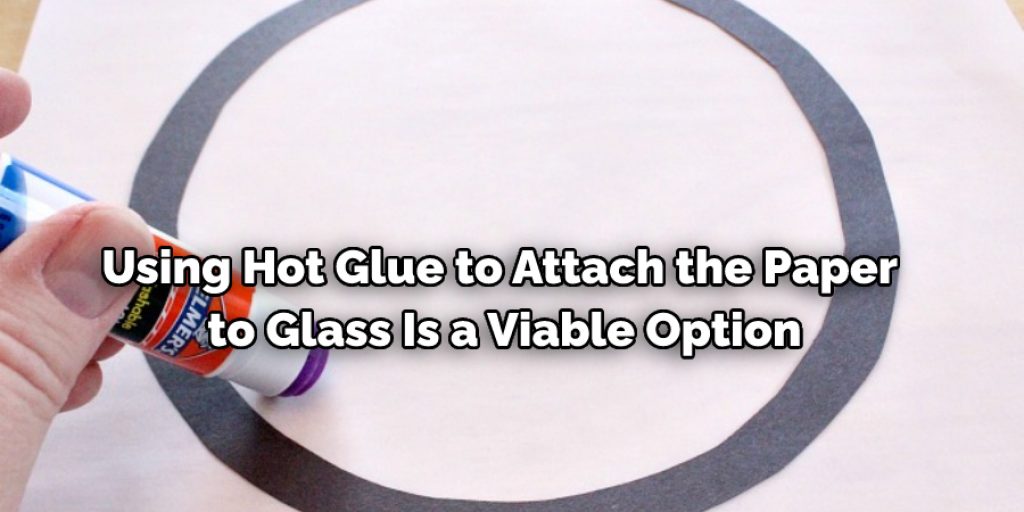
Can You Hot Glue Paper to Glass?
Using hot glue to attach the paper to the glass is a viable option. This allows you to create unique and personal designs on nearly any flat, clear surface such as windows, mirrors, or picture frames. It is important that the surface be smooth and non-porous so that the glue can adhere properly.
The glue is typically applied to the back of the paper and spread evenly over a small surface area. Then, you hold it in place for several seconds until the glue begins to dry and forms a more secure bond. It also dries clear so that any designs or words will not be visible from the front side of your project.
Hot glue is not as permanent as some other glues, so it may be easier to remove the paper from the glass if desired. However, it may not provide as strong of a bond over time compared to specialized glass glues.
Frequently Asked Questions:
Q: What Types of Paper Work Best for This Project?
A: You can use a variety of papers, such as tissue paper, scrapbook paper, or even photographs. Just make sure the paper is thin and flexible enough to adhere smoothly to the glass surface. You can also experiment with different textures and patterns for unique effects. It’s best to avoid using thick cardstock or construction paper as they may not adhere well and can cause bumps in the finished product. The type of paper you choose will also determine the amount of glue needed and the drying time.
Q: Can I Do This Project on Other Surfaces Besides Glass?
A: Yes, this project can be done on other surfaces such as plastic or metal. However, make sure to use a specialized glue that is suitable for bonding paper to that specific surface. For example, if you are attaching paper to plastic, a glue designed for plastic would work best. You can also experiment with different materials for unique and personalized projects. It’s always best to test the glue on a small area first before committing to your project.
Q: Is This Project Safe for Children?
A: While this project can be a fun and creative activity for children, it is important to supervise them when using any type of glue. Hot glue guns should only be used by adults or under adult supervision as they can cause burns if not handled properly. It’s also important to make sure the work area is well-ventilated and that children are using appropriate tools and materials for their age. But overall, this can be a great project for children to express their creativity and make something they can be proud of.
Q: How Do I Remove Paper From Glass if I Want to Change the Design?
A: To remove paper from glass, you can try gently peeling it off or soaking it in warm water until the glue softens. You can also use rubbing alcohol or an adhesive remover to help loosen the glue. It’s always best to test a small area first before attempting to remove the entire paper. Also, keep in mind that some glues may be more difficult to remove than others, so it’s important to choose the right type of glue for your project.
Q: Can I Seal the Paper to Make it More Durable?
A: Yes, you can seal the paper with a clear sealer once the glue has dried. This will make the project more durable and water-resistant, making it last longer. Just make sure to choose a sealer that is suitable for use on glass and paper to avoid any damage or discoloration. You can also experiment with different types of sealers to achieve different effects, such as a glossy or matte finish. Overall, sealing the paper can add an extra layer of protection and enhance the overall look of your project.
Conclusion:
If you’re looking for a way to attach the paper to glass, we recommend using an acrylic adhesive such as Mod Podge. This is the best type of glue because it won’t warp or ruin your paper as water-based adhesives can. It also dries quickly and will not leave any residue on the surface once dry.
The post has provided you with clear instructions on how to glue paper to glass. Remember, the key is patience and understanding your materials before starting. If you have any questions about doing this project or need more information on the supplies needed, feel free to contact us.
Elizabeth Davis
Elizabeth is a creative writer and digital editor based in the United States. She has a passion for the arts and crafts, which she developed from a young age. Elizabeth has always loved experimenting with new mediums and sharing her work with others. When she started blogging, she knew that DIYquickly would be the perfect platform to share her tutorials and tips. She's been writing for the blog from the beginning, and her readers love her helpful advice and easy-to-follow instructions. When she's not writing or editing, Elizabeth enjoys spending time with her family and friends.