How to Hang Yoga Swing From Ceiling
Hanging a yoga swing from your ceiling can be a great addition to your home practice. It allows for more freedom and versatility in your movements, as well as the ability to easily adjust the height of the swing. But before you jump into hanging your yoga swing, there are a few things you should consider.
The main advantage of hanging a yoga swing from the ceiling is that it allows for greater flexibility and mobility during your practice. This is because you have 360-degree access to the swing, allowing for a wider range of motion and more dynamic movements.
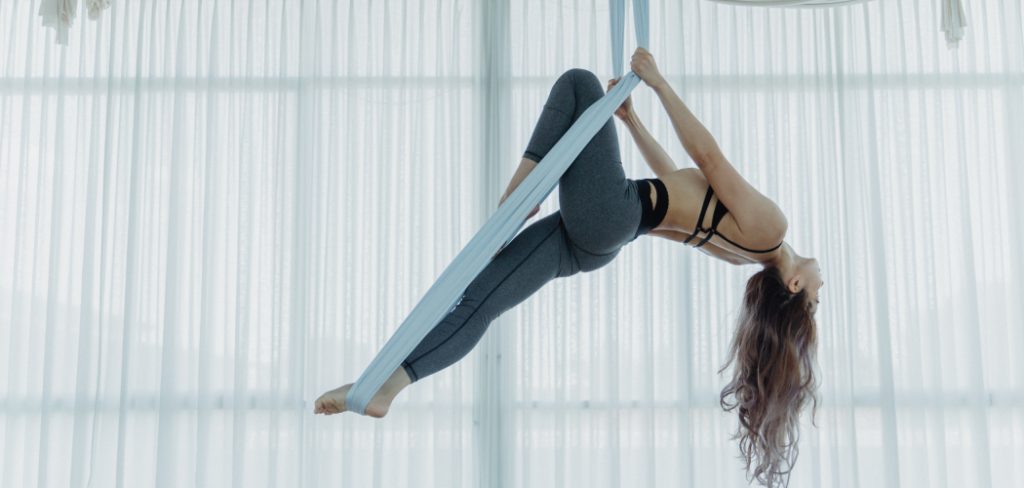
Additionally, suspending the swing from the ceiling provides a more stable base compared to other options such as door frames or trees. In this blog post, You will learn in detail how to hang yoga swing from ceiling.
Step-by-step Instructions for How to Hang Yoga Swing From Ceiling
Step 1: Inspect the Space
Before installing your yoga swing, make sure that there is enough space for it to hang freely. The recommended height for a yoga swing is at least 8 feet from the ground. Additionally, check if the ceiling is strong enough to support the weight of the swing and your body.
Step 2: Gather Materials
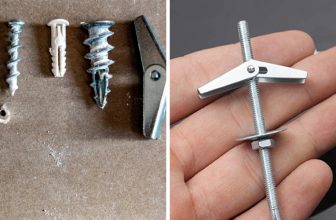
To hang a yoga swing from the ceiling, you will need a few materials including:
- A sturdy yoga swing with carabiners
- A drill
- Stud finder
- Screws or eye bolts for mounting the swing to the ceiling
Step 3: Locate the Ceiling Joists
Using a stud finder, locate the ceiling joists where you plan on hanging your yoga swing. These are the beams that support the weight of your ceiling and they are typically spaced 16 inches apart. Once you have identified the ceiling joists, mark their locations with a pencil. This will make it easier for you to drill into them.
Step 4: Drill Pilot Holes
Using a drill bit that is slightly smaller than your screws or eye bolts, drill pilot holes into the marked spots on the ceiling joists. This will prevent the wood from splitting when you screw in the bolts. Screw in your eye bolts or screws into the drilled pilot holes, making sure they are securely attached to the ceiling joists.
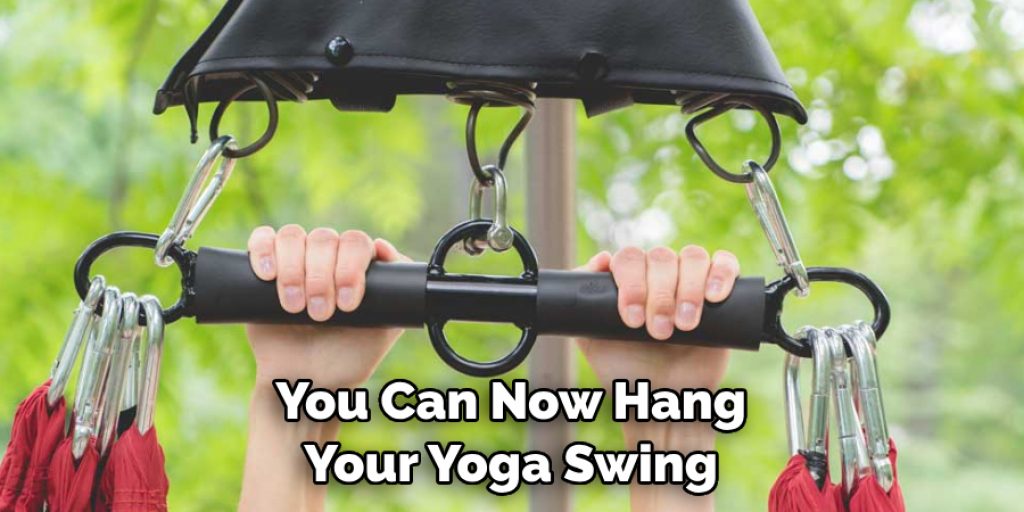
Step 5: Attach Carabiners to Swing
Attach the carabiners to the ends of your yoga swing and make sure they are tightly closed. Hook the carabiners onto the eye bolts or screws that you installed in Step 6. Make sure they are securely hooked and can support your weight.

Step 6: Test It Out
Before fully committing to using your yoga swing, give it a test run to make sure everything is securely in place and the swing can support your weight. Slowly test out different poses and movements to ensure the swing is stable and secure.
By following these simple steps, you can easily and safely hang your yoga swing from the ceiling. Remember to always check the stability of your setup before each use and make any necessary adjustments if needed.
Safety Precautions for How to Hang Yoga Swing From Ceiling
- Before attempting to hang your yoga swing, make sure that your ceiling can support the weight of both the swing and anyone using it. If you’re unsure, consult a professional contractor or engineer.
- Choose a strong and sturdy attachment point on the ceiling, such as a beam or joist. Do not use drywall, plaster, or other weak materials to hang your swing.
- Always follow the manufacturer’s instructions for installing and hanging your yoga swing. If you have any doubts or questions, contact the manufacturer for clarification.
- Double-check all knots and attachments to ensure that they are secure and tight. This will help prevent the swing from slipping or falling during use.
- Make sure there is enough space around your yoga swing for safe and comfortable movement. You should have at least 2-3 feet of clearance on all sides.
- Inspect your yoga swing regularly for any signs of wear and tear, such as frayed ropes or loose attachments. If you notice any issues, stop using the swing immediately and contact the manufacturer for replacement parts.
- Always use your yoga swing with caution and do not attempt any risky or advanced poses without proper instruction and supervision.
By following these safety precautions, you can enjoy a safe and secure yoga swing experience from your ceiling. Remember to always put safety first and never compromise on the integrity of your installation.
How Do You Properly Install and Secure the Mounting Brackets for the Swing?
After gathering all the necessary materials and tools, the next step is to install and secure the mounting brackets for your yoga swing. The installation process may vary depending on the type of ceiling you have, so it’s important to carefully read through the instructions provided by the manufacturer. However, here are some general guidelines that can help you properly install and secure your mounting brackets:

1. Find a Suitable Location for the Swing
The first step is to find a strong and sturdy ceiling beam or joist where you can safely hang your yoga swing. It’s important to choose a location that can support the weight of the swing and the person using it.
2. Measure and Mark the Placement of the Brackets
Use a measuring tape to determine the distance between the two mounting brackets. Make sure to leave enough space for the swing to hang comfortably and allow for movement during use. Once you have determined the placement, mark it with a pencil.
3. Drill Pilot Holes
Use a drill and an appropriate size drill bit to create pilot holes in the marked locations on your ceiling. These holes will make it easier to screw in the mounting brackets later on.
4. Attach the Brackets
Screw in the mounting brackets using the provided screws or bolts. Make sure they are securely attached to the ceiling and can support the weight of the swing.
5. Double Check for Stability
Give the mounted brackets a gentle tug to make sure they are securely attached and can hold your weight without any issues. If there is any wobbling or instability, double check the installation and make any necessary adjustments.
6. Hang the Swing
Once the mounting brackets are securely attached to the ceiling, you can now hang your yoga swing using the provided carabiners. Make sure they are properly locked and that the swing is hanging evenly.
7. Test It Out
Before using your yoga swing for a full workout, do a few trial runs to make sure it is stable and properly installed. Adjust the height of the swing if needed for maximum comfort.
By following these steps, you can safely and properly install and secure the mounting brackets for your yoga swing. Remember to always prioritize safety when using any exercise equipment, and never hesitate to seek help or guidance if you are unsure about the installation process.
How Do You Properly Care for and Maintain the Hardware and Materials Used to Hang the Swing?
In order to ensure the safety and longevity of your yoga swing, it is important to properly care for and maintain the hardware and materials used to hang it from the ceiling. Here are some tips to help you do just that:
1. Check for Wear and Tear
Regularly inspect all of the hardware and materials used to hang your yoga swing from the ceiling. Look for any signs of wear and tear such as fraying or rusting. If you notice any damage, replace the affected parts immediately.
2. Clean and Lubricate
Dirt and debris can accumulate on your hardware over time, causing it to become clogged or stuck. To prevent this, regularly clean all metal components with a damp cloth and mild soap. You can also use a lubricant such as WD-40 to keep the hardware moving smoothly.

3. Avoid Overloading
It may be tempting to hang multiple swings or add extra weight to your existing setup, but this can put unnecessary strain on the hardware and lead to damage. Always follow the weight limit guidelines provided by the manufacturer and avoid overloading your yoga swing.
4. Use Proper Installation Techniques
Proper installation is crucial for the safety and stability of your yoga swing. Follow the instructions provided by the manufacturer carefully and ensure that you are using the correct suspension system for your specific ceiling type.
5. Inspect Ceiling Mounts
In addition to checking the hardware used to hang the swing, it is important to also regularly inspect the ceiling mounts or hooks. Make sure they are securely attached and show no signs of wear or damage. If you have any doubts about the stability of your ceiling mounts, consider hiring a professional to install or reinforce them.
6. Replace When Necessary
Just like any other equipment, the hardware and materials used to hang your yoga swing will eventually need to be replaced over time. It is important to keep track of the age and usage of your hardware and replace any parts that show signs of wear or have exceeded their recommended lifespan.
By following these tips, you can ensure that your yoga swing remains safe and secure for all of your aerial workouts. Remember to always prioritize safety when it comes to hanging equipment from the ceiling, and don’t hesitate to seek professional help if needed.

Conclusion
In conclusion, learning how to hang a yoga swing from the ceiling is an important skill that can greatly enhance your yoga practice. Not only does it provide a fun and challenging way to approach traditional poses, but it also offers numerous health benefits including improved flexibility, strength, and mindfulness. However, as with any physical activity, there are some disadvantages to consider before attempting to hang a yoga swing from your ceiling.
One of the main disadvantages is the potential risk of injury if proper installation and safety precautions are not followed. It is important to ensure that your ceiling can support the weight of the swing and that all hanging hardware is securely attached.
Additionally, proper instruction and supervision are crucial to prevent accidents or strain on muscles and joints. I hope this article has been beneficial for learning how to hang yoga swing from ceiling. Make Sure the precautionary measures are followed chronologically.
Angela Ervin
Angela is the executive editor of DIY quickly. She began her career as an interior designer before applying her strategic and creative passion to lifestyle and home. She has close to 15 years of experience in creative writing and online content strategy for housekeeping, home decorations as well as other niche efforts. She loves her job and has the privilege of working with an extraordinary team. She lives with her husband, two sons, and daughter in Petersburg. When she's not busy working she spent time with her family.