
How to Hook Up Fuel Pressure Regulator
Fuel pressure regulators are an essential part of your car’s fuel system. They help ensure that the correct amount of fuel is delivered to the engine under all conditions. If your car is experiencing problems with acceleration, poor fuel economy, or black smoke from the exhaust, a faulty fuel pressure regulator may be to blame.
If you’re looking to install a fuel pressure regulator on your vehicle, there are a few things you need to know before getting started. In this article, we’ll walk you through how a fuel pressure regulator works and provide some tips on how to hook up fuel pressure regulator. So, whether you’re a novice mechanic or just looking to add this upgrade to your car, read on for all the information you need!
What is a Fuel Pressure Regulator
A fuel pressure regulator is a device that keeps the fuel line pressure at an optimum level. It has a certain pressure threshold which it will not let the fuel increase or decrease from, no matter how much or how little fuel you are sending through.
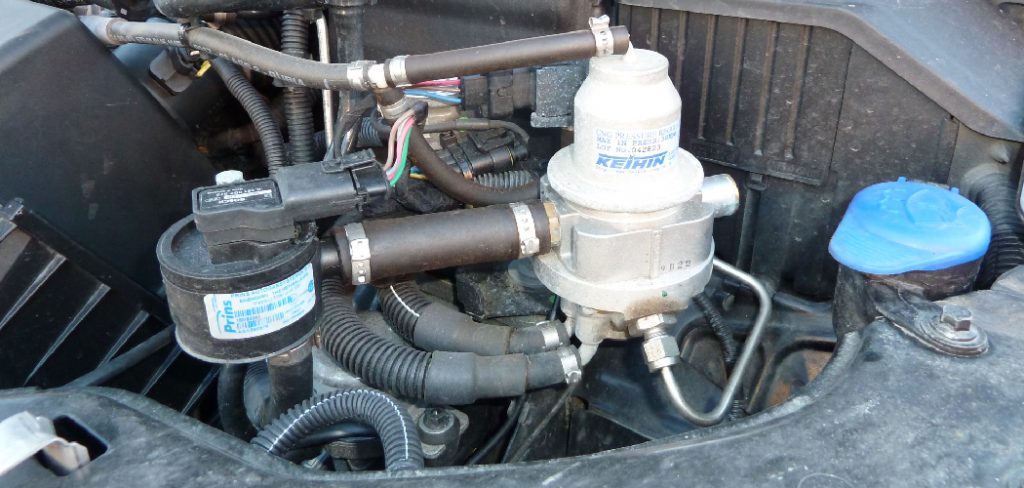
Fuel Pressure Regulators are located on the back of most cars’ engines. They are generally black and silver and take the form of a cylindrical box with several tubes coming out of the sides. There will be a fuel line connected to it and an electrical plug and then one other tube connected to nothing.
What is the Purpose of a Fuel Pressure Regulator
Fuel pressure regulators benefit the vehicle owner in two ways. First, it is programmed into modern vehicles to control excess fuel pressure inside the engine so that it runs with about six psi of pressure under most conditions. Second, it will release excess fuel when needed to have a sufficient volume of fuel inside the engine. This prevents stalling or not starting, which can damage the car.
10 Ways on How to Hook Up Fuel Pressure Regulator
1. Remove Old Regulator from Fuel Rail:
Unscrew the three pressure regulator mounting bolts and remove them from the fuel rail. Next, remove the fuel rail end plug and then clean off any sealant on the opening where the regulator was at.
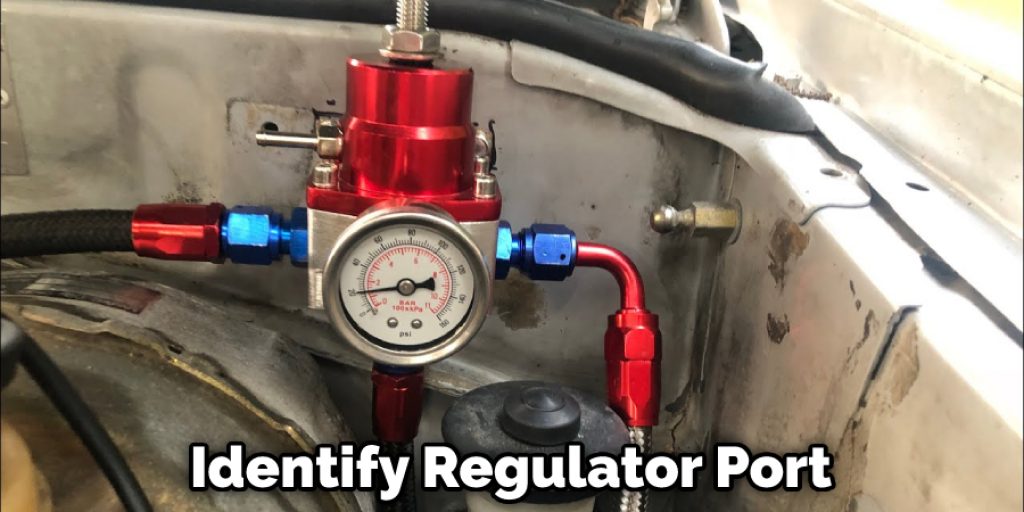
2. Identify Regulator Inlet and Outlet Ports:
Identify which port your regulator inlet line is, which will have a banjo bolt fitting. Then identify which port is your regulator outlet line, which will have a plastic tube running from the fuel rail to the new regulator.
3. Acquire Fuel Inlet Hose:
Acquire a high pressure/high volume hose section that will reach from the fuel rail outlet port on the new regulator to the fuel supply line where you can attach the diesel fuel supply line.
4. Install New Regulator to Rail:
Install your new regulator to the rail using the three bolts; tighten them down without over-tightening to ensure there is no leak between regulator and rail. Now install both metal banjo-to-hose fittings, one on the inlet port and one on the outlet.
5. Adjust Fuel Pressure:
Follow the set-up steps that came with your new fuel pressure regulator. Once you have turned the adjusting screw clockwise, turn off the engine, check for leaks between hose fittings, and ensure that no air is leaking into or out of the regulator inlet line. If there is a leak, turn the adjuster counterclockwise until no air is seen.
6. Install New Fuel Line:
Remove the old line from the fuel rail and install a new high-pressure hose to the regulator outlet port using same clamps as your current lines have been using. Use Teflon tape on all banjo bolt fittings for a snug fit, and use hand Teflon pliers to tighten clamps.
7. Check For Leaks:
Now check for leaks between regulator, fuel line fittings, and fuel pump end plug where you removed this old piece of hardware and clean off any remaining sealant. The leaks should be minimal but if needed, use a wrench on the regulator adjusting screw to turn it clockwise until the leak is stopped.

8. Start Engine:
Start your engine and watch for leaks between regulator fittings, adjuster, and fuel line fitting by turning the pressure adjuster counterclockwise to eliminate these minor leaks. Note that a small amount of air may be present in lines, but this will correct itself in a short time.
9. Thread New Regulator Inlet Lines:
Take your injector-rated fuel hose and route it from the regulator inlet port to the banjo fitting on the end of the rail going out to the engine via a swivel coupling, ensuring that you have the tightest fit possible. Use two hose clamps on the banjo fitting and Teflon tape for all fittings.
10. Open Up a Valve Downstream of the Regulator:
Open a valve downstream of your fuel pressure regulator to connect a gauge to the line and check for over-pressure. You can use this regulator to control the pressure that enters the rail. Your new fuel pressure regulator should be adjusted according to any directions for your particular regulator.
The manufacturer’s instructions should be followed exactly, as the parts are designed for a specific range of input/output pressures manufactured by its specifications to ensure proper performance.
Things to Consider When Hooking Up Fuel Pressure Regulator
1. Fuel Pressure Must Be Set Correctly:
The pressure you set your fuel pressure regulator to is based on the vehicle’s needs. For example, some performance cars require higher than normal pressures, while others need lower than normal ones.
Consult a manual or ask a dealer what the specific requirements are for your car. For example, in terms of reliability, an engine can run with the wrong fuel pressure, but it will skip and sputter; lower than normal pressure may starve the engine of fuel, while higher than normal is just wasteful.

2. Fuel Pressure Regulator Must Be Adjusted:
The regulator has a small screw that adjusts the pressure inside the regulator. It is better to aim low, then increase as needed rather than having too much pressure and wasting fuel. If the regulator is adjusted incorrectly, it will cause problems.
3. Fuel Pressure Regulator May Leak:
The fuel pressure regulator is an important part of your car’s engine management system; it maintains the correct fuel pressure level under many different driving conditions. However, even if you get everything connected perfectly, there is a chance that your fuel pressure regulator will leak, and you’ll find yourself in the same position in a few months.
4. Pressure Gauge:
You need to know what your fuel pressure is at any given time to adjust it with the regulator knob accordingly. Purchase a gauge that connects directly to the fuel rail with hose clamps.
5. Inline Fuel Filter:
The last thing you want is debris from a corroded or collapsed fuel line clogging up your pressure regulator and causing even more problems. But, of course, this will only happen if the regulator breaks loose from fuel pressure, so make sure to secure it correctly both with its strap and in a vise-grip to the rail.
6. New Fuel Lines:
The auto parts store will recommend new fuel lines for your car when you ask them how to hook up a fuel pressure regulator. Instead, they’ll suggest an overpriced plastic line like the corrugated rubber hose that is already in place on most cars.
The truth is that there’s no need to replace the stock line unless it has seriously deteriorated. If there’s a good section that you can cut out and replace, go ahead and get a new hose. If it is severely damaged, just cut off the bad part and keep going.
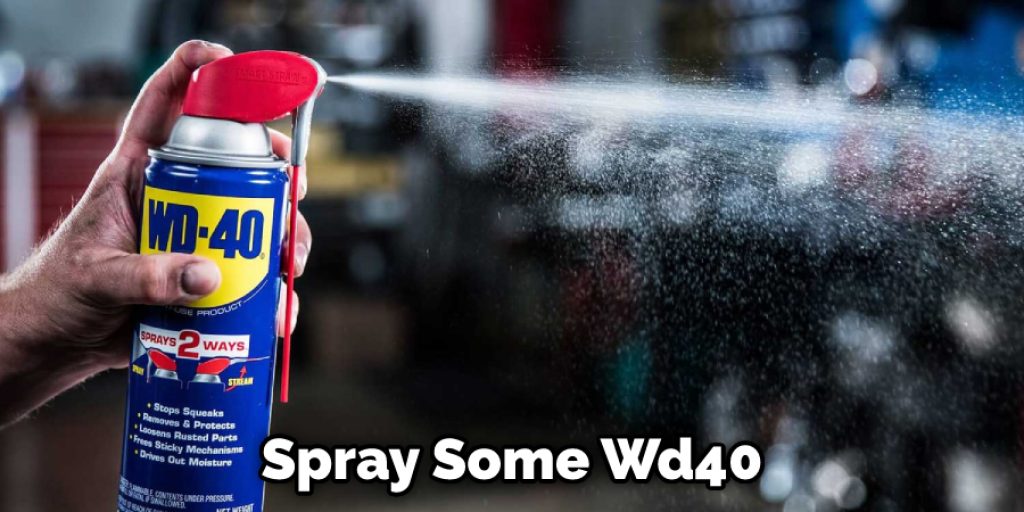
7. Lubricating O-Ring:
The one other thing to remember about hooking up the fuel pressure regulators is to lubricate the O-ring connector. The best way to do this is to pressurize the regulator with air and spray some WD40 on the connector. Let the regulator cool before you take the pressure off or disconnect it.
How Does a Fuel Pressure Regulator Work
A fuel pressure regulator works as a safety mechanism to protect the engine from running too high of fuel pressure, damaging or destroying engine components.
It is typically mounted on the fuel rail with a rubber or metal tube leading into it that goes directly into the intake manifold. A spring-loaded diaphragm directs excess fuel back into the fuel tank when fuel pressure exceeds what the engine can run safely.
Conclusion
If you’re looking to increase your fuel pressure and improve your engine’s performance, then a fuel pressure regulator is the best way to do it. Installing one of these regulators is an easy process that can be done in just a few minutes, and it can make a big difference in how your car runs.
The first step is to remove the old regulator from your vehicle. This is usually done by unscrewing it from the intake manifold or carburetor.
Once it’s off, look at it to see how it attaches. The pressure regulator is the device on most fuel-injected cars that regulates the fuel pressure inside the fuel rail. We hope this article has helped you learn more about how to hook up fuel pressure regulator and shown you how easy they are to install. Thanks for reading!
Louis Wein
Louis has always been fascinated by cars. He loves the way they look, the sound of the engine, and how they make him feel when he's driving. He is always keen to learn more about different mechanics of cars and how the engine contributes to other aspects of the car. As an automotive technician with over 10 years of experience, he knew how they worked and loved taking them apart to see how they went back together. He was especially interested in the mechanics of combustion engines and loved finding ways to make them more efficient. He loves to work on cars and help people keep their vehicles running smoothly. As a senior editor, he enjoys contributing to Diy quickly because it allows him to share his knowledge and expertise with others.


