
How to Iron Nylon Fabric
Do you find your clothes wrinkled after a few hours of wear? Have you ever been scared to iron your delicate nylon fabric and make it worse? Do you ever find yourself frustrated while ironing nylon fabric? Don’t worry—ironing doesn’t have to be such a fearful process.
With the right techniques, ironing can even become enjoyable! This blog post will give you easy-to-follow step-by-step instructions on how to iron nylon fabric. You’ll soon master the art of pressing delicate materials with confidence in no time!
From choosing the right temperature setting on your iron to prepping your fabric correctly, we’ll walk you through each step—ensuring that when all’s said and done, all that’s left is a crisp, wrinkle-free piece of fabric. So let’s get started!
What to Keep in Mind When Ironing Nylon Fabric?
1. Heat
When it comes to nylon fabric, the most important factor is heat. Nylon can easily melt and burn when ironed at too high of a temperature. So, it’s important to use the lowest setting possible on your iron that will still remove wrinkles from your fabric.
That being said, not every type of nylon fabric requires the same low temperature. Nylon fibers come in different types, and each type has its own ironing instructions. Knowing the exact name of your nylon fabric is key to finding the appropriate heat setting for your iron.
2. Stretching
Nylon fabric is very prone to stretching. To avoid stretching and distorting the shape of your garment, it’s important that you don’t pull or stretch the fabric while ironing. Instead, hold the iron still as you move it across the material in even strokes—this will prevent any unwanted changes to the shape of your garment.
3. Prepping
Before you start ironing, it’s important to prepare your fabric correctly. This will ensure that the heat from the iron is evenly distributed and there are no unwanted creases or wrinkles. First, make sure to turn the fabric inside out and press on the wrong side of the material. Then, lay the fabric flat on your ironing board and cover it with a damp cloth. This will help to keep your nylon fabric from sticking to the iron while you press it.

Preparing Your Fabric for Ironing
Before you start to press your fabric with an iron, it’s important to prepare it correctly. Start by turning the fabric inside out and pressing on the wrong side of the material. This will help to protect the design or pattern from any damage caused by heat.
Once you’ve done that, lay your fabric flat on an ironing board and cover it with a damp cloth. This will keep your nylon fabric from sticking to the board while you press it, preventing any unwanted creases or wrinkles.
Required Items
To start, you’ll need a few items to get the job done
- An ironing board
- An iron
- A damp cloth
- Nylon fabric of your choice
How to Iron Nylon Fabric in 10 Steps
Step 1: Check the Label
Check the care label on your garment to determine what type of nylon fabric you have. Also, refer to the ironing instructions on the care label for the required heat setting. Checking the label is important to ensure that you don’t damage your garment with too much heat.
Step 2: Set Up Your Ironing Board
Set up your ironing board and adjust it so that it’s at a comfortable height for you to iron. Make sure the surface of the board is covered with a clean cloth or sheet. Setting up your board correctly will help to prevent any creases caused by the ironing board itself.

Step 3: Preheat Your Iron
Turn on your iron and adjust the temperature setting according to the care label instructions. Allow it to heat up completely before moving on to the next step. Preheating your iron before you start will help to ensure that the heat is evenly distributed across the fabric.
Step 4: Place Your Nylon Fabric on the Board
Once your iron is preheated, place the nylon fabric on the board. Make sure it’s flat and not wrinkled or bunched up. This will prevent any accidental creases or wrinkles. Also, check that the damp cloth is still covering the fabric.
Step 5: Start Ironing
Start ironing your nylon fabric using slow and steady movements. Keep the iron still as you move it across the material in even strokes to prevent stretching or distortion of the fabric. Remember to use a low-temperature setting on your iron—this will help to keep your fabric from melting or burning.
Step 6: Iron the Seams and Trim
Iron around any seams and trim to get rid of any unwanted wrinkles. Be careful not to press down too hard on these areas, as this could cause damage to the fabric. A light pressure is all you need to achieve a smooth finish.
Step 7: Move the Iron into Sections
To get rid of any stubborn wrinkles, move the iron into small sections. This will help to ensure that all of the fabric is pressed and all wrinkles are removed. Again, use light pressure and slow movements as you do this.
Step 8: Allow Fabric to Cool Down
Once you’ve finished ironing, allow the fabric to cool down for a few minutes before moving it. This will help to lock in the crisp, wrinkle-free finish that you achieved with your iron. Allowing the fabric to cool down will also help to prevent any accidental stretching or distortion.
Step 9: Hang Up the Garment
Once your garment has cooled down, it’s time to hang it up! To keep your garment looking crisp and wrinkle-free for longer, hang the fabric on a clothes hanger instead of folding it. This will help to keep the fabric from creasing, resulting in a smoother finish.
Step 10: Enjoy Your Crisp Fabric!
Congrats—you’ve finished ironing your nylon fabric! Now, all that’s left is to enjoy and admire your crisp, wrinkle-free piece of fabric. Just remember not to leave the fabric in direct sunlight, as this could cause discoloration or fading.
Ironing nylon fabric may seem like a daunting task at first, but with these 10 steps you’ll be creating perfect pieces of wrinkle-free fabric in no time! Now that you know how to iron nylon fabric, there’s nothing stopping you from achieving flawless results every time.
6 Safety Precautions to Follow When Ironing Nylon Fabric
Ironing nylon fabric requires special care to ensure you don’t overheat or burn the fabric. Follow these safety tips so that your projects turn out perfectly!
- Always read and follow the instructions on the care tag of any garment made with nylon fabric before ironing. Allowing the fabric to cool after ironing is typically recommended. Also, be sure to check the fabric type and temperature settings.
- Select the right iron setting for the nylon fabric you are working with. Nylon can melt if heated too high, so it is important to use a low heat setting such as “silk” or “nylon” on your iron’s temperature dial.
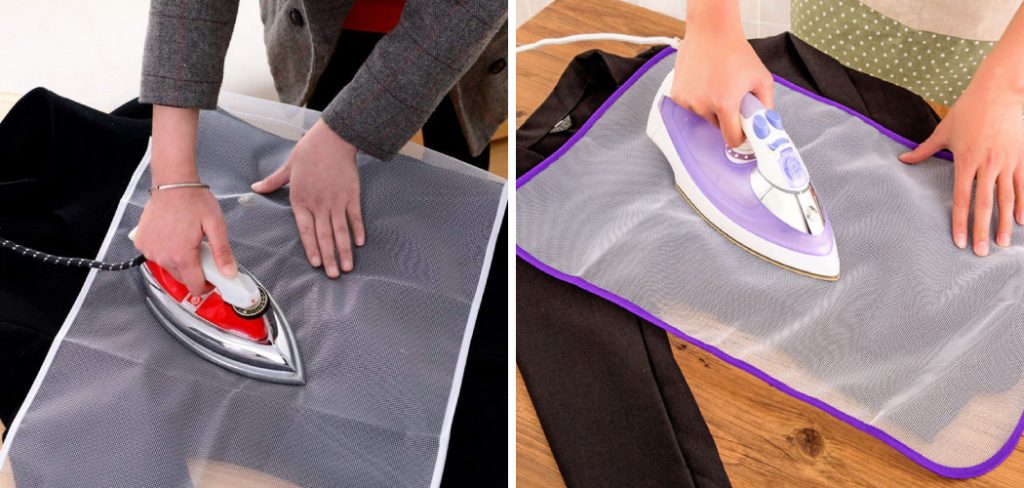
- Do not iron directly on the fabric with a hot iron. It is important to use a pressing cloth or press guard between your garment and your iron. This will help protect the nylon from any accidental damage caused by too much heat and pressure.
- Use a slow, steady motion when ironing nylon fabric so that you don’t overheat the fabric and cause it to melt. Using too much pressure can also cause the fabric to stretch or crease.
- Test a small hidden area first before ironing any delicate fabrics to be sure you don’t accidentally damage them with your iron setting or movements. Smaller items, such as lingerie, should be turned inside out and then ironed.
- If you need to steam brittle fabrics like nylon, use only a light mist of water and always keep the iron moving so it does not become overly hot in one place for an extended period of time.
Following these simple safety precautions will help ensure that your nylon fabric projects turn out perfectly every time!
Conclusion
Overall, learning how to properly iron nylon fabric is a fundamental skill for any fashion lover. The user-friendly steps discussed in this post are easy to understand and can help you iron your nylon fabrics with ease. But more than that, mastering the art of ironing your clothes can be a source of pride and joy for any individual who takes the time to understand the delicate processes involved.
Not only will you look stylish after perfecting the art of ironing, but you’ll also get your task done faster and better. So don’t wait around – start concerning up on how to iron nylon fabric today! You may find that it could be one of the most satisfying tasks in everyone’s wardrobe management routine. Now go ahead, take those wrinkled garments in hand, and let them shine again!
Nancy Behan
Nancy is an embroidery artist, fashion blogger and a full time editor at DIY quickly. Nancy edits the fashion section on DIY quickly, focusing on the embroidery and cross stitch articles, alongside with fabric and other costume design elements. She graduated from the University of Michigan with a Bachelor of Arts in Art History. She loves to work on her own projects, read books and watch romantic movies in her spare time.


