
How to Make a Fabric Heart
Fabric hearts are charming and versatile creations that can serve a multitude of purposes, from heartfelt decorations in your home to thoughtful gifts for loved ones. These handcrafted treasures often carry personal meaning, making them cherished items for any occasion.

The process of making a fabric heart involves selecting your materials, cutting out heart shapes, sewing them together, and adding unique embellishments to reflect your style. Learning how to make a fabric heart allows for creativity and an enjoyable crafting experience, perfect for beginners and seasoned crafters. Handmade crafts foster a sense of accomplishment and personal connection, as each piece is infused with your personality and intention.
Materials and Tools Needed
To create your fabric heart, you’ll need the following materials:
- Fabric: Choose your preferred material, such as cotton or felt.
- Stuffing: Polyester fiber fill, cotton, or any suitable filling.
- Thread: Matching or contrasting thread for sewing.
- Embellishments: Optional items like buttons, lace, or ribbons for decoration.
Gather these essential tools:
- Scissors: For cutting fabric and threads.
- Sewing Needle or Sewing Machine: Depending on your sewing preference.
- Pins: To hold fabric pieces in place while sewing.
- Fabric Marker: This is used to trace your template onto the fabric.
Additionally, you may consider optional items such as ribbons to attach to your fabric heart or various buttons and charms to enhance its design.
Choosing and Preparing the Fabric
When choosing the fabric for your heart, consider materials that fit your aesthetic and provide the right texture and durability. Cotton is a popular choice due to its versatility, softness, and ease of handling, while felt offers a thicker and warmer option, ideal for more structured hearts.

As you browse, pay attention to patterns and colors that resonate with your theme; florals may be perfect for a romantic touch, while bright colors can create a cheerful vibe. Before diving into crafting, washing, and ironing your selected fabric to remove any dirt or wrinkles, ensure a smooth and clean surface for your project. Washing also helps pre-shrink the fabric, preventing any distortion after your heart is completed.
Creating the Heart Template
To create your heart template, start by drawing a heart shape on a piece of sturdy paper or cardstock. Aim for a size that aligns with your intended use — larger hearts might serve as statement decor, while smaller ones can be lovely accents. Once you’re satisfied with your heart shape, carefully cut it out to use as a template. This guide will ensure consistency and precision when cutting your fabric pieces, ultimately leading to a beautifully finished fabric heart.
Cutting the Fabric
Now that your heart template is ready, it’s time to cut the fabric. Begin by pinning the paper template securely to your chosen fabric, ensuring it’s flat and does not shift. Once pinned, use a fabric marker to trace around the template, following the heart shape carefully. This step is crucial as it creates a clear outline for cutting.
After tracing, remove the paper template and use sharp fabric scissors to cut out two identical heart shapes from the fabric. Take your time during this process to ensure clean, precise cuts, as this will affect the overall appearance of your finished fabric heart.
How to Make a Fabric Heart: Sewing the Fabric Hearts
Aligning the Fabric Pieces
With the two fabric heart pieces cut out, it’s time to sew them together. Place the fabric heart pieces together with the right sides facing each other, ensuring the colors and patterns are on the inside. To keep them aligned, pin the edges carefully, making sure the layers do not shift while you sew.
Sewing the Heart
Now, you can begin sewing around the edges of the heart. Start at one point of the heart and sew all around, leaving a small gap of about two inches for turning and stuffing later. For a neat finish, it’s recommended to use a 1/4-inch seam allowance. Don’t forget to reinforce the starting and ending points by backstitching; this secures the stitches and prevents unraveling once the heart is turned right side out.

Turning the Heart Right Side Out
After sewing, it’s time to turn your fabric heart right side out. Carefully pull the fabric through the gap you left, ensuring you maintain the shape. To achieve defined seams and points, use a blunt tool — such as a chopstick or the end of a pencil — to push out the curves gently. Take your time, as this will enhance the overall appearance of your fabric heart.
Stuffing the Heart
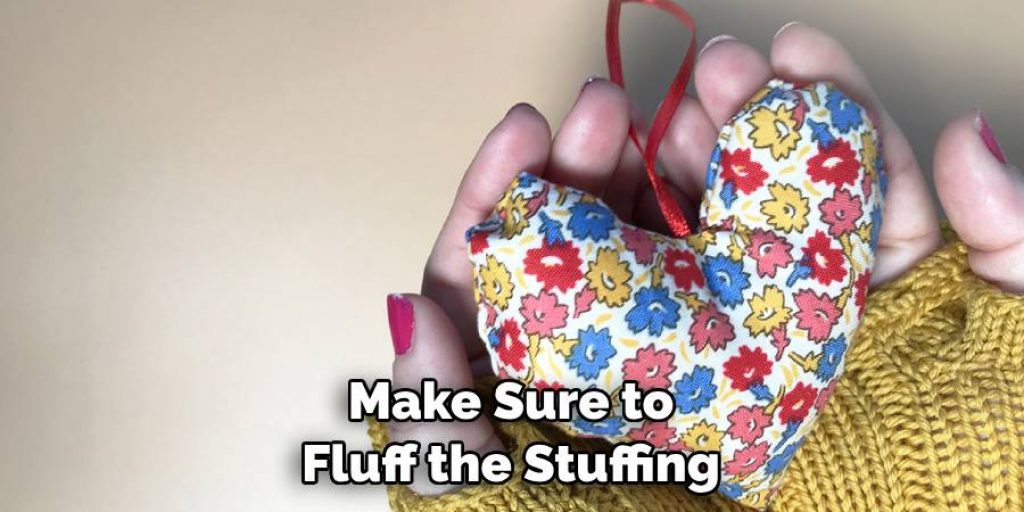
Once your fabric heart has been turned right side out, it’s time to add the stuffing to give it that delightful, plump shape. Begin by selecting your chosen filling material—polyester fiber fill is popular for its softness and resilience, while natural cotton provides a more eco-friendly option. Using a small amount at a time, start filling the heart through the gap you left earlier.
Make sure to fluff the stuffing as you go, packing it in gently to avoid lumps and creating an even distribution throughout the heart. Pay special attention to the corners and edges; ensuring these areas are adequately filled will help maintain your heart’s overall shape and appearance. A good rule of thumb is to stop stuffing when the heart feels firm yet still retains a certain level of softness.
Once you’re satisfied with the amount of stuffing, closing the gap is time. Carefully fold the raw edges inwards, pinning them together to create a smooth seam. This step may require patience, but it ensures a clean finish. Now you’re ready to sew the opening closed, secure the stuffing inside, and complete your fabric heart!
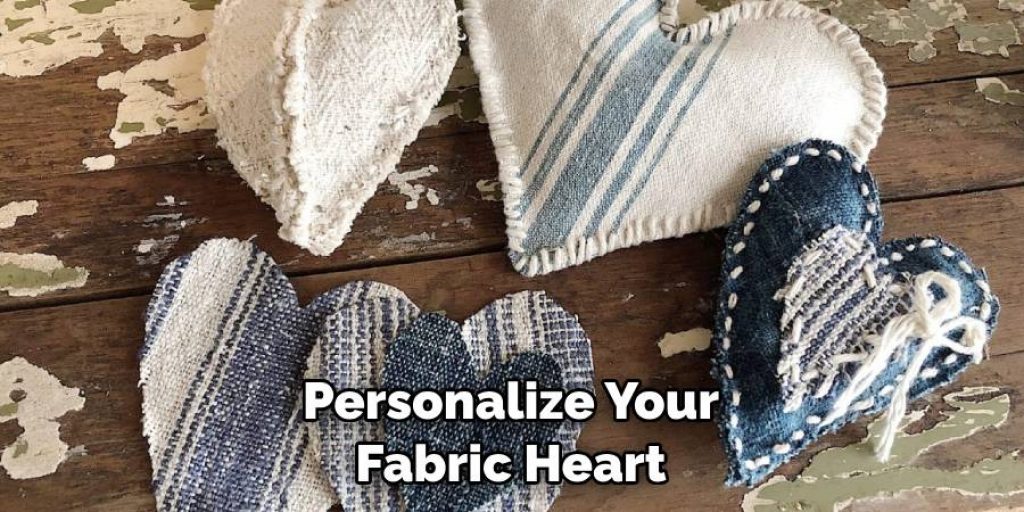
Adding Embellishments
Now that your fabric heart is stuffed and the opening is securely stitched, it’s time to personalize your creation with embellishments. This is where you can let your creativity shine! Consider adding decorative elements such as buttons, lace, or ribbons that resonate with your original theme.
For a whimsical touch, sew on a few buttons in complementary colors to create playful contrasts. Lace can be attached along the edges or across the heart for an elegant finish. If you have any ribbons, these can be tied into bows and sewn onto the heart or used to create a loop for hanging purposes.
When adding embellishments, think about balance and placement. You want your decorations to enhance the overall aesthetic without overwhelming the design. Experiment with the layout before permanently securing anything in place; this may involve laying pieces out on the heart without committing to stitches initially.
Once you’re satisfied with the results, sew each embellishment securely to ensure durability. Remember, this is your chance to infuse your fabric heart with personal flair, so feel free to mix textures and colors, creating a unique piece that truly reflects your style and intention. Enjoy the process of crafting, and take pride in the finished embellishments that bring your heart to life!
Using the Fabric Heart
Once your fabric heart is complete, it can serve a variety of delightful purposes, adding a personal touch to your home or as a thoughtful gift. If you created a larger heart, consider using it as a decorative pillow on your sofa or bed, providing a cozy accent that showcases your crafting skills. Smaller hearts can be perfect as keychains or bag charms, allowing you to carry a piece of your creativity with you wherever you go.
You can also use fabric hearts in seasonal decorations. For instance, they can be part of your Valentine’s Day décor, hung on a wall, or placed around your dining table as charming centerpieces. Additionally, these hearts can be made into festive ornaments during the holidays, adorning your Christmas tree, or being gifted as unique, handmade presents to loved ones.
Moreover, consider using your fabric hearts in special celebrations such as weddings or anniversaries. They can be personalized with names or dates and used as lovely keepsakes for guests to remember the occasion. Their versatility and charm make them beautiful craft projects and meaningful additions to any event or décor.
Frequently Asked Questions About Fabric Hearts
What Materials Do I Need to Make a Fabric Heart?
To create a fabric heart, you will need fabric (of your choice), stuffing material (like polyester fiber fill or cotton), sewing pins, a needle and thread (or a sewing machine), scissors, and optional embellishments such as buttons, lace, or ribbons.
How Do I Ensure My Fabric Heart Is Well-Stuffed?
Add small amounts of filling at a time for optimal stuffing, fluffing it gently for an even distribution. Pay close attention to the corners and edges to maintain the heart’s shape. Stop when the heart feels firm yet retains a soft quality.
Can I Machine Sew My Fabric Heart?
Yes, you can use a sewing machine to construct your fabric heart. For durability, follow a 1/4-inch seam allowance and backstitch at the beginning and end.
How Can I Personalize My Fabric Heart?
There are countless ways to personalize your fabric heart! You can choose unique fabrics that reflect your style, add embellishments like buttons or lace, or even embroider names or dates for special occasions.
How Should I Care for My Fabric Heart?
Care will depend on the materials used. If machine-washable fabric is used, you can gently wash and air-dry it. For delicate embellishments, spot cleaning may be a better option to maintain the heart’s appearance.
Conclusion
In summary, learning how to make a fabric heart involves selecting fabric, creating a template, cutting, sewing, stuffing, and embellishing your project. Each step contributes to crafting a unique piece that reflects your style. Don’t hesitate to experiment with various fabrics and decorations; the possibilities are endless. Handmade crafts bring joy, allowing you to express creativity while producing gifts and decor that carry personal significance. Embrace the process and cherish each heart you create!
Elizabeth Davis
Elizabeth is a creative writer and digital editor based in the United States. She has a passion for the arts and crafts, which she developed from a young age. Elizabeth has always loved experimenting with new mediums and sharing her work with others. When she started blogging, she knew that DIYquickly would be the perfect platform to share her tutorials and tips. She's been writing for the blog from the beginning, and her readers love her helpful advice and easy-to-follow instructions. When she's not writing or editing, Elizabeth enjoys spending time with her family and friends.


