
How to Make a Fall Burlap Wreath
As the leaves transform into vibrant hues of red, orange, and gold, fall decor becomes a delightful way to embrace the change of season. Wreaths, in particular, have gained widespread popularity for their ability to welcome guests and set the tone for autumn festivities.
The charm of DIY wreaths lies in their unique ability to reflect personal style and creativity, allowing individuals to customize their designs with seasonal elements like faux leaves, pumpkins, and berries. In this article, we will detail how to make a fall burlap wreath, guiding you through each step from gathering materials to adding the perfect finishing touches. With a little time and effort, you can create a beautiful wreath that enhances your home’s aesthetic and encapsulates the warmth and joy of the fall season.
Materials and Tools Needed
To successfully create your fall burlap wreath, gather the following materials and tools:
Materials
- Burlap Ribbon: Choose a roll of burlap ribbon in a color that complements your fall theme, such as natural brown or vibrant orange.
- Wire Wreath Frame: Choose a sturdy wire frame in your preferred size, typically 12 to 18 inches in diameter.
- Fall Decorations: Incorporate a variety of fall-themed decorations, including faux leaves, small pumpkins, berries, pinecones, and acorns to bring your wreath to life.
Tools
- Scissors: Essential for cutting the burlap strips and any additional materials you may need.
- Hot Glue Gun: This is used to secure decorations to the burlap and wreath frame, providing a durable bond.
- Floral Wire: Useful for attaching the burlap securely to the frame and keeping decorations in place.
- Wire Cutters: These are helpful for trimming floral wire to your desired lengths for a neat finish.
Optional Items
- Ribbons: Consider adding ribbons in autumn colors to enhance the wreath’s charm.
- Bows: Create a beautiful bow to incorporate as a focal point.
- Additional Embellishments: For an extra touch, experiment with other decorative items, such as glittery accents or seasonal ornaments.

Preparing the Burlap Ribbon
Selecting the right burlap is crucial to creating a stunning fall burlap wreath. Look for burlap in warm, autumnal colors such as deep oranges, browns, and rustic creams that resonate with the fall season. A medium-weight burlap will offer the ideal balance between being sturdy enough to hold its shape while still remaining flexible when creating loops.
Once you’ve chosen your burlap, cut it into manageable strips. A common size is approximately 6 inches wide and 10 to 12 inches long, but the dimensions can be adjusted based on your preference for the loop size and the overall fullness of the wreath. Make clean, straight cuts using scissors to ensure the edges are even.
Burlap tends to fray easily, so using a few techniques to prevent this is beneficial. To minimize fraying, you can seal the edges of the burlap strips with fabric glue or a lighter, carefully running it along the cut edges for a more polished finish. Additionally, consider folding the edges inward before attaching them to the frame; this can give a neater appearance and help maintain the integrity of the burlap throughout the crafting process.
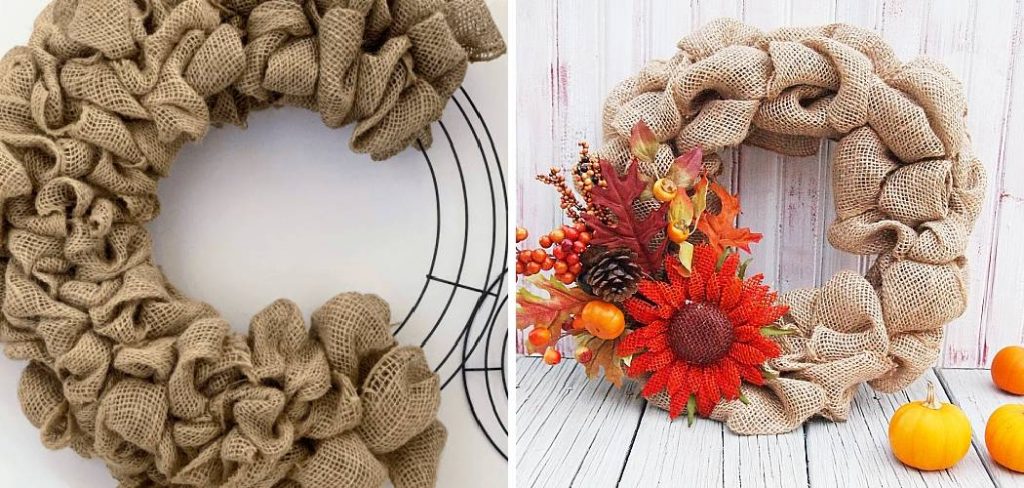
How to Make a Fall Burlap Wreath: Attaching Burlap to the Wreath Frame
1. Securing the Burlap
To begin attaching burlap to the wreath frame, take one end of your pre-cut burlap strip and secure it to the frame using floral wire or a hot glue gun. It’s essential to ensure that the burlap is firmly anchored to prevent slipping as you work. A tight attachment here will lay the foundation for the consistent loops you’ll create, setting the stage for a beautifully crafted wreath.
2. Creating Loops
Once secured, start forming loops with the burlap by pushing it through the sections of the wire frame. As you create each loop, adjust its size according to your desired fullness. Alternate the sizes of the loops for a more textured and dynamic look. This variation will enhance the visual appeal and contribute to a more balanced overall design. Ensure that the loops are placed with consideration to their spacing, allowing them to be evenly distributed around the wreath frame.

3. Filling the Frame
Continue the process by weaving the burlap through the frame and repeating the looping technique until the frame is adequately filled. Regularly adjust and fluff the loops to achieve a uniform appearance. Pay attention to gaps and adjust any loops to ensure that every section of the frame is populated with burlap. Once you’ve filled the frame completely, secure the burlap strip’s end using floral wire or hot glue. This final step will cement your hard work and ensure a polished finish to your fall burlap wreath.
Adding Fall Decorations
Choosing Decorations
To infuse your fall burlap wreath with seasonal charm, select a variety oSelect various fall-themed decorations to infuse your fall burlap wreath with seasonal charm fall-themed decorations. Faux leaves in vibrant shades of red, orange, and yellow can add warmth and contrast, mimicking the stunning colors of autumn foliage. Small pumpkins—whether in traditional orange or in more unique hues—can serve as delightful focal points.
Berries, especially in deep red or cranberry shades, contribute a pop of color and texture. Additionally, incorporating natural elements like pinecones and acorns will enhance the rustic feel of your wreath, bringing a piece of the outdoors inside. Consider a cohesive color scheme that harmonizes with your burlap’s tones when choosing decorations. For instance, pairing warm earth tones with bright pops of color can create a visually appealing contrast, while a monochromatic palette can exude elegance and simplicity.
Attaching Decorations
Once you’ve chosen your decorations, it’s time to bring your wreath to life by attaching them securely. Start with larger elements, such as pumpkins or clusters of faux leaves, and use a hot glue gun to affix them to the burlap loops and wireframe. Position these prominent decorations first, as they will set the tone for the visual hierarchy of the wreath.
Once the larger items are in place, fill in the gaps with smaller embellishments like berries, pinecones, and acorns. Apply hot glue to ensure that each decoration is securely attached, as this will prevent them from shifting or falling off over time. As you place each piece, consider their arrangement and how they balance visually against one another to ensure a harmonious look. Aim for an even distribution across the design, paying attention to the overall symmetry and flow of the wreath.

Adding Final Touches
Consider incorporating extra elements such as ribbons or bows that resonate with your fall theme to polish off your wreath. A burlap or plaid bow can add an additional layer of texture and a charming focal point. After attaching all decorations, take a moment to fluff and adjust the burlap and additional elements to ensure that they’re well-distributed and that the overall appearance is inviting and balanced. This final adjustment will help your wreath maintain a lush look while enhancing its festive feel.
Creating a Hanger for the Wreath
Creating a sturdy hanger for your wreath is essential for displaying it proudly on your door or wall. Begin by using floral wire to fashion a loop at the top of the wreath. Ensure that this loop is firmly secured to the frame to support the wreath’s weight when hung. For a polished appearance, make certain the hanger is properly aligned and positioned where it will not detract from the overall aesthetics.
If the floral wire isn’t readily available, consider alternative methods for creating a hanger, such as using a decorative ribbon that complements your wreath’s colors or even opting for pre-made hangers designed for wreaths, which can provide a quick and easy solution. With your wreath completed and ready to hang, you’ll be prepared to greet the fall season in style!
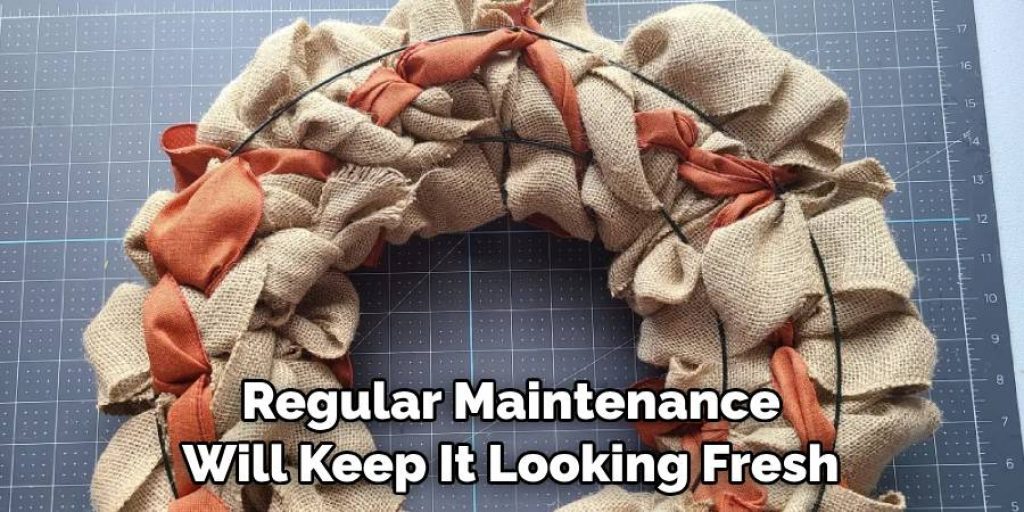
Tips for Preserving Your Wreath
To ensure your fall burlap wreath maintains its charm, proper storage is key. When not in use, store the wreath in a cool, dry place, ideally in a cardboard box to shield it from dust and moisture. If your wreath is displayed outdoors, protect it from harsh weather conditions by taking it down during adverse weather, such as heavy rain or strong winds, which can cause damage to both the burlap and decorations.
To clean, gently brush off any dust with a soft cloth or a feather duster. If your wreath is particularly soiled, spot-clean it with a damp cloth, but avoid soaking the burlap. Regular maintenance will keep it looking fresh and vibrant season after season.
Conclusion
In summary, creating a fall burlap wreath involves securing burlap to a frame, adding decorative touch points, and finishing with a sturdy hanger. Remember, how to make a fall burlap wreath is a versatile craft that invites personalization; feel free to experiment with various decorations and themes to make it uniquely yours.
Crafting seasonal décor like this enhances your front door and brings joy and warmth to your home, welcoming guests with the spirit of autumn. Embrace the creativity of making your own wreath and enjoy the satisfaction of your handcrafted masterpiece!
Elizabeth Davis
Elizabeth is a creative writer and digital editor based in the United States. She has a passion for the arts and crafts, which she developed from a young age. Elizabeth has always loved experimenting with new mediums and sharing her work with others. When she started blogging, she knew that DIYquickly would be the perfect platform to share her tutorials and tips. She's been writing for the blog from the beginning, and her readers love her helpful advice and easy-to-follow instructions. When she's not writing or editing, Elizabeth enjoys spending time with her family and friends.


