How to Make Book Trees
Are you looking for a fun and creative way to display your favorite books? Look no further than book trees! These unique displays are visually appealing and functional as you can easily store and access your books.
How to make book trees is a delightful and imaginative way to repurpose old or unused books while adding a touch of whimsy to your home or event decor. These unique sculptures can range from simple, small arrangements to elaborate, towering designs that inspire creativity and promote a love for reading. Whether you’re looking to craft a holiday centerpiece, a decorative item for your bookshelf, or a playful project for children, making book trees is an enjoyable activity that allows you to express your artistic flair.
This guide will explore the materials needed, the step-by-step process, and tips to help you bring your book tree vision to life.
What Will You Need?
To make a book tree, you’ll need the following materials:
- Books of various sizes and thicknesses
- A base for your book tree (can be a wooden block, vase, or any sturdy object)
- Scissors
- Glue or tape
- Decorative items (optional) such as ribbon, flowers, ornaments, etc.
Once you have all the necessary materials, it’s time to get creative and start building your book tree!
10 Easy Steps on How to Make Book Trees
Step 1. Choose Your Books:
Selecting the right books is a crucial first step in crafting your book tree. Consider using books with varying sizes, shapes, and colors to create a visually dynamic arrangement. Old or unused books work best, as they can be repurposed without concern for damaging valuable editions. Select books with covers that complement your intended decor or theme, whether it’s festive, rustic, or whimsical. Mixing genres—such as fiction, non-fiction, and children’s books—can create an engaging narrative element within your display.
Aim for a good balance of thickness and size; larger, thicker books can serve as a sturdy foundation, while smaller volumes can add layers and intricacy on top. Don’t hesitate to incorporate personal favorites or books that hold sentimental value, as this adds a unique touch to your creation.

Step 2. Prepare Your Base:
The stability of your book tree largely depends on the base you choose. Begin by selecting a sturdy object that can support the weight of your books; this could be a wooden block, a vase, or even a cake stand. If necessary, reinforce the base with glue or tape to ensure it remains steady during the construction of your tree. Once your base is secured, ensure it is clean and free of any dust or debris; this will help your book tree stand out and look its best. Consider the height and shape of your base with the books you’ve selected, as this will influence the overall appearance of your book tree. A well-chosen base sets the foundation for an impressive display!
Step 3. Arrange Your Books:
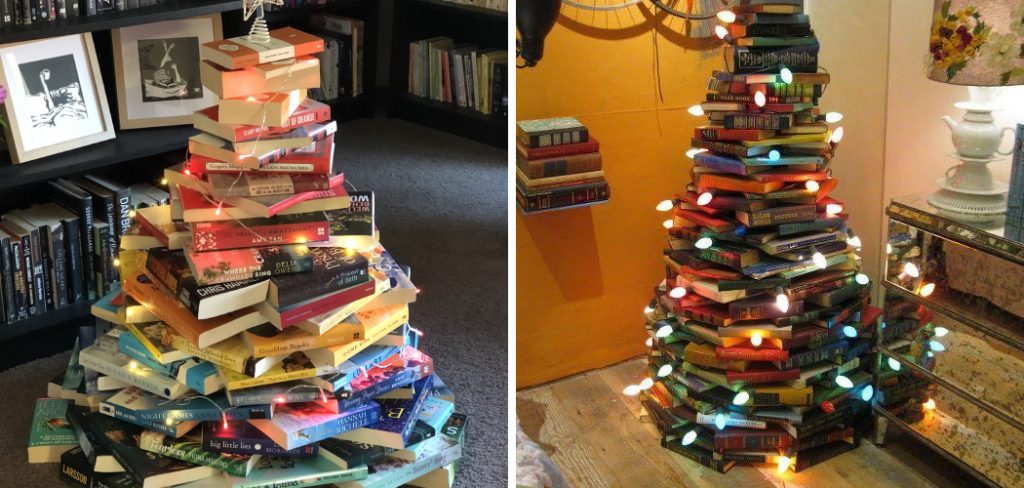
Now comes the exciting part: arranging your books into a tree shape! Start by laying out your larger, thicker books as the base layer at the bottom. This provides stability and gives your book tree a solid foundation. Gradually work your way up, adding smaller books and varying their positions to create an aesthetically pleasing tiered effect. Feel free to experiment with angles; some books can be placed upright while others are stacked flat to add dimension. As you build, take a step back occasionally to assess your tree’s overall shape and balance. Trust your instincts—this is a creative process, and there’s no right or wrong way to arrange your books.
Step 4. Secure the Books:
Once you have your books arranged in a pleasing shape, it’s essential to secure them to ensure your book tree remains stable. Use glue or tape to affix the books together at the contact points where they touch. For stacked books, apply a small amount of glue on the spine or the edges where they meet. If you’re using tape, place it strategically to avoid visibility, preserving the aesthetic appeal of your tree. Allow any glue to dry completely before moving on to the following steps, as this will help maintain the integrity of your structure during construction. Additionally, ensure a smooth transition between books so the tree looks cohesive and well-finished. This foundational step not only enhances the durability of your book tree but also allows you to proceed with decorating and personalizing your creation with confidence.

Step 5. Add Decorative Items:
Now that your book tree is securely assembled, it’s time to infuse your creation with personality by adding decorative items. This is where your artistic flair can truly shine! Consider incorporating ribbons, ornaments, faux flowers, or seasonal decorations that complement your theme. You should wrap ribbons around certain books, intertwine faux greenery throughout, or place small ornaments on the branches of your book tree to enhance its festive feel. Be mindful of balance and harmony—too many decorations can detract from the books’ beauty, while too few might leave the tree looking sparse. Take a moment to step back and evaluate how your decorative items harmonize with the structure.
Step 6. Final Touches and Adjustments:
After adding your decorative items, it’s time for the final touches that will give your book tree a polished and complete look. Inspect your tree from different angles and make any necessary adjustments to the arrangement of the books or decorations. Ensure that all elements are secure and that the overall structure is balanced. You may want to add a star or a small decorative item on top to create a focal point that draws the eye upward. If you find any empty areas lacking visual interest, consider filling those spaces with minor decorative elements or additional books. Once satisfied with the final arrangement, take a moment to appreciate your unique creation, combining creativity and the joy of reading into a beautifully crafted display.

Step 7. Lighting Your Book Tree:
To elevate your book tree further, consider incorporating lighting elements that add warmth and charm to your display. Select string lights, fairy lights, or even small LED candles that can be safely placed among the books without posing a fire hazard. Carefully weave the lights through your book tree’s branches, ensuring they are evenly distributed to create a soft glow. This added illumination enhances the visual appeal and creates a cozy atmosphere, perfect for festive gatherings or quiet reading nights. Just ensure the lights are plugged in safely and aren’t left unattended.
Step 8. Create a Themed Environment:
Enhancing the surroundings of your book tree can transform it into a focal point of your space. Consider setting up an area that complements your book tree’s theme. For instance, if your book tree features a holiday theme, add a cozy blanket, matching cushions, and some hot cocoa nearby to create an inviting reading nook. Incorporate related decor items such as bookends, framed pictures, or themed ornaments that echo the essence of your tree. You can create a cohesive and immersive experience for yourself and your guests by crafting a themed environment around your book tree.
Step 9. Maintain Your Book Tree:
Once your book tree is complete, it’s crucial to maintain its beauty. Regularly dust the books and decorative items to prevent any buildup that could detract from your display. Pay special attention to any lighting elements to ensure they remain functional. If you’ve used natural elements such as flowers or greenery, check periodically for signs of wilting and replace them as needed. Maintaining your book tree keeps it looking fresh and allows you to enjoy and appreciate your creative effort throughout the season.
Step 10. Share Your Creation:
Finally, don’t forget to share the results of your hard work! Capture photographs of your book tree from different angles, showcasing its structure and the details of your decorations. Share these images on social media platforms or with friends and family to inspire them with your creative project. You might even consider hosting a small gathering to showcase your book tree in person, allowing others to appreciate the fusion of creativity and literature. Celebrating your creation brings you joy and can spark new ideas and projects among fellow book lovers.

By following these steps, you can transform your love for books into a beautiful and unique book tree display that all will admire.
Conclusion
How to make book trees is a delightful way to celebrate both your passion for literature and your artistic abilities.
By following the steps outlined in this guide, you can construct a stunning display that showcases your favorite books and adds a personal touch to your home decor. Remember, the beauty of a book tree lies in its individuality, so feel free to experiment with different materials, decorations, and themes to make it your own. As you gather around your completed book tree, take pride in your creativity and the joy it brings to your space and those who share it with you.
Embrace the magic of storytelling and let your book tree inspire others to embark on their creative journeys.
Elizabeth Davis
Elizabeth is a creative writer and digital editor based in the United States. She has a passion for the arts and crafts, which she developed from a young age. Elizabeth has always loved experimenting with new mediums and sharing her work with others. When she started blogging, she knew that DIYquickly would be the perfect platform to share her tutorials and tips. She's been writing for the blog from the beginning, and her readers love her helpful advice and easy-to-follow instructions. When she's not writing or editing, Elizabeth enjoys spending time with her family and friends.