How to Make Pen Wraps With Cricut
Are you tired of constantly losing your pens and pencils? Do you want to add a personalized touch to your writing tools? Then, making pen wraps with Cricut might be the perfect solution for you!
How to make pen wraps with cricut machine is a fun and creative way to personalise your writing instruments. Whether you’re looking to add a splash of color to your workspace, create memorable gifts for friends, or even promote a brand, pen wraps are a simple yet effective solution.
In this guide, we’ll walk you through the steps to design, cut, and apply your own unique pen wraps, transforming ordinary pens into personalized pieces that reflect your style and creativity. Let’s explore the exciting world of DIY pen wrapping!
What Will You Need?
Before diving into the process, let’s ensure you have all the necessary materials. Here are the items you’ll need to get started:
- Cricut cutting machine
- Cricut adhesive vinyl or heat transfer vinyl (depending on your preference)
- Standard grip mat
- Scissors
- Pen or pencil
- Ruler
- Design software (such as Cricut Design Space)
Gather all of these items before starting, and feel free to add any other supplies that you think might enhance your pen wrap design!
10 Easy Steps on How to Make Pen Wraps With Cricut:
Step 1: Measure Your Pens
To create perfectly fitting pen wraps, the first step is to measure the diameter and length of your pens. Using a ruler, take note of the circumference of the pen by wrapping the ruler around its widest part. For the size, measure from the top to the bottom of the pen. It’s helpful to write these measurements down for easy reference later on. This step is essential, as accurate measurements ensure that your pen wraps fit snugly without excess material.
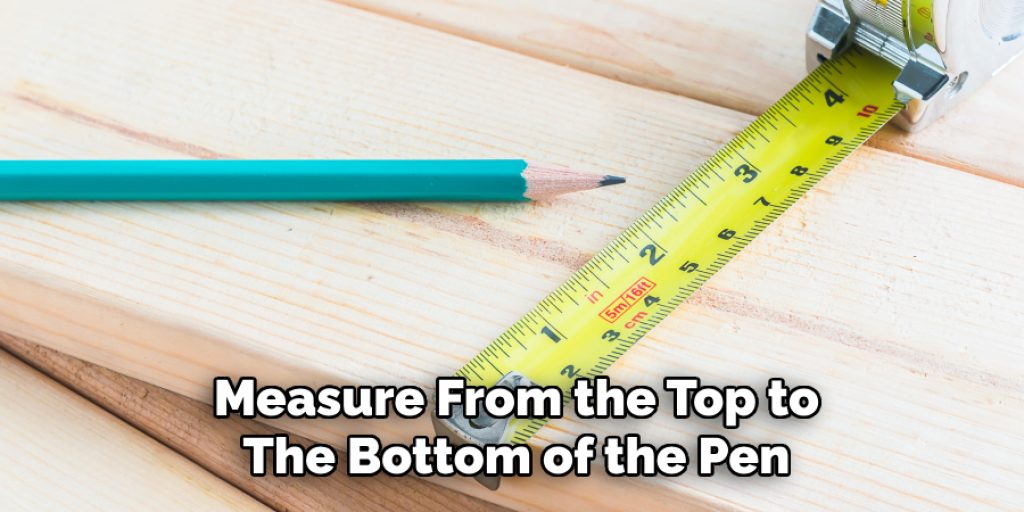
Additionally, consider the design and style of the pen; some may have clips or unique shapes that you’ll want to account for in your measurements. Once you have your dimensions, you’re ready to move on to the design phase, where you’ll create wraps that fit and reflect your personal flair!
Step 2: Design Your Pen Wraps
Now that you have your measurements, it’s time to get creative! Open your design software, such as Cricut Design Space, and start a new project. Set the canvas size according to the dimensions you measured. You can design each pen wrap from scratch or choose from a variety of templates and graphics available online. Personalize your wraps by adding text, patterns, or images that reflect your style.
Consider using bright colors or fun designs to make your pen wraps stand out. Once you’re happy with your design, ensure it fits within the dimensions you recorded earlier, and save it for cutting.
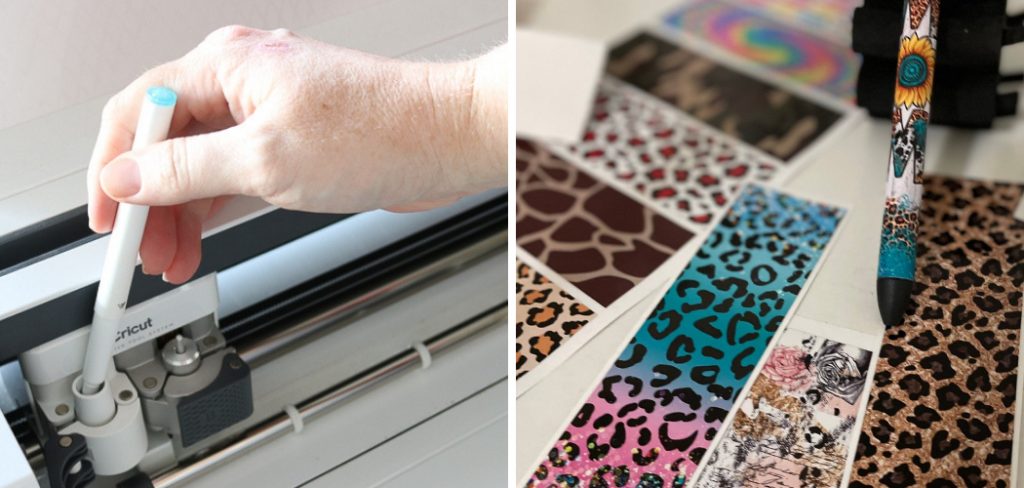
Step 3: Cut the Vinyl
With your design ready, it’s time to cut! Load your Cricut cutting machine with the vinyl you’ve chosen. If you’re using adhesive vinyl, place the shiny side on your standard grip mat. Follow the prompts in your design software to select the correct material setting and cut the design. Pay close attention to the cutting process, ensuring the machine cuts cleanly without tearing the vinyl. Once the cutting is complete, carefully unload the mat and remove the vinyl.
Step 4: Weed the Design
After cutting, you will need to weed the excess vinyl. Using a weeding tool or tweezers, gently peel away the parts of the vinyl that you don’t need, leaving only your design on the backing material. This step is crucial for ensuring a clean and professional-looking pen wrap. Take your time to make sure all the excess vinyl is removed, particularly around intricate designs.
Step 5: Apply Transfer Tape
To transfer your design onto the pen, cut a piece of transfer tape slightly larger than your design. Carefully place the transfer tape over the top of your weeded vinyl design, smoothing it to ensure no bubbles. This tape will help you to easily lift your design and position it on the pen without messing up its alignment.
Step 6: Adhere the Design to the Pen
Now that your design is prepared with transfer tape, it’s time to apply it to the pen. Start by ensuring the surface of your pen is clean and dry to promote better adhesion. Position the pen on a flat surface and carefully peel the backing off the transfer tape, exposing your vinyl design.

Align the design onto the pen, taking care to center it properly and avoid any overlaps or twists. Once you’re satisfied with the placement, gently press the transfer tape onto the pen, starting from one end and working your way to the other to eliminate any air bubbles. Use a smooth tool, like a credit card or your finger, to firmly adhere the vinyl to the pen. After this, carefully peel away the transfer tape, ensuring your design sticks. If any part of the vinyl lifts, gently press it back down with your tool.
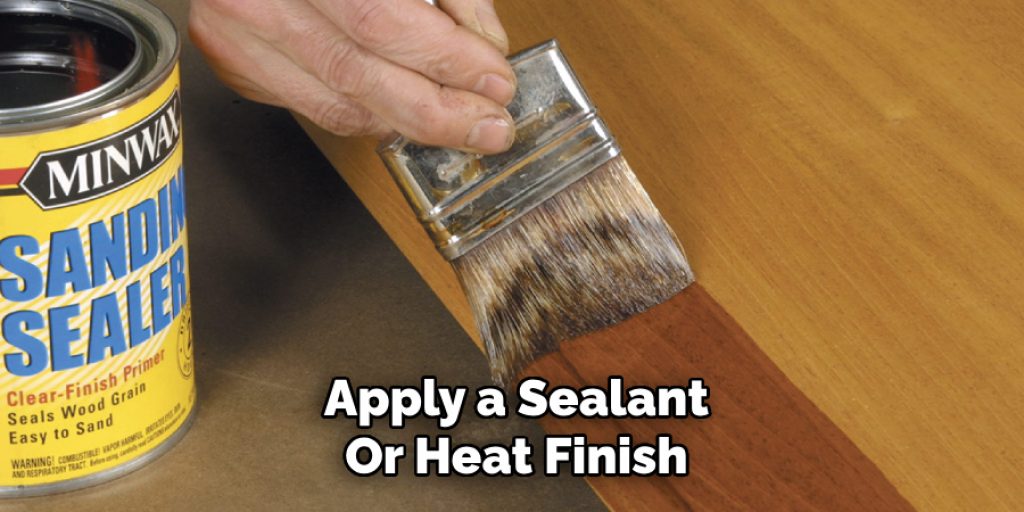
Step 7: Seal the Design
To ensure the longevity of your pen wrap and protect it from wear and tear, it’s essential to apply a sealant. Consider applying a clear acrylic sealer spray over the wrapped design if you’re using adhesive vinyl. Hold the spray can about 6-12 inches away from the pen and apply a light, even coat, allowing it to dry completely according to the manufacturer’s instructions.
For heat transfer vinyl, you may heat the design with an iron or heat press to help set the adhesive. This additional step will make your pen wraps more durable and resistant to daily use so that you can enjoy your personalized designs for longer!
Step 8: Trim Excess Vinyl
Once your design is sealed, the next step is to trim any excess vinyl from the edges of your pen wrap. Using sharp scissors, carefully cut around the edges of the wrap to remove any overlapping vinyl. Make sure to follow the contours of the pen for a smooth finish. This step will not only enhance the overall appearance of your pen but also prevent any parts of the vinyl from peeling over time.

A clean trim can give your pen a polished and professional look, showcasing the craftsmanship of your design. Take your time with this step to ensure a neat result.
Step 9: Test Your Pen Design
After completing your pen wrap, it’s time to put your creation to the test! Grab your pen and try writing to ensure that the wrap does not interfere with its functionality. Check for any areas where the vinyl might cause discomfort or grip issues while writing. This step is essential to confirm that your personalized pen remains as practical as it is stylish. If everything feels good, you can showcase your custom pen; if you notice any issues, consider adjusting the design or how it’s applied for future creations. Enjoy your unique and vibrant pen wraps!
Step 10: Share Your Creations
Now that you’ve crafted and tested your personalized pen wraps, it’s time to share them with the world! Consider documenting your process by taking photos at each stage, from design to application, showcasing your final product. You can share these images on social media platforms or crafting communities to inspire others to try their hand at creating custom designs. Engaging with fellow crafters can provide valuable feedback and ideas for future projects. Don’t forget to include any tips or tricks you’ve learned to help others achieve similar results. Enjoy the creativity and connection that comes from sharing your work!
By following these steps, you can easily create your custom pen wraps to add a touch of personality and flair to your writing instruments.
5 Things You Should Avoid
- Skipping the Design Planning: It’s tempting to jump straight into cutting, but you need to plan your design thoroughly to avoid mistakes. Sketch out your ideas and double-check the dimensions to ensure a good fit.
- Using Low-Quality Vinyl: Not all vinyl is created equal. Avoid using low-quality materials that may not adhere well or could tear during the cutting or welding process. Invest in suitable vinyl to ensure a professional finish.
- Neglecting Proper Cutting Settings: Different materials require different cutting settings. Ensure your Cricut machine is set to the right material type before starting the cut. This helps prevent miscuts and wasted materials.
- Rushing the Weeding Process: Weeding can be tedious, but hurrying through it can damage designs. To maintain the integrity of your design, take your time to carefully remove excess vinyl, especially around intricate details.
- Forgetting to Seal the Design: Skipping the sealing step can lead to a design that fades or peels. Always apply a sealant or heat finish, depending on your vinyl type, to make your pen wraps durable and long-lasting.
Conclusion
How to make pen wraps with cricut machine is a fun and rewarding project that allows you to express your creativity while personalizing your writing instruments.
By following the detailed steps outlined in this guide—from designing your wrap and applying it with care to sealing and trimming for the best finish—you can achieve professional-looking results. Remember to take your time, choose quality materials, and test your design for functionality.
Whether you’re making these pen wraps for yourself or as gifts, sharing your creations can inspire others in the crafting community. Embrace the joy of DIY and enjoy writing with your uniquely designed pens!
Elizabeth Davis
Elizabeth is a creative writer and digital editor based in the United States. She has a passion for the arts and crafts, which she developed from a young age. Elizabeth has always loved experimenting with new mediums and sharing her work with others. When she started blogging, she knew that DIYquickly would be the perfect platform to share her tutorials and tips. She's been writing for the blog from the beginning, and her readers love her helpful advice and easy-to-follow instructions. When she's not writing or editing, Elizabeth enjoys spending time with her family and friends.