
How to Make Sfx Makeup Wax
Making your own SFX makeup wax is a great way to save money, and it’s also a fun project. You can create any wax you need for your makeup projects, and you can customize the ingredients to get exactly the right consistency and properties you need. This tutorial will show you how to make sfx makeup wax that is perfect for creating wound effects.
Sfx makeup wax is a type of modeling compound, which can be used for many applications. It’s non-toxic and easy to use, making it perfect for beginners. Wax also comes in two different forms: liquid or pellets.
The liquid form is often easier to work with than the pellet form but requires more effort when storing since it needs to be kept cool at all times so that it doesn’t solidify before you’re ready to use it again. Read on t know more!
10 Ways on How to Make Sfx Makeup Wax:
1. Melt Down Some Crayons:
This is a great option if you want to make a colorful wax. Start by melting down some crayons in a pot on the stove. Make sure you melt them down completely. Then, pour the wax into a container and let it cool.
2. Use a Hair Dryer to Melt Down Chocolate:
If you want to make a chocolate wax, start by melting down some chocolate in a pot on the stove. Make sure you melt it down completely. Then, pour the wax into a container and let it cool.
3. Use Old Candles:
If you have any old candles lying around, you can use them to make wax. Just melt the candles down in a pot on the stove and pour the wax into a container.
4. Use a Blow Dryer:
You can use a blow dryer to melt the wax down quickly. Just pour the wax into a container, turn on your blow dryer, and hold it close enough to melt the wax. Make sure you don’t touch the wax with your blow dryer, though, because this could cause problems with your dryer.

5. Use a Microwave:
If you have a microwave, try using it to meltdown wax! To do this, put the wax in a microwave-safe container and place it in the microwave for a few minutes until the wax melts. Make sure not to leave it too long, though, because microwaves can melt the wax down quickly.
6. Use a Double Boiler:
If you have a double boiler, you can melt down wax quickly with it! Place the wax in the top part of the double boiler and place this on top of another pot containing some water. Heat the water on your stove until it boils; the boiling water in the bottom pot will heat the wax in the top part of the double boiler.
7. Make Some Candles:
If you want to make your candles, you can use wax in them! Try making some votive candles to start with because they are easy to melt down quickly. If you want a colored candle, add some crayons or melted chocolate to your wax.
8. Use Petroleum Jelly:
If you want to make a white wax, you can use petroleum jelly to make it. Just heat up some petroleum jelly on the stove, pour it into a container, and let it cool.
9. Use Wax Paper:
If you want to make some colorful wax that’s easy to clean up, try using wax paper! Just place the wax paper over whatever you are trying to color and iron it down. Make sure you heat up the wax paper thoroughly before attempting to color with it; otherwise, you could burn yourself!
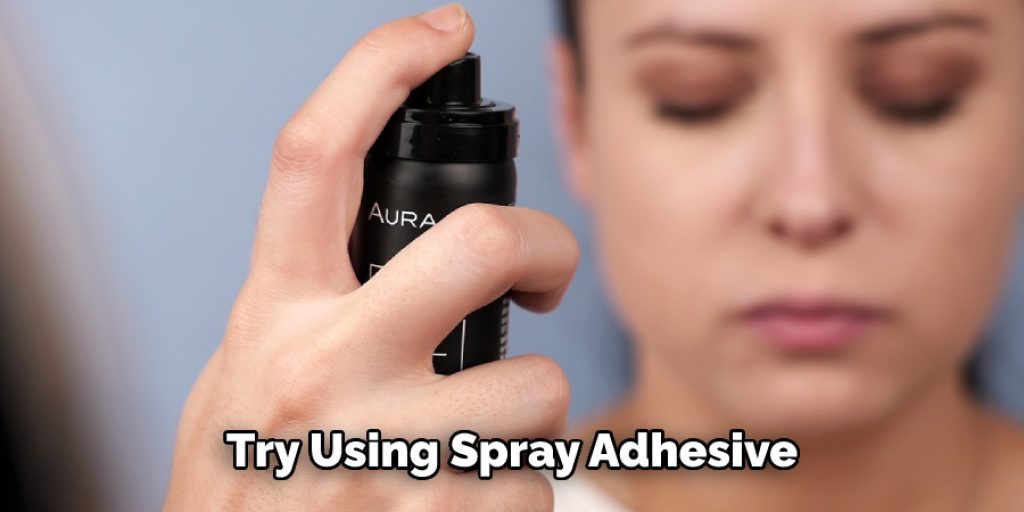
10. Use Spray Adhesive:
If you want to make some transparent wax, try using spray adhesive. Just lay the wax paper over whatever you are trying to color and mist it down with the spray adhesive. Let it dry and then color with crayons or melted chocolate.
Some Tips and Suggestions:
1. Don’t apply it to an area you can’t cover with petroleum jelly.
2. Don’t get it on your clothes if you are going out after wearing the makeup; it will melt the fibers of your clothes and leave stains.
3. Don’t get it on furniture, carpets, or rugs unless you don’t mind replacing them.
4. Don’t try to heat it. It will burn the skin around your fingernails.
5. Never use butter knives; they are not made for cosmetic purposes to leave bacteria.
6. If you have sensitive skin, do a scratch test before using it on your face or body areas that won’t be covered with clothing.
7. If you get it in your hair and can’t get all of it out, put conditioner on the affected areas and leave it on for a few minutes.
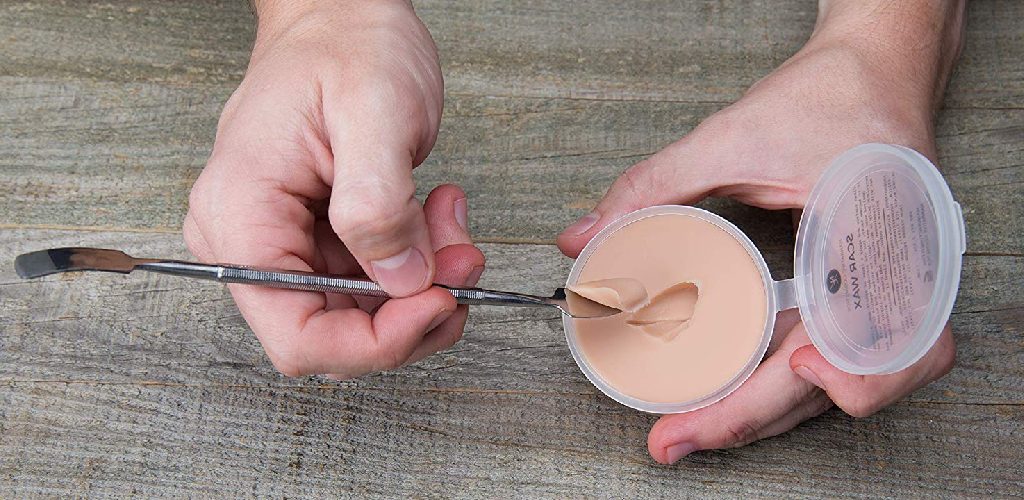
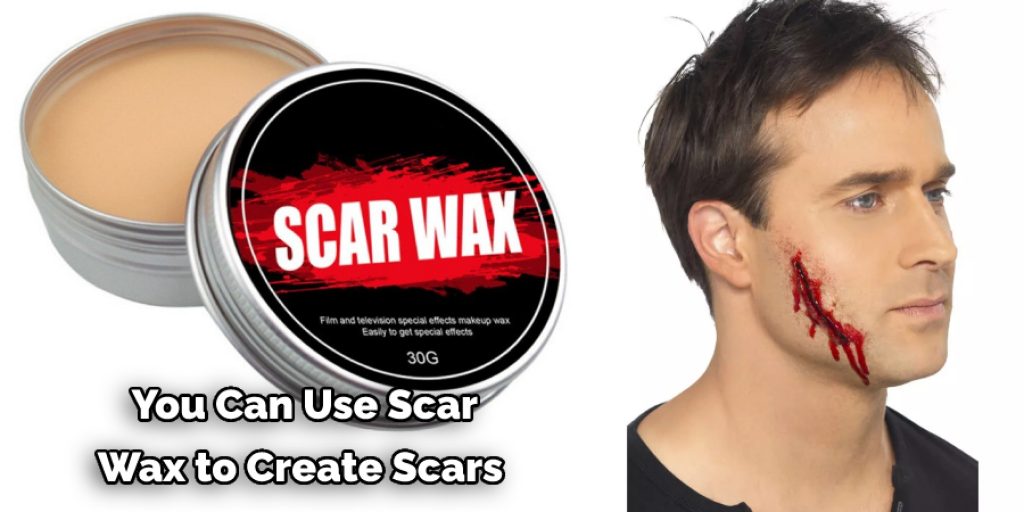
What Is Scar Wax Made of?
Scar wax is a soft wax used in the special effects industry to create scars, cuts, and other wounds. It is made from mineral oil jelly, a byproduct of petroleum. In addition, it may also include beeswax, paraffin, and pigment.
For safety purposes, most scar wax products are made with non-toxic pigments. However, you should avoid scar wax if you are sensitive to mineral oil jelly, petroleum products, beeswax, or any other ingredients known to cause reactions.
How to Use Scar Wax?
Scar wax is easy to use. First, soften the wax by heating it in a microwave or placing it in hot water. Then, using a brush or your fingers, apply the wax to the skin in the desired location. You can use scar wax to create scars of any size and shape.
Once the wax has cooled and hardened, you can apply makeup to the scar to give it a more realistic appearance. Be sure to blend the edges of the wax with the surrounding skin to create a natural look.
Conclusion:
SFX makeup wax is a hair and body adhesive that works as an effective barrier to water. It can be used on the skin, fake wounds, prosthetics, etc. If you’re looking for ways to make your own SFX makeup wax or just want more information about it in general, we’ve got the perfect article for you!
Waxing has been used since ancient times, and it’s still very popular today! You can use this simple tutorial on how to make Sfx makeup wax at home to get the perfect solution for removing unwanted hair from your face. Plus, by making it yourself at home, you will save lots of money too!
Jane Hubbard
Jane has always been passionate about hair and beauty. After many years of working as a hairdresser specialist, she decided to start her own consultancy business. She is an experienced haircare and beauty consultant, and she loves helping others find the perfect look for them. She has been writing articles for DIY quickly for over 3 years. In her free time she enjoys keeping up with the latest news in the industry, practicing yoga, and spending time with her friends and family.


