How to Make Sugar Wax in the Microwave
Are you looking for an easy way to wax at home? If so, then sugar waxing may be the perfect solution—it’s a simple, cost-effective alternative to salon treatments! This DIY method uses just three ingredients and a microwave oven.
It’s fast, efficient, and will leave you with smooth skin in no time. In this blog post, we’ll cover everything from the basics of how to make sugar wax in the microwave to best practices for application. With these tips and tricks under your belt, you can become an expert at waxing your body from the comfort of your own home!
How Long Does It Take to Make Sugar Wax in the Microwave?
Making sugar wax in the microwave is a relatively quick process, taking only about 10 minutes to complete. The exact amount of time it takes can vary depending on how hot the mixture gets and how much wax you are making.
To ensure that your sugar wax has reached its desired consistency, use a thermometer while cooking and stop when the temperature reaches 250 degrees Fahrenheit. You may also need to adjust the cooking time according to your microwave’s wattage.
If you’re using a high-wattage microwave, it will take less time to make your wax than if you were using a low-wattage one. Additionally, the more wax you are making at once, the longer it may take.
Once the wax has reached 250 degrees Fahrenheit, it is ready to be removed from the microwave and poured into the desired container for storage. Be sure to handle the sugar wax carefully after removing it from the microwave, as it will likely still be very hot. To cool down the wax more quickly, pour a small amount of cold water into the container. Allow the wax to cool completely before using it, as it may cause burns if used while still hot.

Making sugar wax in the microwave is a quick and easy way to get beautiful results for your hair removal needs. With just 10 minutes of cooking time, you’ll have perfect sugar wax every time!
What You’ll Need
To make sugar wax in the microwave, you’ll need:
- 1 cup granulated sugar
- 1/4 cup water
- 1/4 cup lemon juice
- Microwave-safe bowl
- Spatula
- Strip of cloth or paper towels
8 Steps How to Make Sugar Wax in the Microwave
Step: 1. Combine the Sugar and Water
In a microwave-safe bowl, combine the sugar and water. Stir until the sugar is completely dissolved. The amount of water you need will depend on the amount of wax you are making, but it is usually 2 parts sugar to 1 part water.
Put the bowl in the microwave and heat on high for 5 minutes. Take the bowl out of the microwave and stir it again to make sure all of the sugar has dissolved. Though it may seem that the water is boiling, there is a good chance that the temperature of the liquid has not reached its full potential yet. It is important to stir the mixture so that all of the sugar has been completely dissolved and the wax will not be too thick.

Step: 2. Add the Lemon Juice
Add the lemon juice to the sugar mixture and stir to combine. This will help break down the sugar and aid in creating a wax-like consistency. The lemon juice also helps keep the sugar from sticking to your skin.
Be sure to stir until all the sugar is dissolved and you can no longer see it in the mixture. This will help make sure that your sugar wax is smooth and easy to apply.
When you are done stirring, the mixture should resemble a thick syrup-like consistency. If it is too thin, add a bit more sugar and stir again. If it is too thick, add a bit more lemon juice and stir until the desired consistency is reached.
Step: 3. Microwave the Mixture
Place the bowl in the microwave and cook on high for 2 minutes. Remove the bowl from the microwave and stir the mixture. Return the bowl to the microwave and cook for an additional 2 minutes. Repeat this process until the mixture becomes thick and syrupy. This should take a total of 8-10 minutes.
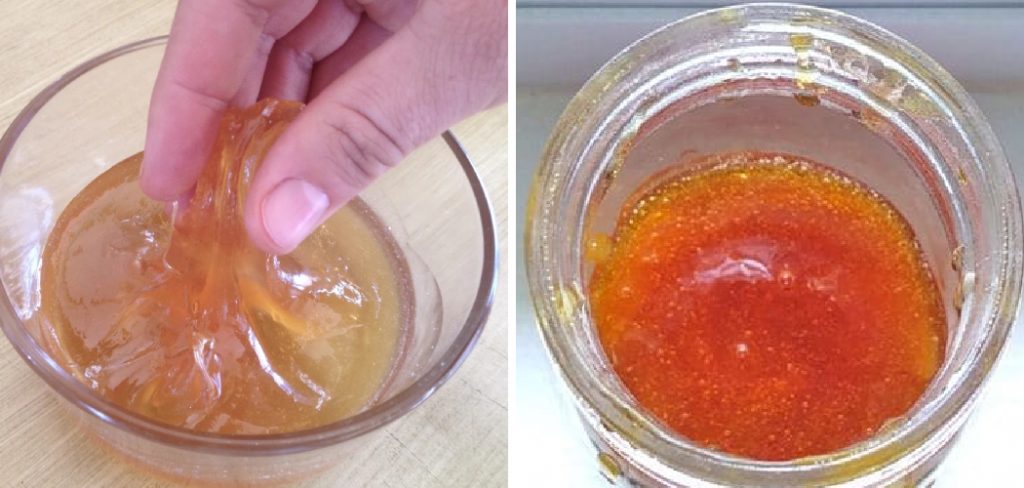
Once the mixture reaches a thick, syrupy consistency, it is ready to use. Carefully remove the bowl from the microwave and allow the mixture to cool for at least 15 minutes before attempting to remove it from the bowl. The finished sugar wax should have a honey-like, sticky consistency. It is now ready for use!
Step: 4. Allow the Wax to Cool
Once the wax is thick and syrupy, allow it to cool for a few minutes so that it is no longer hot to the touch. Do not leave it to cool for too long, as the wax will begin to harden and become more difficult to handle. Proceed with caution so you do not burn yourself.
If you have the wax too hot, you may opt to let it cool in a container of cold water. While the wax can still be used, it will not hold up as well and could break easily during removal. However, if you don’t have the patience to let it cool, you can always start again with a fresh batch.

Step: 5. Apply the Wax to Your Skin
Once the wax is cooled, apply it to your skin in the direction of hair growth using a spatula or your fingers. Be sure to apply a thin layer of wax as too much can be difficult to remove. In addition, it is important to make sure that the wax does not get too hot before you apply it since this can cause a burning sensation when applied to your skin.
After applying the wax, press a piece of cloth firmly against the waxed area for several seconds and then quickly pull it off in the opposite direction of hair growth. Repeat this process until all of the desired hairs have been removed.
Step: 6. Place a Strip of Cloth or Paper Towel over the Waxed Area
Once you have applied the wax, place a strip of cloth or paper towel over the top of it. Press down firmly on the strip to ensure that it adheres well to the waxed area. This will help the wax to adhere to your skin and make it easier to remove.
Once you have pressed down on the strip, carefully lift it off to reveal the waxed area. You are now ready for your waxing sugar session! Although it may seem intimidating at first, once you get used to the process, you will discover that it is a great way to remove unwanted hair quickly and easily. Goodbye razor burn and bumps, hello smooth skin!
Step: 7. Remove the Strip in the Opposite Direction of Hair Growth
To remove the wax, grasp one end of the strip and pull it off in a quick, firm motion in opposite direction of hair growth. Pulling the strip in the opposite direction of hair growth should remove as much of the wax and hair as possible.
Once you have pulled off the strip, discard it and inspect the area. You may need to reapply wax and repeat steps 4-7 if there’s still hair in the area. When you are satisfied with the results, rinse the area with cold water to remove any remaining sugar wax. Pat dry with a clean towel.
Step: 8. Enjoy the Results
After you have removed the wax, cleanse your skin with warm water and enjoy the smooth results! With just a few minutes and a few simple ingredients, you have made your own sugar wax in the microwave.

You can use this method to quickly and easily remove unwanted body hair without having to leave the house or purchase any expensive products. Give it a try today and experience the smoothness that comes with using sugar wax!
Things to Consider When Making Sugar in the Microwave
1. Know Your Microwave’s Wattage
Sugar wax has a tendency to get very hot, so it is important to know the wattage of your microwave in order to prevent overheating and burning.
2. Measure Out Exact Proportions for Best Results
Inaccurate measurements can lead to uneven and ineffective sugar waxing. Make sure you measure correctly for the best results.
3. Have an Appropriate Container Handy
Using a container that is too small can cause the sugar wax to overflow and make a mess, while using one that is too large won’t allow enough heat to reach all of the mixtures, preventing it from melting properly.
4. Stir Frequently During the Heating Process
Stirring every 30 seconds or so helps evenly distribute the heat and prevent burning.
5. Don’t Overheat Your Sugar Wax
Once you reach the desired consistency, immediately remove it from the microwave and allow it to cool slightly before applying it to any body parts. Allowing your sugar wax to be overheated can result in an overly sticky, hard to work with a product that is unpleasant to use.
6. Be Sure To Clean Up
Sugar wax can get very hot and cause burn marks on surfaces if it is not cleaned up properly. Wipe down your microwave and any other surfaces that come into contact with the wax after it is used.

Some Common Mistakes When Making Sugar in the Microwave
1. Not Heating the Sugar Long Enough
Sugar needs to be heated until it reaches a honey-like consistency. If the sugar is not heated long enough, it will not be thick enough to use as wax.
2. Not Stirring the Sugar Regularly
During the heating process, you will need to stir the sugar regularly to make sure it doesn’t burn and also to prevent uneven coloring of the sugar wax.
3. Adding Too Much Water
While a small amount of water is needed for making sugar wax in the microwave, too much water can cause the sugar to become runny and difficult to work with when waxing due to its sticky nature.
4. Not Cooling Enough Before Application
Sugar wax needs to be cooled before application on the skin or else you may experience burns from hot sugar on your sensitive skin. Make sure to test the temperature of the wax before applying it, and let it cool for a few minutes if needed.
5. Not Using Enough Sugar
Sugar wax needs enough sugar content to be able to stick to your body, so make sure there is enough sugar in the mixture before you start heating it up. If there is not enough sugar in the mixture, the sugar wax will not work properly and will cause more mess than necessary when applied to the skin.
These are some common mistakes people make while making sugar wax in the microwave. As long as you take care to follow all instructions when preparing your sugar wax and ensure that each step is done properly, you should be able to successfully create a great batch of sugar wax every time. With a bit of practice, you’ll be able to make perfect sugar wax in the microwave with ease!

Conclusion
Making sugar wax at home is a safe and affordable option for your waxing needs. There are many recipes available online that can guide you through the process, and you’ll be able to customize the ingredients to your own preferences.
With this article, you now have the steps you need to make sugar wax in the microwave. Try these out and you may never buy store-bought wax again! If you learn how to make sugar wax in the microwave correctly and take safety precautions, you’ll get salon-quality results every time.
Waxing isn’t always easy, but making sugar wax yourself provides a great alternative that everyone should try! Now it’s time to get started so go ahead, gather your ingredients and try make sugar wax in the microwave today!