How to Remove a Logo from A Bag
Many individuals opt to remove logos from bags for various reasons, such as personalizing an item, aligning with their style preferences, or simply wanting a more minimalist look. Logos can sometimes detract from the overall aesthetic of a bag, prompting the desire for a fresh start. Logos come in several different forms, including printed designs, embroidery, heat transfers, and metal or plastic attachments, each made from a range of materials like leather, fabric, and synthetics. It’s crucial to approach the task of logo removal with care to avoid damaging the bag.
Knowing how to remove a logo from a bag effectively means understanding the type of logo and material involved, as this knowledge will guide you in choosing the right method and tools for a successful outcome.
Understanding the Type of Logo and Bag Material
When considering how to remove a logo from a bag, it’s essential to understand the different types of logos and the materials used in both the logos and the bags. Logos can be categorized into several types: printed logos are often created using ink or paint on the bag’s surface, while embroidered logos are stitched directly into the fabric, making them more complex to remove. Heat transfer logos are applied using heat and pressure, which bond the material to the bag. Lastly, metal or plastic logos are typically attached with screws or adhesives, requiring specific tools for removal.
Equally important is identifying the material of the bag itself. Common materials include leather, which offers durability and classic appeal; fabric, which can range from cotton to polyester, providing versatility; and synthetic materials like nylon, known for their lightweight and water-resistant properties. Each material presents unique challenges and requires tailored approaches for successful logo removal.
For instance, printed logos on synthetic material may be easier to lift with solvents, while embroidered logos on leather demand a delicate touch to avoid tearing. Matching the removal method to both the logotype and bag material will ensure the best chances of a successful and damage-free result.
Materials and Tools Needed
Gathering the appropriate materials and tools is crucial to effectively remove a logo from a bag and ensure a smooth process without causing damage. Here’s a comprehensive list to get you started:
Materials
- Adhesive Remover: Effective for removing stickers or adhesive-based logos.
- Acetone or Rubbing Alcohol: Useful for dissolving printed logos.
- Fabric Shaver: Helps in clearing away any remaining thread from embroidered logos.
- Sewing Thread or Fabric Glue: To repair any minor damage after logo removal.
Tools
- Scissors: For trimming any loose threads or cutting away damaged material.
- Seam Ripper: Specifically designed for safely removing stitched logos.
- Tweezers: Handy for pulling out threads or small pieces of material.
- Heat Gun or Iron: Used for removing heat transfer logos with precision.
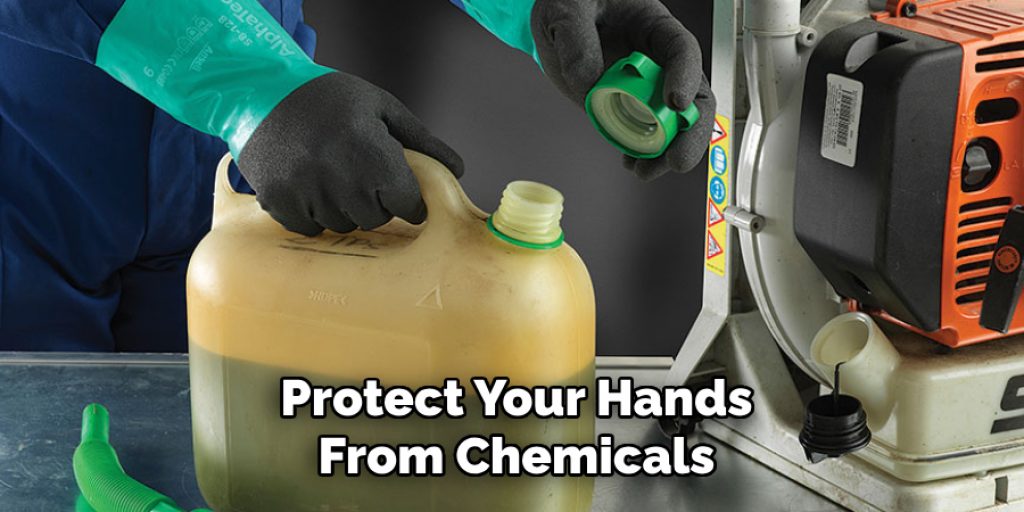
Safety Gear
- Gloves: Protect your hands from chemicals and rough materials.
- Protective Eyewear: Essential when working with tools or chemicals to safeguard your eyes.
Having the right materials and tools facilitates a more effective logo removal process and significantly reduces the risk of damaging the bag, ensuring a successful outcome.
How to Remove a Logo from A Bag: Methods for Removing Different Types of Logos
1.Printed Logos
Removing printed logos can be a straightforward process if done with care. Start by applying acetone or rubbing alcohol to a soft cloth. Gently rub the logo, ensuring that you do not saturate the fabric, as it may cause damage to the bag’s material. As the ink or paint starts to dissolve, wipe away any residue before it dries.
After removing the logo, clean the area with mild soap and water to ensure that no chemical traces remain, and dry the surface thoroughly. Always test the solvent on an inconspicuous area first to ensure it does not affect the bag’s color or fabric.
2.Embroidered Logos
For embroidered logos, the removal process requires a delicate touch to prevent fabric damage. Begin by using a seam ripper to carefully cut the stitches attached to the logo. Once the stitches are cut, use tweezers to pull out the threads gently, ensuring you remove all pieces for a clean finish. After all threads have been extracted, a fabric shaver can clear away any remaining thread residue, giving the area a neat appearance. Take your time during this process, as rushing can lead to tearing the bag’s material.
3.Heat Transfer Logos
Heat transfer logos can be effectively removed using a combination of heat and a careful approach. Set your iron to a low heat setting and place a cloth over the logo to create a barrier that protects the bag. Apply the iron for a few seconds without pressing too hard, allowing the heat to loosen the adhesive beneath the logo. Once heated, gently peel away the logo with tweezers. Be cautious during this step to avoid damaging the bag’s fabric.

After removing the logo, it’s essential to eliminate any remaining adhesive. Use an adhesive remover on a cloth and gently rub the area until it’s clean.
4.Metal or Plastic Logos
Removing metal or plastic logos typically involves using specific tools to avoid damage. Starting with a screwdriver or pliers, gently pry off the logo from its attachment point. Care is crucial here; too much force can dent or scratch the bag. After removing the logo, assess any holes or gaps left behind. Use fabric glue or patching to fill these areas, ensuring a smooth repair that restores the bag’s overall appearance.
Tips for Repairing and Restoring the Bag
Once you have successfully removed the logo, cleaning the area thoroughly is crucial. Use a gentle soap solution and a soft cloth to remove any remaining residues, such as adhesive or chemical traces, ensuring the bag looks pristine. If the removal process has caused minor damage or discoloration, consider carefully re-dyeing the affected area to blend it with the rest of the bag.
Applying a dedicated leather conditioner for leather bags can help restore moisture and suppleness, effectively rejuvenating its texture and shine. If the bag is fabric, a fabric-safe conditioner can enhance its appearance and soften its feel, helping to match the treated area with the original fabric.
In addition to these repairs, check for any loose threads or small tears that might have occurred during the logo removal process. Use a sewing needle and matching thread to make discreet stitches, ensuring a seamless look. Consistent maintenance, such as regular cleaning and conditioning, will preserve the bag’s visual appeal over time.
Alternative Options
Consider alternative solutions if logo removal seems daunting or risks damaging your bag. One effective approach is to cover the logo with a patch or decorative element that complements the bag’s overall design. This adds a unique touch and provides an aesthetic solution without compromising the bag’s integrity.
Consulting a professional for high-end or complicated bags can be advantageous; they possess the expertise to handle more delicate materials and ensure flawless results. Weighing the pros and cons of removing versus covering the logo is essential—while removal can restore a bag to its original state, covering allows for creativity and may decrease the risk of irreversible damage.
Preventing Damage During Logo Removal
When learning how to remove a logo from a bag, it’s essential to prioritize the prevention of damage. Begin by testing any removal method on a small, inconspicuous bag area to ensure compatibility. Patience is paramount; take your time with each step to avoid mistakes that could lead to fabric damage. Employ gentle pressure during the removal process, especially on delicate materials, and refrain from using harsh chemicals that could cause discoloration or degradation of the fabric.
Always follow the manufacturer’s recommendations for the specific material to safeguard your bag’s integrity while achieving your logo removal goals.
Troubleshooting Common Issues
Even with caution, you may encounter challenges while removing a logo. If you face a stubborn logo that refuses to budge, try adding heat or solvent to facilitate removal. Discoloration or stains left behind after logo removal can often be mitigated with appropriate cleaning solutions or re-dyeing techniques tailored to the material.
If the bag sustains noticeable damage or if you are unsure about your ability to repair it, seeking professional help can prevent further complications, ensuring your bag is restored to its original condition safely and effectively.
Frequently Asked Questions (FAQs)
1. How Can I Tell if My Bag Can Handle Logo Removal?
Before removing a logo, check the bag’s care label for specific instructions. Testing a small, inconspicuous area with your chosen removal method can also help determine its compatibility with the fabric or leather.
2. What Should I Do if The Logo Removal Leaves a Stain?
If you notice stains or discoloration after logo removal, immediately clean the area with a gentle soap solution suitable for the material. For tougher stains, consider using specialized cleaners or re-dyeing methods designed for that specific fabric.

3. Can I Remove a Logo from A Waterproof Bag?
Removing logos from waterproof bags may require special caution to avoid compromising the material’s waterproofing. Always consult the manufacturer’s guidelines and consider using gentle heat methods or adhesive removers that won’t affect the waterproofing layer.
4. Is It Better to Remove or Cover a Logo on My Bag?
Deciding between removing and covering the logo depends on your preference and the bag’s condition. Removal restores the bag’s original look but can risk damage while covering allows for creative expression without the stress of potential harm. Evaluate both options before proceeding.
Conclusion
In summary, successfully learning how to remove a logo from a bag involves several critical steps. Start by ensuring you have the right tools and methods for the type of logo and material. Remember to test removal techniques in a discreet area first to minimize risks. Approach the process with care, utilizing gentle methods and considering alternatives if you’re uncertain. Ultimately, prioritizing your bag’s integrity while also exploring creative solutions can lead to a satisfying outcome. Embrace the opportunity to refresh your bag’s look with confidence and creativity.
Elizabeth Davis
Elizabeth is a creative writer and digital editor based in the United States. She has a passion for the arts and crafts, which she developed from a young age. Elizabeth has always loved experimenting with new mediums and sharing her work with others. When she started blogging, she knew that DIYquickly would be the perfect platform to share her tutorials and tips. She's been writing for the blog from the beginning, and her readers love her helpful advice and easy-to-follow instructions. When she's not writing or editing, Elizabeth enjoys spending time with her family and friends.