
How to Test Water Cooling Pump
It is no secret that water cooling your PC can lead to some significant performance gains. However, to get the most out of your system, you need a functioning water cooling pump. This article will walk you through how to test water cooling pump and determine if it is working correctly. Let’s get started!
A water cooling pump is responsible for circulating water through your system. If the pump is not working correctly, it can lead to several problems, including overheating and component failure. So, it is essential to test your water cooling pump regularly to ensure that it is functioning correctly.
What is a Water Cooling Pump
A water cooling pump is a device that circulates water through a system to keep it cool. The water flows through the pump and is then circulated through the computer system, absorbing the heat from the components. The cooled water is then returned to the pump recirculated back through the system.
Features of a Water Cooling Pump
A water cooling pump is an important part of a water-cooled system. It circulates the coolant through the radiator and back to the engine. The pump should be tested for proper operation before installation.
There are several features to look for when testing a water cooling pump:
- The pump must be able to produce enough flow to circulate the coolant through the entire system.
- It should be quiet in operation.
- The bearings should be sealed and lubricated for long life.
- The pump should have adequate pressure to overcome the head loss in the system.
Things You’ll Need
- Bucket
- Hose
- Pliers
- Screwdriver
- Multimeter
A Step by Step Guide on How to Test Water Cooling Pump
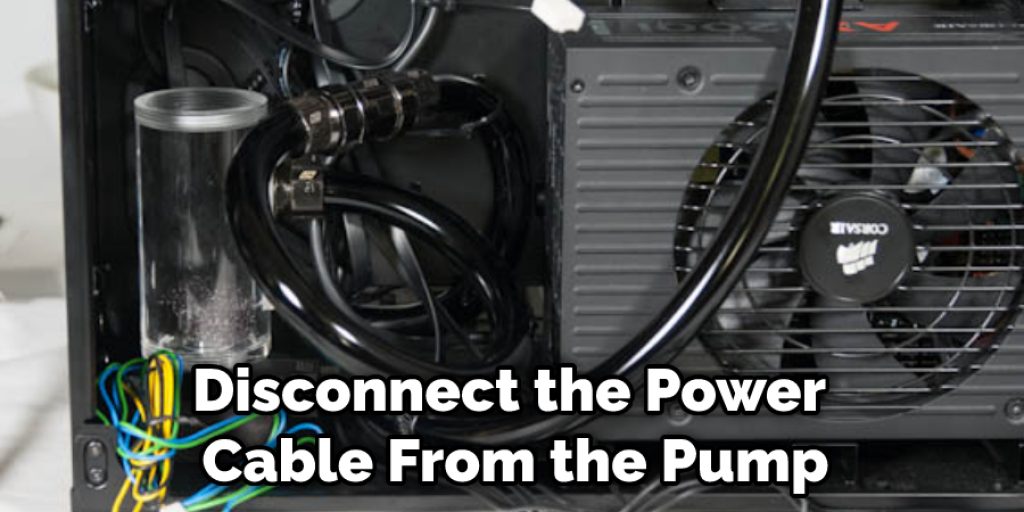
Step1: Determine
Determine whether the pump is getting power. First, disconnect the power cable from the pump. Then, using a screwdriver, remove the cover of the pump. There you will see a small circuit board. Using a multimeter, test for continuity between the two terminals on the board. If there is continuity, then the pump is getting power.
Step2: Test With Multimeter
Testing the water cooling pump is a critical step in order to ensure your system is working correctly. There are a few different ways to test your pump, and each method has its advantages and disadvantages. The most common way to test a water cooling pump is by using a tester such as a multimeter.
You will need to set the multimeter to resistance mode and clip the leads onto the wires leading to the pump. Once it is attached, turn on the pump and take note of the reading on the multimeter. A good water cooling pump should have a resistance of between 1 and 5 ohms. If your pump has a higher or lower resistance than this, it may not be functioning correctly, and you will need to replace it.
Step 3: Test Performance
Another way to test a water cooling pump is by checking its performance. First, fill a container with water and place the pump in it. Then, turn on the pump and check to see how much water it can move. A good water cooling pump should be able to move at least 1 gallon of water per minute. If your pump can’t move this much water, it may not be functioning properly, and you will need to replace it.
Step 4: Check Pump’s Sound
You can also test your water cooling pump by listening to it. First, remove the shroud from the pump and place your ear next to the fan to do this. Next, turn on the pump and listen for any abnormal noises. If you hear any strange noises, it may mean that the pump is not functioning correctly, and you will need to replace it.
Step 5: Check for Leakage
Once you have assembled the water cooling system, it is time to test the water pump for leakage. Pour a small amount of water onto the pump and watch for any leaks. If there are any leaks, you will need to fix them before proceeding with the installation.
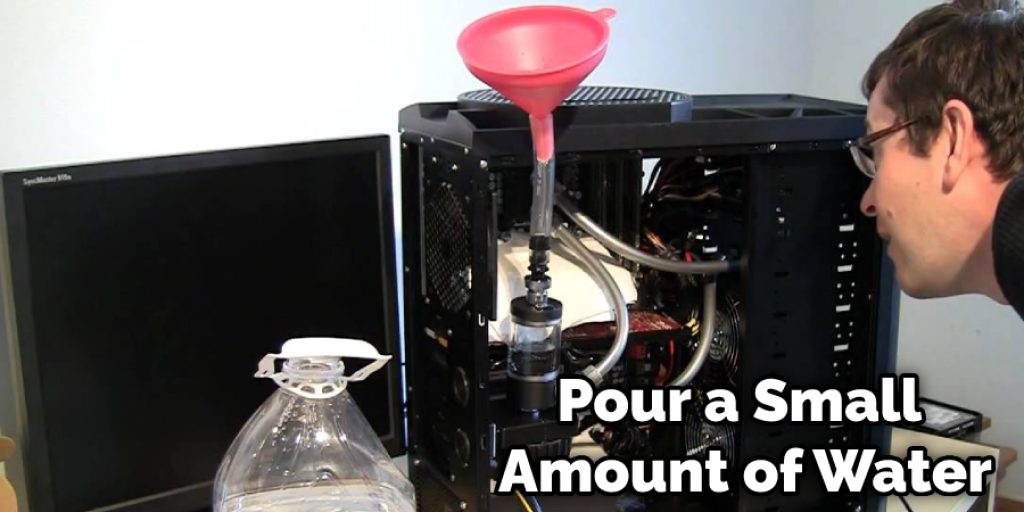
Leakage can occur for various reasons, such as a faulty seal or gasket. If the pump is leaking, you may be able to fix it by replacing the seal or gasket. However, if the pump is leaking due to damage or wear, you will need to replace the pump itself.
Be sure to check all of the fittings and connectors on the cooling water system for leaks.
Step 6: Check Air Pressure
After the pump is primed and the water flows through the system, it’s essential to check the air pressure. Too much or too little air pressure can cause problems with the cooling system. Many pumps come with a gauge that displays the current air pressure. If there isn’t a gauge on your pump, you can purchase one at most hardware stores.
To check the air pressure, turn off the pump and disconnect the tubing from the pump and radiator. Hold one end of the tubing against your ear and blow into the other end. You should be able to hear a hissing sound if there is air in the line. If you can’t hear anything, there is either no air in the line or too much air pressure.
If there is too much air pressure, you can release some air by opening the bleed screw on the pump. The screw is usually located on the top or side of the pump. Be careful not to touch the sharp end of the screw when releasing the air. Once you’ve released enough air, reconnect the tubing and turn on the pump. Recheck the air pressure and make any necessary adjustments.
Step 7: Monitor Temperature
Now that the pump is installed, it is essential to monitor the temperature of the water. If the water becomes too hot, severe damage can occur to your hardware. A good rule of thumb is to keep the temperature below 80 degrees Celsius.
There are a few ways to monitor the water temperature. One way is to use a dedicated thermometer specifically designed for cooling systems. Another way is to use software that monitors temperatures and sends alerts if they exceed a certain threshold.
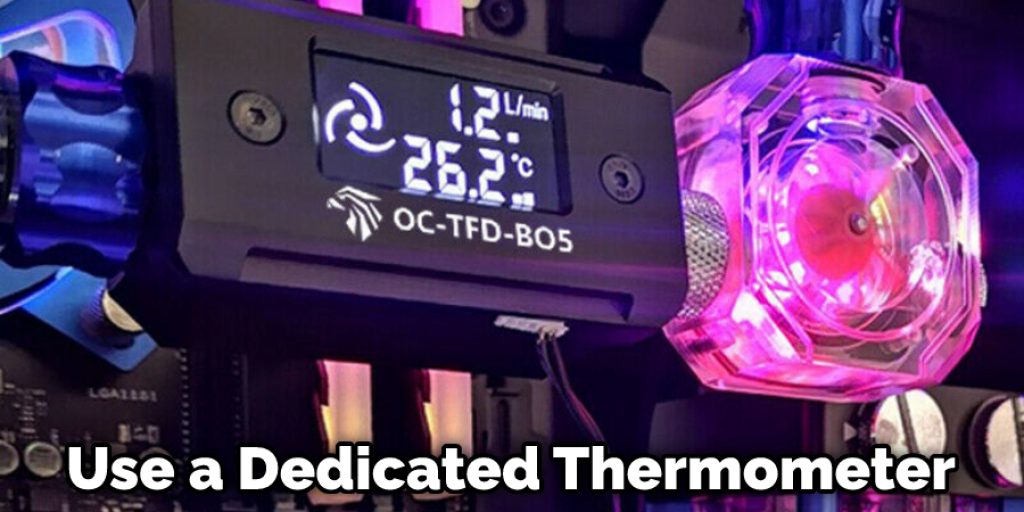
Whichever method you choose, it is essential to stay on top of the temperature levels to ensure your system remains safe and stable.
Step 8: Adjust Pump Speed If Needs Be
If the pump is not pumping enough water or is pumping too much water, you will need to adjust the speed of the pump. This can be done with the pump’s speed controller. Turning the knob clockwise will increase the speed of the pump, and turning it counterclockwise will decrease the speed of the pump.
Once you have the pump adjusted to the correct speed, you can tighten down all of the screws on the pump housing. Ensure that all of the screws are tight so that the housing does not come loose. You may also want to use some sealant around the screws to make sure they do not come loose over time.
Many water cooling pumps come with a built-in LED light. This LED light will help you verify that the pump is working properly. The light should be on when the pump is turned on. If the light is not on, there may be a problem with the pump.
Step 9: Keep Your System Clean
Regular cleaning and maintenance of your water cooling system are essential for running at peak performance and avoiding corrosion and other damage. Make sure to clean your radiator, blocks, tubing, and reservoir regularly using either tap water or a specialized cleaning solution. Be sure to rinse everything thoroughly afterward.
It’s also a good idea to keep an eye on your fluid levels, as low fluid levels can cause damage to the system. If you notice that your water level is dropping significantly over time, you may need to top it up with more distilled water. Never add any other substances to the cooling water system, which could have disastrous consequences.

By following these simple steps on how to test water cooling pump, you can help keep your water cooling system running smoothly and prevent any damage from occurring.
Precautions
1. Be sure to unplug the power cord from the wall before you begin any testing.
2. Always test water cooling pumps in a non-operational state.
3. Make sure to have a bucket or container to catch any water that may spill out.
4. Only test the water pump if it is completely submerged in water.
5. Always discharge capacitors before working on a computer. There are several ways to do this, but the most common is to use a screwdriver to short out the leads of the capacitor.
Conclusion
So, if you are looking for a water cooling pump and want to ensure that you get the right one the first time, test it before making your purchase. By following the steps in this article on how to test water cooling pump, you can make sure that the pump you choose is perfect for your needs.
You Can Check It Out to: Reduce Airflow From Air Pump


