
How to Tile Around a Window without Trim
Introduction
Tiling a window is always challenging for the person who is performing the task because there is a considerable possibility of creating an uneven layer sue to the use of trim and adhesive together. Thus, today, we are going to suggest a technique on how to tile around the window without trim. This will be much helpful for the beginners, and the total tiling of the window will become much firm and long-lasting.

Requirements
In order to build a house, you will need a plaster mixer, concrete, wooden planks, a drill machine, and pins. The concrete will be used as a core material, and the wooden planks will be used to create a boundary. The drill machine and pins will be used to attach the wooden planks.
There is a great need for a spade when plastering because the trowel will be used to level the plaster. Next, you will need a plastering spatula, which will help grow the integrity and fast drying of the mix. Finally, you will need a primer mix to protect against the absorption and development of rust.
Procedure
Tiling around a window without using trims is much complex to perform, this requires some stipulated elements that we have mentioned earlier, and the process also requires much patience. For this reason, we are going to break down the steps for you and so that you can easily take part in this process and complete it. The steps are explained below.
Step One
At first, you have to process the wall and the edges of the window. In this case, you have to take a small piece of wood and the search for the weaker spots on the wall around the window. This can be easily understood by taping the wall with the piece of wood, and then you have to use the hammer and chisel to take out the paint of those parts. Next, you have to clean all the specks of dust that are associated with the frame of the window. You can easily do this by a blower or vacuum machine.
Step Two
After you’ve vacuumed the area, you’re ready to start the process. Trims are used in window tiling to keep tiles balanced, but sometimes the trims decay and the tiles become dislodged. In this case, we suggest using plaster and concrete for a more robust solution to attaching tiles to the window frame.
Step Three
In order to prime a window frame, you must first add primer to a spray can. Once the primer is added, dilute it with water. Once diluted, begin spraying the primer on the window frame and surrounding wall. This will create a clean surface that is free of rust.
Step Four
After you have successfully applied the primer, you have to wait for it dry; next, you have started mixing the concrete, the mixing of the concrete can be done using a mixer, or you can hand mix it as there is need of any substantial work for this concrete. We are using this concrete to give a proper sturdiness to the window frame. Now you have to take the drill machine and install the wooden plank at the lower end of the window frame.

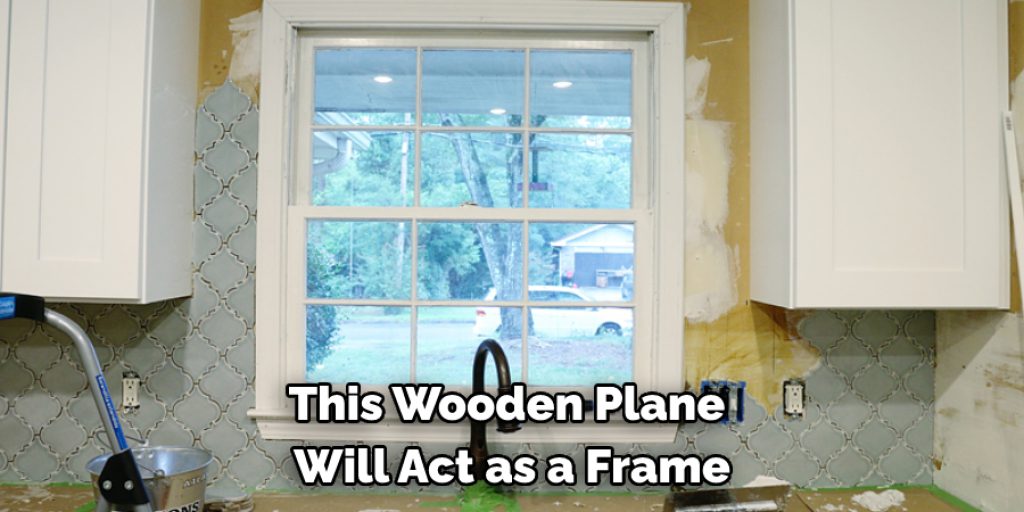
Step Five
This wooden plane will act as a frame to pour the concrete, and once the concrete gets hardened, we will get rid of this part of the process. So you have to take a drill machine and drill three holes on the wall, including the wood and then attach those using pins. Once the attachment is complete, pour the concrete in ti and let it dry. Now you have to use plastic plaster mesh along the corner of the window frame.
Step Six
This mesh is used for accelerating the process. Net, you have to prepare a plaster by mixing the sand a block of cement in an adequate ratio. Then you have to apply the plaster along the border of the window frame. This will substitute the trim, apply the mesh on the plaster, and then make it smooth using the plaster spatula. The mesh will let the plaster dry quickly, and it will also provide integrity between the frame and the plaster
Step Seven
After the plaster and the concrete have dried, you can take off the wood panel. But there will still be some holes on the wall. You can easily block them using the previously mare plaster. In this case, you have to remember that we are using the concrete in the lower end of the window frame, and all the other ends are strengthened by applying plaster. This is done because the lower end will have more weight to get distributed along the masonry wall.
Step Eight
This is the last step of the process. Once the plaster is dried, and all the other accessories are managed, you will get a total frame for the tiling. Now you have to take the tiles and attach the adhesive to the tales and start attaching them along with the window frame. The frame will not have any uneven space after you have applied the plaster in them, and the tiles will easily get attached. Lastly, you can use a leveler for making the tiles leveled to the masonry wall.
Check It Out to Learn to Paint the Trim of a Room.
Conclusion
In conclusion, we would like to state that the steps we have mentioned here to tile the window without using any trims properly will be beneficial for the people interested in getting rid of the trims. Especially for beginners, this will be a great way of enhancing their DIY skills. The windows tiled in this manner will surely be much sturdy and long-lasting. Thank you for your patience. Have a good day!!
Angela Ervin
Angela is the executive editor of DIY quickly. She began her career as an interior designer before applying her strategic and creative passion to lifestyle and home. She has close to 15 years of experience in creative writing and online content strategy for housekeeping, home decorations as well as other niche efforts. She loves her job and has the privilege of working with an extraordinary team. She lives with her husband, two sons, and daughter in Petersburg. When she's not busy working she spent time with her family.


