
How to Wrap a Tumbler With Straw
Wrapping a tumbler with a straw is not only a practical way to personalize your drinkware but also an excellent opportunity to express your creativity. Whether for gifting, special occasions or simply making your favorite tumbler more visually appealing, this process can be both enjoyable and rewarding.
In this guide on how to wrap a tumbler with straw, we will explore the materials needed and the step-by-step process to achieve a beautiful and functional wrap that complements your tumbler’s design while ensuring durability.
Why Wrap a Tumbler With Straw?
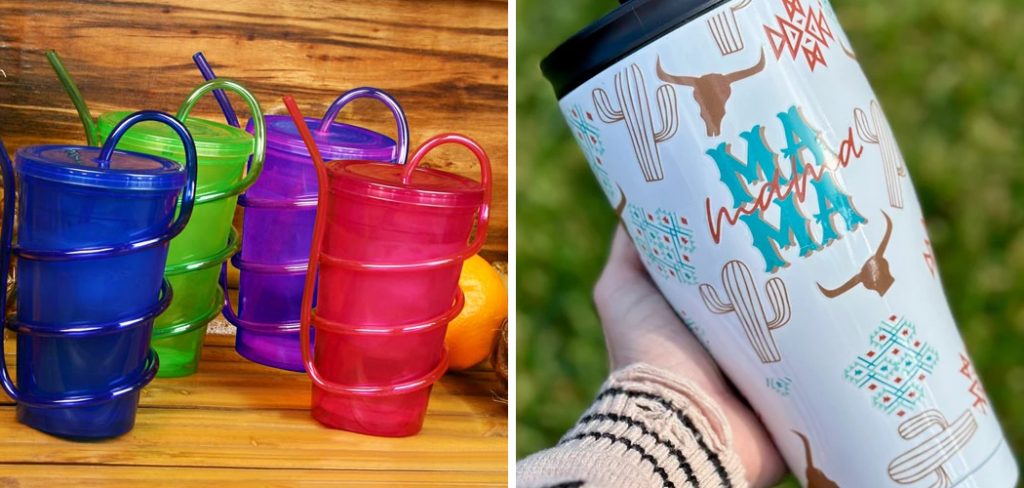
There are various reasons why you may want to wrap your tumbler with straw. Firstly, it can serve as an extra layer of insulation, helping to maintain the temperature of your drink for longer. Secondly, if you have multiple tumblers or use them in a shared space, wrapping them with straws can help to identify which one belongs to you easily. Additionally, it can add a touch of personality and uniqueness to your tumbler, making it stand out from the rest.
You can use different materials and techniques for wrapping a tumbler with straw, ranging from simple to intricate designs. It all depends on your personal preference and the level of customization you want to achieve. So let’s dive into the steps involved in creating a beautiful wrap for your tumbler.
Materials Needed
A Clean and Dry Tumbler:
Before beginning the wrapping process, make sure your tumbler is clean and free of any dirt or residue. This will ensure that the wrap adheres properly to the surface.
Straws:
You can use regular plastic straws or paper straws for this project. Depending on the size of your tumbler, you may need between 10-20 straws.
Scissors:
Cut and shape the straws according to your desired design.
Glue Gun/Adhesive:
To secure the straw pieces onto the tumbler’s surface.
8 Step-by-step Process on How to Wrap a Tumbler With Straw
Step 1: Measure and Cut Straws
Begin by determining the height of your tumbler to ensure the straw pieces will fit perfectly. Using a ruler, measure the height from the base to the rim. Once you have your measurements, take the straws and cut them into equal lengths based on that measurement. It’s advisable to cut a few extra straws in case of any mistakes during the wrapping process.
Aim for clean, straight cuts to achieve a polished look. After cutting, lay the straw pieces out on a clean surface to prepare for the next step.
Step 2: Choose a Design
Before attaching the straws to the tumbler, it’s essential to decide on a design that reflects your personal style. You can opt for a simple, uniform pattern, where all the straws are arranged in a straight line, providing a sleek and modern appearance. Alternatively, consider a more playful approach with alternating colors or a staggered arrangement for added texture.
For those feeling adventurous, intricate designs such as spirals or geometric patterns can make your tumbler truly unique. Sketching out your design on paper can be helpful, giving you a visual reference as you begin to assemble the straws on your tumbler. Once you have your design in mind, you’ll be ready to move on to the next step!
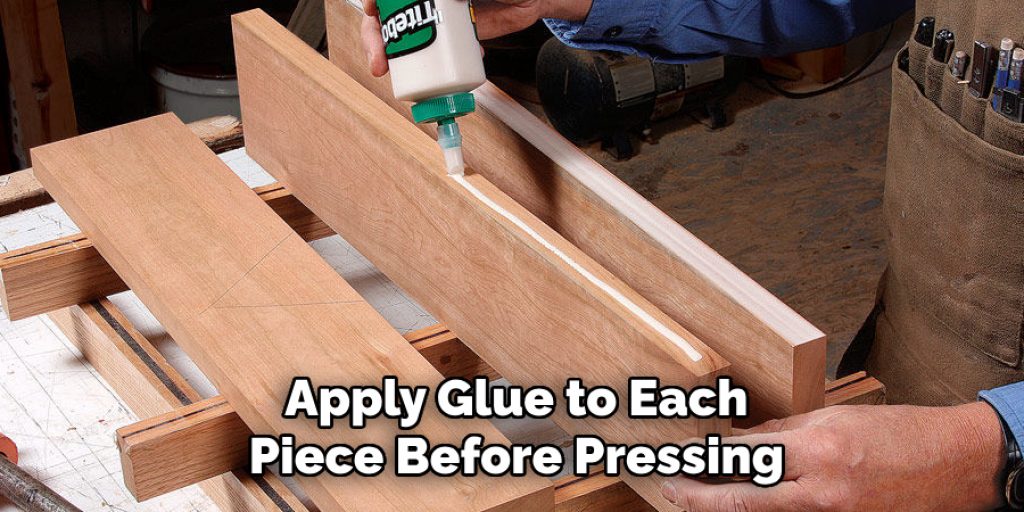
Step 3: Start Wrapping
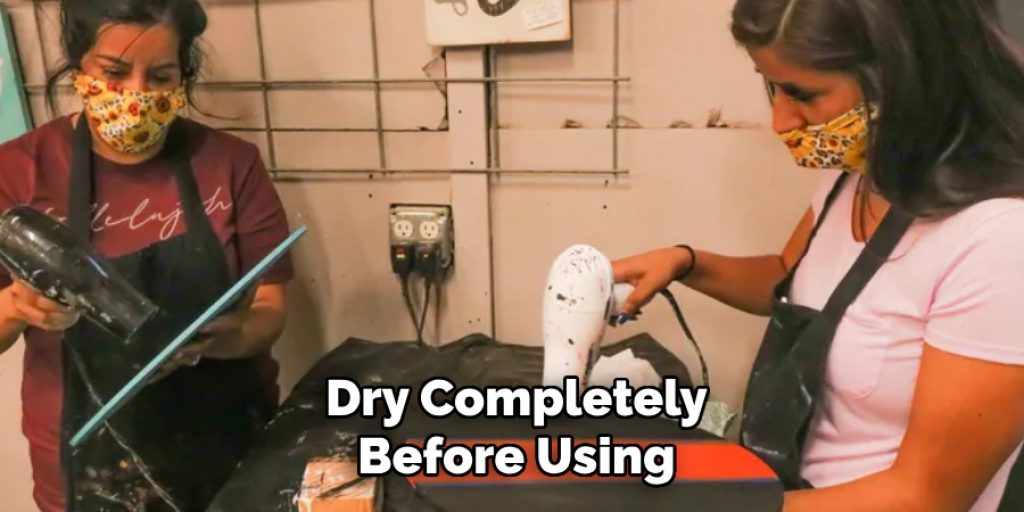
Apply a small amount of glue onto the tumbler’s surface and begin attaching the straw pieces, starting at the bottom. Use your chosen design as a guide, making sure to align each straw evenly as you go along. Apply glue to each piece before pressing it down onto the tumbler to ensure it adheres properly.
Tip: To create a more secure bond, you can also add a layer of clear tape over the straws once they are in place.
Step 4: Continue Wrapping
As you continue wrapping the tumbler with straws, maintain your chosen design and ensure that the straw pieces are closely aligned without gaps. This will create a seamless look that enhances the overall aesthetic of your tumbler.
Apply glue to the bottom end of each straw piece before pressing it down, making sure it adheres firmly to the tumbler’s surface. If you’re creating a pattern with alternating colors, keep an eye on your color placement to ensure consistency throughout the wrap. Work your way upwards, rotating the tumbler as necessary for even coverage. Take your time during this process, as attention to detail will result in a beautifully wrapped tumbler.
Step 5: Trim the Straws
Once you have wrapped the tumbler completely to your desired height, it’s time to trim any excess straw pieces that may be sticking out at the top. Using your scissors, carefully cut the straw ends so that they are even and flush with the rim of the tumbler. This step ensures a neat and polished finish to your design.
Be cautious not to cut too close to the tumbler’s edge, as this could result in jagged ends or an uneven appearance. After trimming, take a moment to examine the wrap and make any minor adjustments, if necessary, to achieve the perfect look before moving on to the final steps of securing and finishing your tumbler.
Step 6: Secure the Straws
To prevent any stray straw pieces from coming loose, apply a small amount of glue along the top edge of the tumbler and press down firmly. This will secure all the straw pieces in place and provide added durability to your wrap.
Tip: If you prefer not to use glue, you can also use clear tape or Mod-Podge as an adhesive.
Step 7: Add a Top Coat (Optional)
For added protection and longevity, consider adding a top coat over your wrapped tumbler. You can use clear spray paint or brush on a layer of clear sealants such as varnish or epoxy resin. This step is optional, but it can help to preserve your design and make the tumbler more resistant to wear and tear.
Step 8: Let It Dry
Once you have completed all the steps, set your tumbler aside to dry completely before using it. This will ensure that the straw pieces and any added top coat have fully adhered and are durable enough for everyday use.
Following these steps on how to wrap a tumbler with straw will result in a beautifully wrapped tumbler that reflects your personal style and creativity. You can also experiment with different materials, such as ribbons or washi tape, to achieve unique designs. So why not give it a try and elevate your tumbler game with this fun and easy project? Happy crafting!
Additional Tips
- If using paper straws, consider coating them with clear sealant before applying them to the tumbler to prevent any potential fading or water damage.
- Experiment with different types of straws, such as striped or patterned ones, to add more dimension and personality to your wrap.
- If you make a mistake during the wrapping process, don’t panic! Simply remove the straw piece and reposition it until you achieve the desired look.
- Use a ruler or masking tape as a guide to ensure evenly spaced straw pieces for a clean and polished appearance.
- To create an even stronger bond between the straws and tumbler, lightly sand the surface of the tumbler before gluing on the straw pieces. This will help roughen up the surface and provide better adhesion.
- Have fun with this project! You can get creative and personalize your tumbler with various embellishments, such as stickers or glitter. The possibilities are endless!
Frequently Asked Questions
Q: Can I Use a Different Type of Adhesive Instead of Glue?
A: Yes, you can also use double-sided tape or Mod Podge as an alternative to glue for securing the straw pieces onto the tumbler. It’s always a good idea to test the adhesive on a small area first before proceeding with the full wrap.
Q: Can I Wrap a Tumbler with Different Sized Straws?
A: Yes, you can mix and match different sizes of straws for a more textured and unique design. Just make sure to align the pieces properly and trim any excess length for a clean finish.
Q: How Do I Clean my Wrapped Tumbler?
A: It’s best to hand wash your wrapped tumbler with mild soap and water to preserve the design and prevent any potential damage. Avoid using harsh chemicals or abrasive sponges that could scratch or damage the wrap.
Conclusion
In conclusion, wrapping a tumbler with a straw is a simple yet creative way to personalize your everyday drinking container. With basic materials and a bit of time, you can transform a plain tumbler into a unique and eye-catching accessory.
Just remember to measure and cut the straws accurately, choose a design that reflects your style, and take your time during the wrapping process for the best results. So why settle for an ordinary tumbler when you can create one that’s uniquely yours? Let your imagination run wild and have fun with this DIY project! Thanks for reading this article on how to wrap a tumbler with straw.
Elizabeth Davis
Elizabeth is a creative writer and digital editor based in the United States. She has a passion for the arts and crafts, which she developed from a young age. Elizabeth has always loved experimenting with new mediums and sharing her work with others. When she started blogging, she knew that DIYquickly would be the perfect platform to share her tutorials and tips. She's been writing for the blog from the beginning, and her readers love her helpful advice and easy-to-follow instructions. When she's not writing or editing, Elizabeth enjoys spending time with her family and friends.


