How to Inflate a Tubeless Bike Tire
For mountain-biking enthusiasts, flat tires can be a huge buzzkill. But with the introduction of tubeless tires, repairing flat bikes has never been easier! In this blog post, we’ll tell you everything you need to know about how to inflate a tubeless bike tire!
From choosing the right pump to breaking out the timer and pressure gauge, there are several steps you should follow when preparing to hit that trail again. Read on as we provide a comprehensive guide on how to ensure your biking adventures never suffer from deflationary woes!
Step-by-Step Guidelines on How to Inflate a Tubeless Bike Tire
Step 1: Select the Appropriate Pump
First and foremost, it’s important to invest in a pump that is designed for tubeless bike tires. A floor pump or hand pump with an appropriate air nozzle should work just fine. This step is especially important since some pumps may cause damage to a tubeless tire. You can also opt for a CO2 inflator, but keep in mind that this will require you to consistently purchase more cartridges.
Step 2: Break Out the Pressure Gauge and Timer
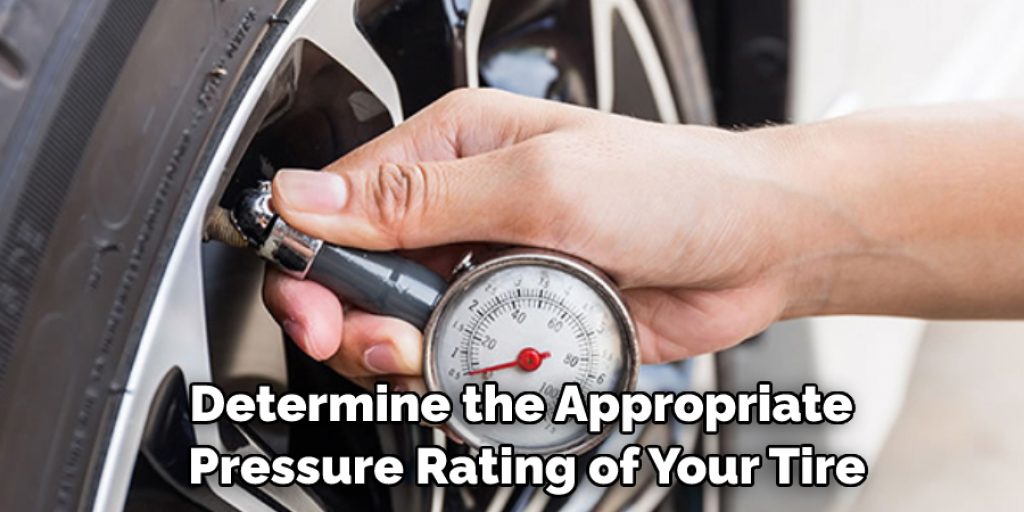
Before attaching your chosen pump, it’s important to determine the appropriate pressure rating of your tire. Many tubeless tires are rated somewhere between 20-30 PSI (pounds per square inch). If you don’t know the exact pressure rating, simply refer to your tire’s manual. Secondly, it is also important to monitor your inflation process with a timer and pressure gauge. This will allow you to track how long it takes for the tire to reach optimal pressure, as well as keep an eye on when it’s time to stop pumping.
Step 3: Attach the Pump
Once you’ve determined the appropriate pressure rating and have broken out the timer and gauge, it’s time to attach your pump! Be sure that your air nozzle is securely attached to the tire valve and slowly starts pumping. As the tire starts to inflate, you can use the timer and pressure gauge to monitor its progress.
Step 4: Re-Check Pressure Levels
After your bike tire is inflated to the appropriate pressure rating, it’s important to recheck the levels with a pressure gauge one last time. This will ensure that your tire has been inflated to the right levels.
Following these steps will help you properly inflate your bike tire and get back on the trails in no time! With a little bit of preparation and some patience, inflating a tubeless bike tire is a surprisingly easy process. So next time you experience a flat, you’ll know exactly what to do! Happy biking!
Additional Tips and Tricks to Inflate a Tubeless Bike Tire

1. Check your tire pressure regularly. It’s important to keep an eye on the amount of pressure in your tires for optimal performance. A general rule of thumb is to adjust your tire pressure based on the terrain you are riding on, as well as your weight and bike type.
2. Make sure you have the right tools for inflating your tire. A tubeless bike tire requires a specific valve and pump to properly inflate. This will help ensure that you don’t damage the wheel or tire during the process.
3. Always use a floor pump when inflating your tires, as this helps to make sure you are putting the right amount of pressure in your tires without damaging the rim.
4. Before you inflate your tire, make sure to check it for any punctures or damage that could prevent it from inflating properly.
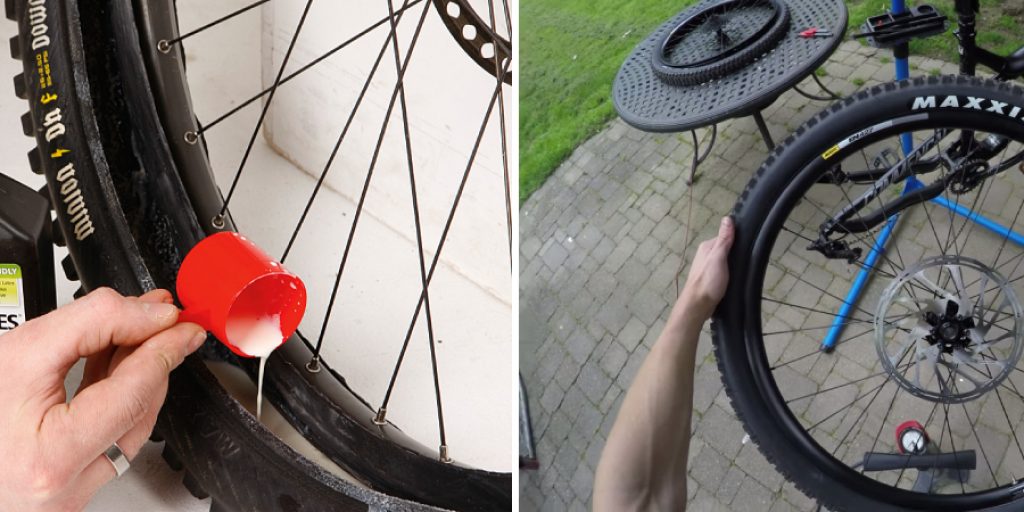
5. If needed, use sealant to help plug any leaks in your tire before inflation. This should help ensure that the tire doesn’t lose pressure once you have successfully inflated it.
6. If you are having trouble getting your tire to inflate, try using a CO2 inflator. This will help the air get into the tire faster and more effectively than if you were to use a traditional pump or floor pump.
7. When inflating your tires, check the sidewall for any bulging or visible damage. If you notice anything unusual, stop and make sure to address the issue before continuing with the inflation process.
8. Once your tire is inflated, recheck the pressure using a gauge. Make sure to keep your tires properly inflated in order to get the most out of your ride.
Inflating your tubeless bike tire doesn’t have to be a difficult process. With the right tools and knowledge, you can quickly and easily get your tires ready for the road or trail ahead. Remember to check your tire pressure regularly, use the correct valves and pumps, inspect for any damage before inflating, and keep an eye on your tire’s pressure post-inflation. Following these tips and tricks will help to ensure that you get the most out of your ride every time.
Things You Should Consider While Inflate a Tubeless Bike Tire
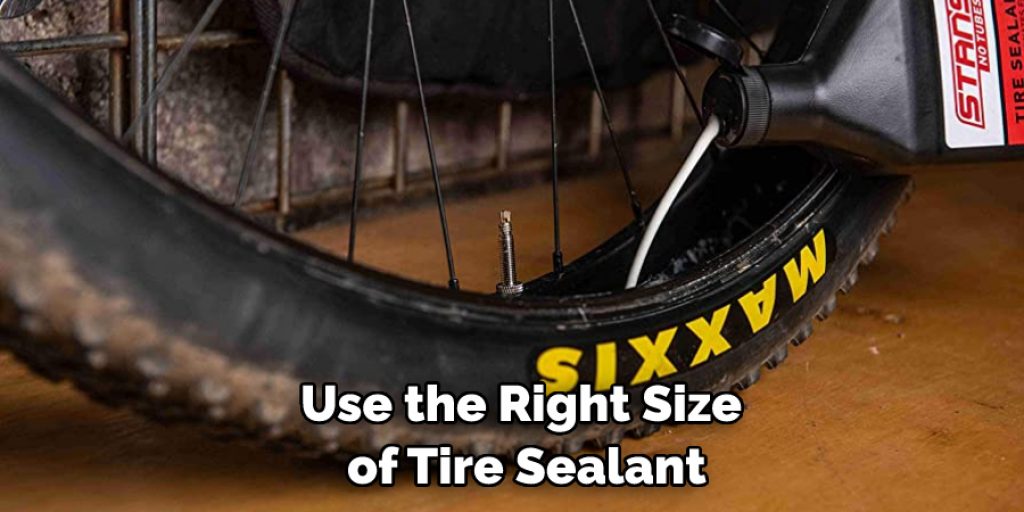
1. Make sure to use the right size of tire sealant for your type of bike tire. Too much or too little can cause problems while inflating the tire.
2. Check the rim and make sure it is securely mounted in place. Any damage or deformity may prevent the tire from properly seating on its bead once inflated.
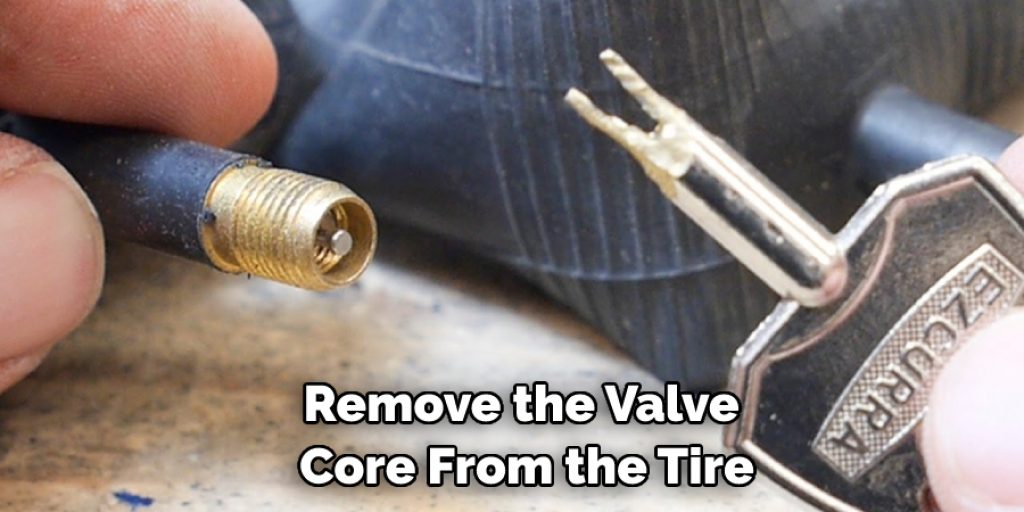
3. Take extra care while unscrewing the valve core. Too much force might cause it to break and require a replacement before inflating the tire.
4. Use an appropriate pump or compressor for your tire size and pressure setting. Too high of pressure can damage the tire, too low won’t inflate it.
5. Make sure you have the right tools at hand such as a tire lever, valve adapter, and sealant injector. Having these items ready will make the job a lot easier.
6. Make sure to use the correct amount of sealant in order to prevent leaks while inflating the tire.
7. Keep an eye on the tire pressure and make sure it has reached the desired level before you start riding.
8. Always double-check that the valve core is properly tightened so the air doesn’t escape while riding.
With these considerations in mind, you can be sure that your tire will be properly and safely inflated. Inflating a tubeless bike tire may seem intimidating at first, but with the right preparation and knowledge, it’s an easy task that can help keep your ride safe and efficient.
Frequently Asked Questions
What is the Difference Between a Tubed and Tubeless Tire?
A traditional bike tire has an inner tube that must be inflated separately. The inner tube keeps the air pressure of the tire at a constant level. Tubeless tires are filled with sealant, instead of an inner tube, which seals any punctures when the tire is inflated.
What are the Benefits of Tubeless Tires?
Tubeless tires offer several advantages over tubed tires, including better puncture protection, reduced rolling resistance, and weight savings. As the sealant in tubeless tires will fill small punctures without loss of air pressure, it eliminates frequent tube replacement and the risk of pinch flats.
The sealant also improves grip by helping to maintain consistent tire pressure. Additionally, tubeless tires reduce rolling resistance due to their improved air retention, resulting in faster speeds and better overall performance. Finally, because there is no inner tube needed with tubeless tires, they are generally lighter than tube tires for an overall lighter bike.
What Do I Need to Inflate a Tubeless Tire?
In order to inflate a tubeless tire, you will need a compressor, preferably with an adaptor for Schrader valves (the same type of valve found on car tires), or an air pump designed specifically for bicycle tires. You’ll also need a tubeless valve and sealant.
How Do I Inflate a Tubeless Tire?
To begin, remove the valve core from the tire and fill it with sealant. Then, attach the tubeless valve to the rim of your wheel and ensure that it is securely tightened. Next, use an air compressor or air pump to inflate the tire. You should continue to add air until the tire is fully inflated and no more sealant leaks out of the valve stem. Finally, replace the valve core and check for any signs of leakage. Once your tubeless tire is properly inflated, enjoy your ride!
Do Tubeless Tires Require Any Special Maintenance?
Tubeless tires require regular inspection to ensure that the sealant is still doing its job and to check for any signs of wear. To help keep your tires in good condition, make sure you inspect them regularly for punctures or leaks and replace the sealant when necessary.
Additionally, it’s important to keep your tubeless tires inflated to the recommended pressure as outlined in your bike’s owner’s manual. Proper maintenance and regular checking will help ensure you get a safe and enjoyable ride.
Conclusion
Knowing how to inflate a tubeless bike tire is important for any cyclist. With the right equipment and a few simple steps, you can quickly and easily inflate your tubeless tire so that you can get back on the road or trail.
Additionally, regular maintenance of your tire will help ensure that it remains in good working condition. Now that you know how to properly inflate a tubeless bike tire, you can enjoy a safe and efficient ride.
Louis Wein
Louis has always been fascinated by cars. He loves the way they look, the sound of the engine, and how they make him feel when he's driving. He is always keen to learn more about different mechanics of cars and how the engine contributes to other aspects of the car. As an automotive technician with over 10 years of experience, he knew how they worked and loved taking them apart to see how they went back together. He was especially interested in the mechanics of combustion engines and loved finding ways to make them more efficient. He loves to work on cars and help people keep their vehicles running smoothly. As a senior editor, he enjoys contributing to Diy quickly because it allows him to share his knowledge and expertise with others.