
How to Install Portable Air Conditioner in Crank Window
Introduction:
However, it is wise to install a mobile unit instead of being dependent upon the centralized team for several reasons. In this article, I will discuss how to install portable air conditioner in crank window.
Portable Air Conditioner is an air conditioner that does not have to be fixed in one location. The portable air conditioner can be moved from one room to another quite easily. Many types of air conditioners comprise window units, central units, and portable units in the market.

The Benefits of Installing a Portable Ac in Your Crank Out Window:
1. Save Money! Installing a portable AC will save you Money on electricity compared to running your central air conditioner. For example, running a window AC at 80% capacity is much cheaper than running the central AC unit at 100%. Window ACs are also more efficient, especially if they are Energy Star rated.
2. Stay Cool any time & and where…You can stay cool anywhere with this small yet powerful Air Conditioner for rooms that don’t have an AC, or have enough power supply to operate Large Central ACs.
Moreover, Portable A/C also provides a cooling solution in construction sites, factories, and warehouses with no fixed Air-conditioner installation areas.
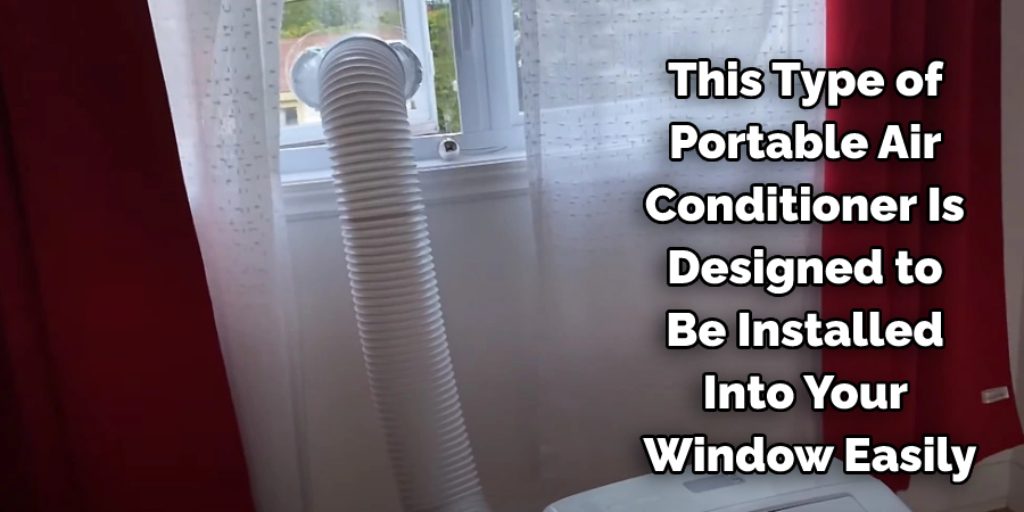
3. Easy Installation – This type of portable air conditioner is designed to be installed into your window easily. It doesn’t matter what type of crank-out windows you have, and these A/Cs can easily fit into any size and shape window!
4. Portable air conditioners come with either dual hoses or single hoses. Dual hoses attach to the exterior vent of the unit and the other end goes to another part of the home, like a window. Single hose models only cool the room they’re in, but they also transfer humidity to another part of the home that has a central AC system.
They work best when paired with another fan that can move the humid air out of the house, so it doesn’t cause problems for anyone else.
5. Window units are an easy solution when you don’t want to sacrifice comfort by giving up your central AC, or you don’t have enough power to run it full time. A window unit will keep one room cool without taking up any floor space.
If you’re looking for a spot cooling solution that’s more effective than an evaporative cooler but less expensive than central air conditioning, then this is the perfect solution.
6. Portable Air conditioners can create negative pressure in rooms with operable windows. Allowing outside air to enter the home through other unconditioned spaces like bathrooms and bedrooms can cause problems – especially if they aren’t well sealed.
Misusing these devices can also allow humidity into the house, leading to mold growth and possible damage to unconditioned spaces’ floors, walls, and ceilings.
Stepwsie Guide on How to Install Portable Air Conditioner in Crank Window:
Step 1 .
Choose a window that has at least an inch on each side of the AC unit after the installation.
Step 2 .
 center of your window to match the size of your AC’s drain pipe.” class=”wp-image-31153″/>
Drill a hole in the center of your window to match the size of your AC’s drain pipe. Use a round file to make it smoother, and you can also use silicon caulking if you wish for water not to seep through.
Do not drill any holes yet unless this is where you will install your AC unit so that water will flow out when it melts down into ice form.
Please make sure that there are no obstructions where you will drill, or else it would end up puncturing other parts inside your room, creating more significant problems than solving one. Keep checking around before finally shooting it.
Step 3 .
Build a temporary panel where your window is installed using plywood material covering the whole window (lining both sides). Make sure that it is tight enough not for water to seep through. You can also line it with a pad or styrofoam around it to make the AC unit installation more accessible and less bulky.
Step 4 .
Put some insulation inside your room before you start working on the outside of your home (if possible, use fiberglass batting because this would completely seal b off any ventilated area or gaps within your room).
It would be best to do this first so that the air conditioner’s compressor will not overheat when in use due to heat built up from direct sunlight entering your house.
Step 5 .
Shave off some of the window frames on the inside of your room if it is made out of heavy wood. Again, make sure to do this sparingly so that you will have support on the outside of your AC unit when you install it.
Step 6 .
Use a caulking gun to apply silicone-based caulk around the AC unit outside your house about 2 or 3 inches away from where it will be installed, all around its edges, and also inside the drain hole that you previously drilled in Step 2.
Caulk around these areas to keep moisture from moist air outside away from anything else except for the drainpipe that will flow them out through another window into a place that is not part of your room or where water leakage will cause any damage to anything else.
Step 7 .
Use screws or nails to hold the AC unit in place against your window’s frame, ensuring that it is firmly tightened down so that the weight of water inside will not be able to push it out.
The screws should be at least 1 ½ inches deep depending on how much strength you want it to hold itself up because once the water starts filling inside, it becomes cumbersome and may even pull away from its base if not installed correctly.
You can also use metal brackets with holes already pre-drilled into them before mounting the unit onto the house where you want to install it. This way, it would be easier for you to climb.
Step 8.
Cut a hole through both sides of your window about 1 inch away from your AC unit. Make sure to trim off the jagged edges on both sides of this hole so that you can insert the drainpipe.
Trim it just enough for it not to be seen at all once you put caulk around it later on because if the metal edge is sticking out, then water would accumulate around it, which will not flow properly through another window into an area outside your house or wherever you may want to lead them down to move them out of the way.
Step 9 .
Mount a board using screws or nails under where your AC unit is located so that when water accumulates inside, instead of flowing towards its base and pulling it away, they will go directly downwards through your drilled holes (into the drainpipe and out of your home).
Step 10 .
You can also add insulation around the area where you drilled holes on the sides of your window, but make sure that it is not blocking any water from seeping through because if it does.
Then you would need to drill another hole somewhere else (longer this time) for “flow” purposes for it to be able to let all moisture escape efficiently without creating too much humidity inside your room.
Step 11 .
Once you have finished applying caulk around these holes, insert the drainpipe into one of them until about an inch or so is showing outside, just enough for water to come out into another bucket when it fills up. Then, repeat Step 10 by attaching a board under the unit’s compressor to keep it from pulling away.
Step 12.
Use screws or nails on the other side of your window where you brought insulation around your AC unit, and attach another board under it so that water would not accumulate. This is to ensure that this water’s weight will stay constant regardless of what else you do or add to your room for decoration purposes.
Conclusion:
I hope you have obtained all the necessary instructions on how to install portable air conditioner in crank window. Thank you and have a nice day!


