How to Make a High Waist Pencil Skirt
Introduction:
A pencil skirt is a kind of women’s clothing with a tight-fitting waistline and a straight skirt. The design will draw an imaginary line from the top point to the bottom point in the back and front. Pencil skirts are pretty popular among girls at work and school because they never go out of style and look professional. In this article, I want to share some ideas on how to make a high waist pencil skirt if you don’t already have one. Pencil skirts always look great with classic blouses or sweaters; they can perfectly match any business suit, outerwear, or sweater.

Stepwise Guide on How to Make a High Waist Pencil Skirt:
Step 1:
Fabric selection is key to making any garment. For the Pencil skirt, a firm fabric like denim or linen should be chosen for easy manipulation. Measurement of the yardage (depends on size) is also necessary to plan for the length and waistband required in the skirt.
If you choose a thicker fabric, then you will have to take more care while handling it as it can tear easily if not handled carefully at every step. Pencil skirts are supposed to be tight-fitted; therefore, cut out a pattern piece so that you get an idea of how exactly your skit will turn out after sewing. Cutting out the pattern from heavier fabrics may result in shifting measurements and later frustrating fitting.
Before cutting your pattern pieces, be sure to allow a seam allowance of 1.5 cm on all sides of the skirt. Also, add darts to accommodate your figure appropriately (e.g., if you are bulky at the bottom/waist, then sew darts accordingly). Finally, allow room for breathing (after considering size inflow) by adding 2-3 cm surplus fabric on width and length.
Step 2: Garment Measurements – Waistband
Cut out a rectangle piece from the waistband material having an inch extra or two on lengths as they will be folded over the raw edge of the waistline when hemming. The actual measurement of the waistband should not exceed half an inch more than your natural waistline, and it should be an inch or two in width.
Stitch the edges so that the raw edge will be folded and hemmed easily. Then fold the waistband piece over the skirt’s side seams on top of them by a small margin and sew it down to create a neat finish which will aid in the easy fitting of the waistline band later.
Step 3:
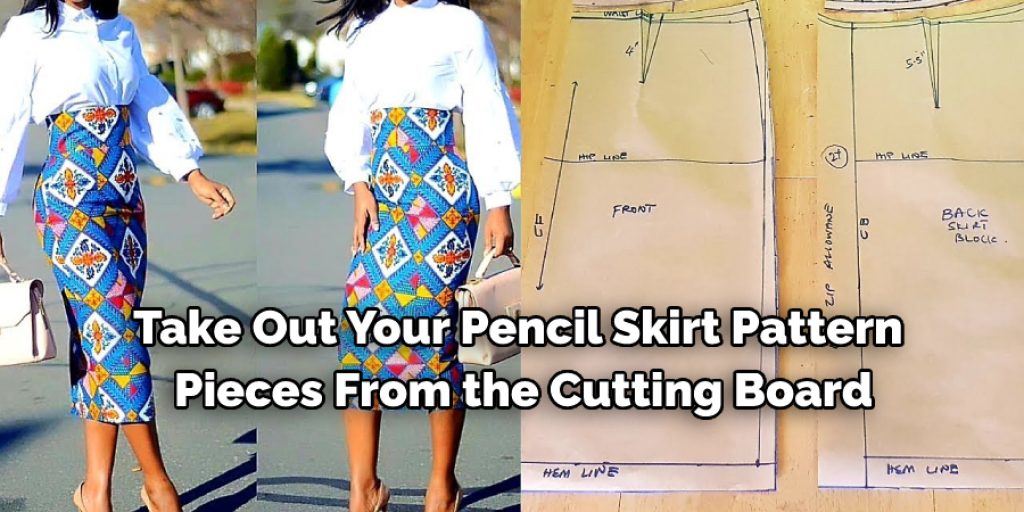
Take out your pencil skirt pattern pieces from the cutting board, lay out the pieces separately on the surface along with the waistband piece,s and then pin them together (make sure seam allowance is included). Once done, cut out all pattern pieces with extra attention required while handling heavier fabrics because they can tear off even if you make a minor mistake! Hemming should be elegant, so ensure to handle the fabric with care.
Step 4:
Layout the pieces of your pencil skirt pattern on a table and the waistband piece and pin them together. After done, cut them out along with extra seam allowances (1-2 cm). Once again, ensure that all measurements in the pattern are correct to avoid shifting while stitching, making fitting difficult later on.
Step 5:
Make a basting stitch on both sides of each seam to keep material tight for sewing above step’s final hemming. Also, ensure not to stretch material while making basting stitches because it may lead to bunching or excess fabric during sewing, which will create extra jamming when sewing is complete. To prevent this, you can either use pins or draw lines on both side seams outside the fabric.
Step 6:
Stretch the waistband piece over both sides and stitch on it to get a neat finish for easier hemming later on. Also, make sure not to stretch material while stitching so that there is no bunching up of cloth at this end, as it will create extra jamming during final sewing.
Sew inner layers together first, then the outer layer accordingly. Finally, ensure that the seam allowances are kept intact for a neat finish without any visible stitches because they can look very awkward when you wear your garment.
Step 7:
Once done with step’s above stitching, cut off the excess length from the sides of the waistband, which exceeds half an inch from the actual waistline measurement, keeping the raw edge tucked inside. Now, roll the waistband piece over the skirt’s side seam and keep it snug, allowing easier hemming later.

Step 8:
Sew the waistline band into place by stitching the inner layers together first and then the outer layer accordingly. Make sure not to stretch fabric while making this final stitch so that there is no bunching up of cloth from this end, as it may cause jamming when you sew in the future. Ensure that your final stitch remains seamless!
Conclusion:
I hope this article has been beneficial for learning how to make a high waist pencil skirt. Thank you, and have a nice day!
Check our article How to Make a Pencil Skirt Without a Pattern