
How to Make a Homemade Star Projector
Introduction:
Today, I am going to show you how to make a homemade star projector. This star projection functions as a pinhole system, so there would be more’ stars’ if you attach additional lighting inside. Be alert. When you look directly at them, you would most likely have pain several times. On the other hand, such led lights are gleaming.
Content:
- Two panels, or some such similar, of 12 x 20 black museum paper.
- Two panels, or some such similar, of 12 x 20 black museum paper.• A RadioShack charger adapter that carries 4 AA batteries. (6V emission amount)
- 1 (or 2) led incredibly white lights. I utilized two of such components/products. (They are valued at 3.15 to 3.99V and 700mA limit)
- Since such led lights pull a lot of voltage, remember to make a package of resistances to manage the capacitance in parallel, or else stuff could cause fires. By each LED, one box of resistances. I utilized three resistors with 470ohm plus one with 4.7ohm. (As the resulting overall sum, you need something small, about 4.7ohms. Use either mix, ensure that your calculation is correct.)
Instructions On How To Make A Homemade Star Projector
- Split the red lines, and the black lines are rated.
- You’ll get to pick out the loops with anything small and rough after you’ve split.
- Flip subtly down all the final scores, and you’ll quickly begin to see the form.
- One bit of advice: take off a quarter of the surface of the scored tab before you get to attaching; it will help the entire form suit even easier.
- Have the adhesive! For a fast solution, I utilized a glue gun. You could even use the mad adhesive. You like to dry everything quickly.
- To get near a final quantity of about 4.7 ohms, I utilized three 470 ohms resistances, including one 4.7 ohms. Using four resistors in parallel makes it easier to accommodate the highest value amp.
- Solder the Lead resistances and hook them up to the set of batteries.
- Set one of the panels open without adhesive as you fix the second part of the item so that you can have the led lights in.
- Within the dome, drop the battery system and LEDs, switching on the power button, and switch off lights!
- (Wire up a dome DC engine and position the entire dome on it to help it turn.)

You Can Check It Out to Organize Resistors
Precautions:
- This should only be done outside or in a well-ventilated area.
- Do not use near an open flame, sparks, lit cigarettes, or other sources of heat.
- Keep the device pointed away from people and any flammable material (trees).
Use nonconductive tools such as wood instead of metal to prevent electric shock when working with electricity.
Why Use Museum Paper For This Process?
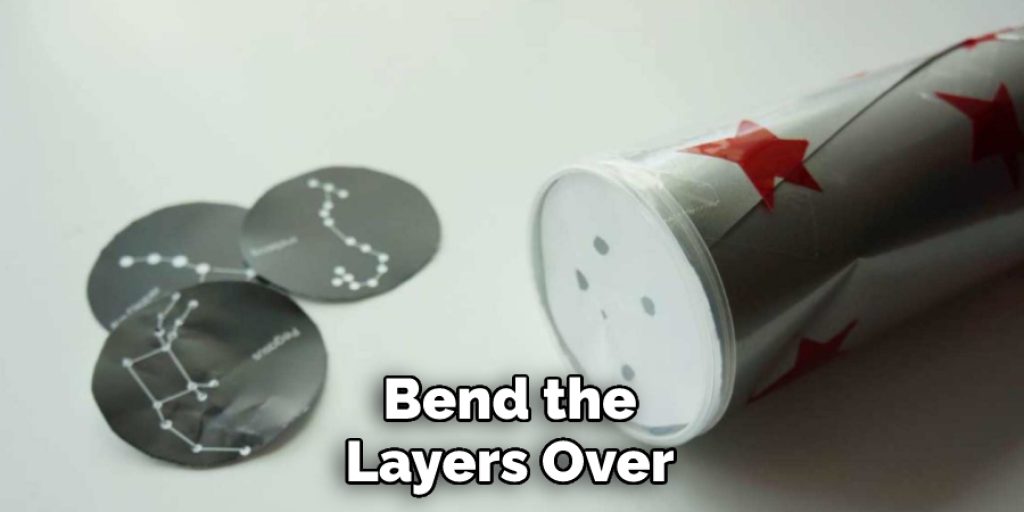
Museum paper is a type of translucent paper with an embossed pattern often used in art projects. Using this specific kind of paper instead of other types reflects light and creates interesting patterns when you bend the layers over each other. This will make your star projector look more like something out of a science fiction movie, rather than just being a simple box-shaped toy to play around with on Halloween night.
Can I Use Other Papers Except Museum Papers?
Yes, you can use any paper that is thick enough to cover the light from below. Place a piece of cardboard or poster board on top of your desk lamp and project onto it!
Can I Use A Different Light Source?
Yes, you can use any light source that is bright enough to project onto your paper. A flashlight or a car headlight will work just as well!
Can I Use Different Tools?
You may, of course, substitute other tools in this craft, such as scissors for an X-Acto knife if needed. How deep into the edge do I cut? It would help if you made sure that no creases are showing on the backside when you’re finished folding. If there are still visible creases, then you have not folded it deeply enough inside out. How wide should my cuts be? The width of the blades depends on how large your star lanterns end up being after they’re unfolded from their new shape, so be sure to measure the finished size before making your cuts.
Which Other Papers Can I Use For This Process?
You can use any paper for this process, but we recommend using a newspaper. If you don’t have access to newspapers or want something fancier, glossy magazine pages work well. Just be careful not to rip the seams on magazines since they won’t lie flat when finished. If it is a light color, you could also use wrapping paper and will show up well with the phosphorescent paint mixture.
Final Thoughts:
The store-bought star projector comes in many shapes, sizes, and colors. Unfortunately, it can be costly too! However, this homemade project was not as pricey or difficult as I thought it would be. So if you have kids that are afraid of the dark, running around at night will feel more safe knowing they’ll see stars all around their room while falling asleep each night.


