
How to Make a Light Up Box Frame
If you’re anything like myself, if you’re doing it anyway and produce the same outcomes, you would not want to waste any cash. The day I was at my nearby camera shop, I spotted one of those lighting sheds “toss-ups.” It took the form of a foldable white shelf container with a gap in front and three lamps-used to picture smaller particles in pictorial production companies (just like chocolate reindeer started shooting on the left).
I was about to buy it when I noticed the sticker price of $75. No chance I’ll waste $75 on a material and three lamps whenever the product would be so little. So I went out and designed one of those light sheds, and it wasn’t at all needy. I used 2x4s and plywood, which I had many of, and covered them with white polyethylene. It would be smooth and flat so it would be easy to clean. I made a door out of one-quarter inch thick polycarbonate.
Method 1
Components:
- A Box – it can be as lengthy as you can shine it any shape you would like! I’d rather it be as rectangular as it could be. You will locate the packages for free everywhere. I earned mine from a workplace they’re putting away anyway. In the back of shopping malls, convenience shops, hardware stores, or practically some locations that produce or sell items, you will see boxes. The wider, the more energetic!
- Tape ‘I’m using tape to safeguard the cloth to package ends. A possible explanation being would be that you’d like to change it up out various garments in-case. I use usual tape for the covering up. A possible explanation being would be that you’d like to change it up out various garments in-case. I use usual tape for the covering up. Plywood ‘I employ plywood or any kind of long wood for the main structure for carrying cloths.
- Adhesive ‘You should use a “Glue Piece” or a sprayed glue to hold the casing in the bag.
- Fabric ‘It might be some sort of again. I included white muslin cloth in my package, which is available in the nearest design & craft shop. Purchase plenty to support the whole line. Several fabrics, such as white cotton and white fleece, were recommended. When your clothes are incredibly inexpensive and have enough linen to lie about, split the ends to where you’ve got two top pieces. When you use several tops, make sure that the shade suits or the outcome are not what you want.
- White Bristol panel ‘It rows the interior of the package and even acts as the back circle. I recommend purchasing 2 to 3 papers because you split two to match up the box (can be much more based on the package shape) and one for the rear portion. Bristol board is a large sheet (.006′′ dense), used during sketch/paintings purposes. The title comes from Bristol England, from which it emerged. You may even collect various colors when you needed another back shot.
- Lamps have to illuminate this package, so it might be the most costly aspect of the box because you’ve got the lighting already. To my perspective, the most critical element of this package is illumination. Because without you won’t get the photo you want. And I’m guessing you want the most beautiful photos in your product image gallery.

Procedure:
- Consider taking your packet with a tape ruler and indicator, and quantify various layers with your sign in 2′′ form of the edge of the package. Use this straight edge to link the areas to which you will get a good looking rectangular/square in the center of the frame, with a 2′′ boundary around this one. Leave the upper part of the package on its own, because you won’t have to label it.
- Split the squares which you have made. Repeat it to the corners of the wall where the frames were placed. Cut the container heads, or erase the flaps at the upper of the packet when you complete it. Consider leaving The Untouched Lower part! I hope you like the result. If you want to make a specific design, you can select and cut out different pictures from the Internet or magazines. You can also add your own photos and print them on paper.
- Now keep taking your Bristol panel and render sections for every 2 inches 16 times with your indicator. Then, use your cutter to cut out 16 slices.
- Adhesive the pieces of paper into a case. Be sure that the edge with the label goes into the cardboard, and it is not noticeable. Take a further part of the Bristol panel and split it so that the size is the same for the frame in there, and the duration will be much higher than the package.
- Position the big section of Bristol panel within the package where the part slopes downwards. Stop creasing because the picture lights up. Split off the extra paper, which sticks out the end. Cut the Bristol panel with a sharp knife.
- Split the fabrics down to where the gaps should be filled. And cut an extensive section into which the rest of the package would be sealed. Tape the cloth to fill the gaps in the package except the one in front of the eyes. Then tape onto the upper corner.
- All you’d have to do is illuminate the roof of the case and start snapping!
- There are lots of differences that you can make to have the picture you would like. If you have a shadow issue, I recommend that you illuminate the other sections of the package. I recommend a lens cap or push the lens back into the box if you have to vignette. Photoshop may even be a helpful device! Because my lens and photographs are not the nicest, I have to post the ash which sits on or in my photo. I’m adjusting the concentrations too, so it’s brighter.
Method 2
Essential Equipment:
- 12 “x 12” Opening plate with 4 “x 4”
- Shadowbox model (minimum depth 1)
- 4 1/2 “images rectangle
- Scissors or tweezers
- Strong Unit
- Stiff conveyor band
- Battery-operated LED Mobile Lighting
Instructions:
- Prepare Frame: Cut behind the glass the bottom, shadowbox lining, and all other components. Set it aside.
- Pictures Print and cut: Printing images to a rectangle measuring 4 1/2 inches, marginally more extensive than the gap of a pad. As needed, trim extra paper from the pictures.
- Protect pictures: Add a strip of tape to the rear of the frame, both with the adhesive surface and picture meeting you. Position the mat over the picture, then organize it and gently press on the spot to be highlighted. Turn the carpet open, then film the picture’s remaining three hands. Continue for all photographs. Put the cloth into the case of images.
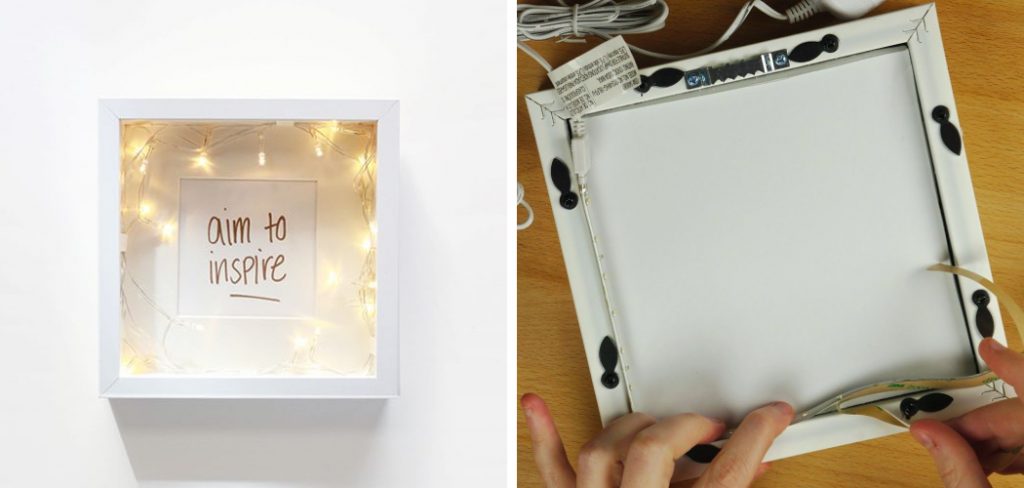
- Effective LED elevated Set: Turn down the LED battery system with sturdy tape on the inside of the piece away. Based on the framework making sure to find about 1/4 inch across the corners.
- Extended as well as Light Security: With transparent tape, glue the LED lighting down such that the picture can be equally illuminated. The LED lighting strip is flexible and can be bent as you like. With transparent tape, glue the LED lighting down such that the picture can be equally illuminated. The LED lighting strip is flexible and can be bent as you like.
- Place package or container back together Position the mat with the photographs within the case (confronting the glass), reassemble the shadow box’s lining, and fasten the bottom. Add a decorative touch Place the shadow box in a safe place where it will not be disturbed. Add to the display by placing other artifacts within the box. For example, if your father’s photographs document his life as a musician, you might add his musical instruments to the display.
Elizabeth Davis
Elizabeth is a creative writer and digital editor based in the United States. She has a passion for the arts and crafts, which she developed from a young age. Elizabeth has always loved experimenting with new mediums and sharing her work with others. When she started blogging, she knew that DIYquickly would be the perfect platform to share her tutorials and tips. She's been writing for the blog from the beginning, and her readers love her helpful advice and easy-to-follow instructions. When she's not writing or editing, Elizabeth enjoys spending time with her family and friends.


