How to Make a Mummy Coffin Out of Cardboard
Introduction:
A mummy coffin is a cardboard coffin you make for those who have opted for cremation. When someone chooses to be cremated, they are given what’s called an urn. The urn is where the ashes are held after the body has been burned at high temperatures to purify it and turn the non-biodegradable parts into ash.
Normally, when you think of an urn, you think of something made of ceramic or metal. However, some families choose to forego the typical urn and instead use a custom cardboard box called a ‘mummy’ or ‘cardboard’ coffin. In this article, I will discuss making a mummy coffin out of cardboard. So let us get started.
Detailed Instructions on How to Make a Mummy Coffin Out of Cardboard:
1. Cut out about half a foot wider than you want your coffin to be.
2. To create the bottom of your coffin, cut a piece of cardboard that is 1/4 inch shorter and 1/4 inch narrower on both sides than the width of your coffin. Then, in the center of this rectangle, draw an upside-down “V” shape in each corner. This will create a tray at the bottom for some adhesive material later on.
3. Now, cut two pieces about 24 inches x 8 inches for the sides, two about 9 inches x 4 inches for the ends, and four 6-7 inches x 3-4 inches for the corners (not including any triangles at the top).
4. Place a piece of cardboard about 12 inches x 6 inches for your right side, and put another one 9 inches by 4 inches on top (make sure you don’t overlap them). Then place two 3 1/2 inch pieces on the side corners and close them up with some tape. Make 2 more sides this way: one for your left side and one for the back panel.

5. With a ruler, make a line across all four walls about 15-16 1/4 inches from the top of your coffin, leaving about 2-3 inches above that space blank so you can glue in some more cardboard to cover over any gaps between your “top” layer of wood and bottom layer of cardboard.
In other words, about 15-16 inches is the space you want to leave for a border, and then cut out some triangles (these will be used as backs on your top layer). This should create a wall that droops over itself at the top to prevent anyone from looking inside your coffin once it’s finished.
6. Now, fold in two triangle pieces on each side: one towards the center (so they overlap) and one towards the outside of your coffin walls. After that, place them flush against the corners where the two sides meet.
Then make another diagonal piece for the top back corner, but make this piece longer than the sides so that when it overlaps, it creates a nice shape on the top of your coffin. Finally, glue these pieces down with some adhesive (I just used hot glue), and then place another piece in between them where they overlap to create a “gap filler.”
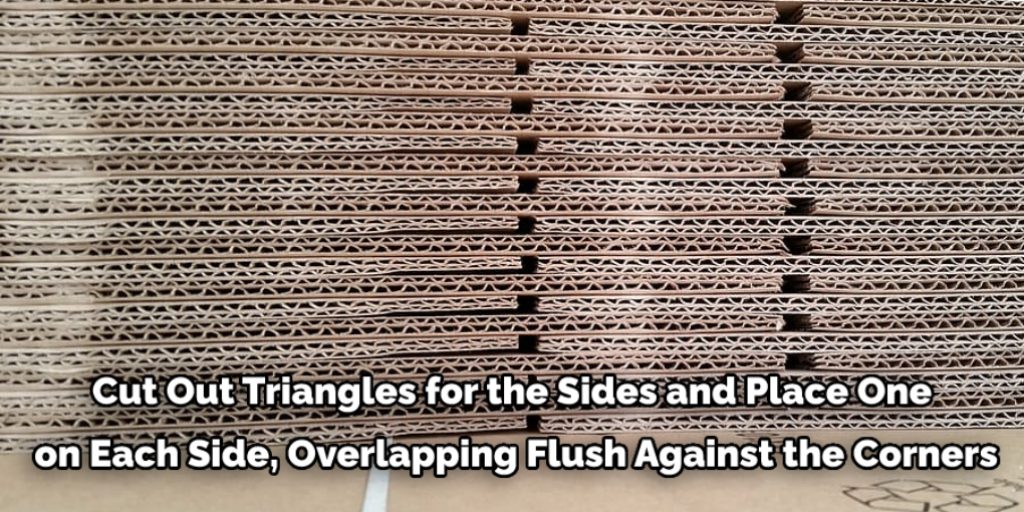
7. Cut out triangles for the sides and place one on each side, overlapping flush against the corners. Then cut out 2 more triangles that you will add to the back panel where the backside triangle overlaps flush against each other.
You’ll use this as extra protection for any gaps you might have after being able to see through all those edges of the cardboard. Use adhesive here also, but remember not to put too much so you can easily fold this over and secure it in the back later.
8. Now that your coffin walls are covered, you’ll want to glue in a piece of cardboard for the very top (use some adhesive here too). This will be about an inch shorter than the other cardboard pieces on the coffin to create a gap between the 2 layers when you close it up.
Again, the length is up to you, but remember that there will need to be enough room near the bottom where you can place a light inside (so perhaps just cut out enough for a foot area or something like that). Also, don’t forget to make two diagonal pieces to fill in those corners!
9. If necessary, add more insulation with some smaller pieces of cardboard. If you notice any gaps, glue some cardboard inside the walls to fill in that space.
10. Use more adhesive to glue on some small pieces of cardboard at the bottom of the coffin that will help prevent light from escaping through the bottom (between your 2 layers). You want this layer to be thick enough to prevent light from showing through anyway, but if your walls aren’t completely sealed yet, then a bit more at the bottom won’t hurt! The paper I used was about 1/4 inch thick, so it was perfect (if needed, just cut out bits and stick them over wherever are still gaps).
11. The last step is making a door for your new “coffin”. I just made mine rather simple: I folded a piece of cardboard in half, cut out an L shape to fit into the edge of my coffin (without protruding outside), and glued it onto there. At this point, you might want to add more cardboard to fill gaps along with your door where it overlaps if necessary.
12. Fill up your coffin with any old clothes that you don’t wear anymore! The idea here is that as soon as someone throws their coin into your “coffin,” then they will be able to see inside through the paper walls, which are not securely sealed yet. It’s meant to look like a placeholder for when you get around to actually sealing everything up later.
Then, place some fabric or something over the top edges so that people won’t see inside even if they shine a lamp in. You don’t want them to accidentally shine their light through the opening where your door is, or else you might spend too much time trying to explain why there’s no mummy inside (which could kill the “suspense” someone will build as they open it).
If you have trouble making the top edges look nice, just cut out some smaller pieces of cardboard and glue them into place on top.
Frequently Asked Questions
Can You Get Cardboard Coffins?
You can get cardboard coffins online. One of the best ways to honor a loved one is by creating a beautiful, meaningful, and personalized cardboard coffin. Our range of customizable cardboard coffins is perfect for all occasions, whether it’s a funeral or just as an idea for a unique birthday present.
Are Carboard Coffins Expensive?
Yes, cardboard coffins are expensive because they are the most environmentally friendly and cheapest way to dispose of your dead body. You can use a cardboard coffin for funerals or cremations.
How Long Does It Take for a Body to Decompose in a Cardboard Coffin?
The average time for a body to decompose in a cardboard coffin is between three and ten days. It will depend on the conditions of the coffin and how much moisture is present in the air.
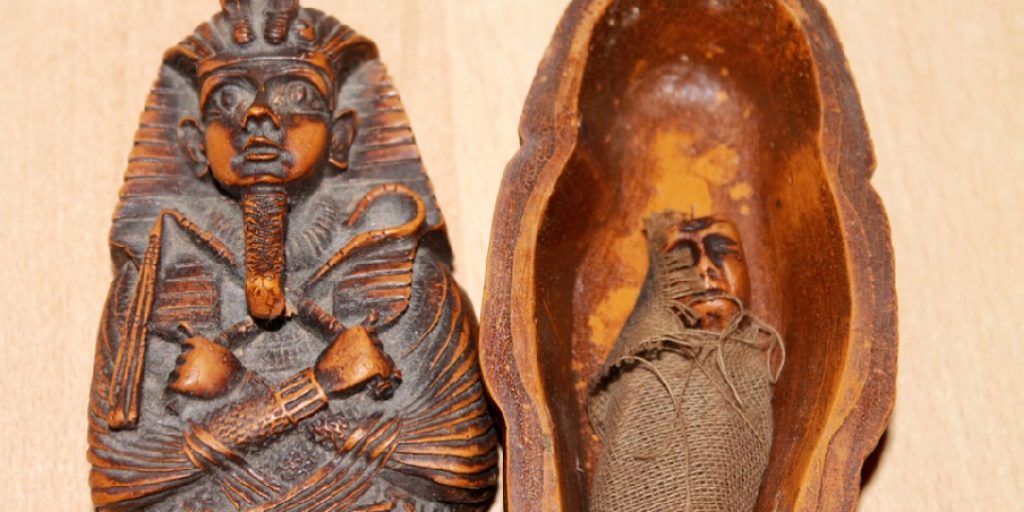
What Is the Burial Box a Mummy Called?
The Burial Box is a name given to the coffin used in Ancient Egypt. It was a wooden coffin with a false bottom with a cavity inside, lined with linen and then filled with organic materials such as sand, mud, and straw.
What Is the Difference Between a Sarcophagus and Coffin?
A sarcophagus is a type of stone container for inhumation. The body of the deceased was placed inside, and the top would be closed with a slab or door. A coffin is made from wood, metal, or other materials such as wickerwork and has an opening at one end for placing the deceased.
Conclusion:
I hope your article has been beneficial for learning how to make a mummy coffin out of cardboard. Thank you, and have a nice day!
You may also read – How to Spray Paint Cardboard