
How To Make Clouds In Resin
The cloud effects inside of a resin piece is really a piece of wonder. It can amaze your guests and attract their attention. In fact, there are several other things that can be done with this little piece of resin. In fact, these things are widely used as decorative items of the house.
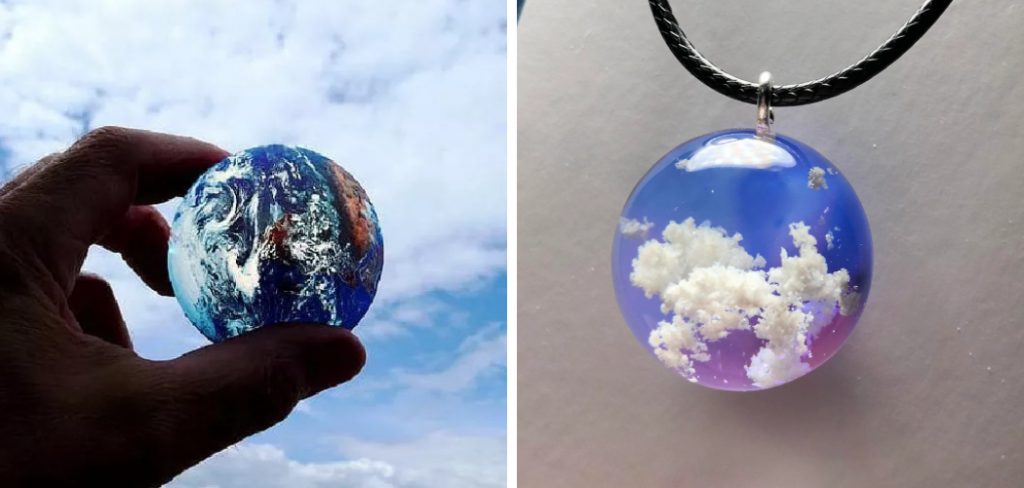
However, there are several other uses for this item. If you want to learn how to make clouds in resin, don’t worry, I am here to show you the exact techniques. After learning the techniques, you will love to make these items more often. So, without any delay, let’s dive in!
Summary: Making clouds in resin is a breeze with the right tools and materials. You’ll need some resin, water, and a paintbrush. Start by mixing your resin and water together in a bowl. Then, paint the mixture onto a surface like a workbench or a canvas. Let the resin dry for a few hours, or overnight. Once it’s dried, use a knife to make cuts into the resin. Then, fill the cuts with air and wait until the resin cools. Finally, use a sharp object to cut out the clouds.
How to Make Clouds in Resin

To make the clouds, we are gonna be using air-dry polymer. Start making the clouds by using a small amount of white polymer clay. Then use two toothpicks to pull up small bits of clay to look like fluffy, wispy clouds.
After that, you have to put a thin layer of clear UV resin into the mold and start adding a few of the clay clouds. Make sure to push them to the bottom of the resin. Add three to four clouds, and then cure that resin layer under the UV lamp.
After that, squeeze another layer of clear resin and add some more clay clouds to it. Once it is finished, put it under a UV light to let it cure. Next, squeeze some clear UV resin into another pot and add some blue color to it. Then put this mixture onto the bottom part of the previous layer. That’s it; your homemade resin clouds are ready now.
Step by Step Guide: How to Make Clouds in Resin
Step 1: Tools You’ll Need
Tools required:
- Resin Mixing Cups, Scoops & Spoons
- Resin Cleaners and Degreasers
- Resin Dyes
- Cosmetic Sponges & Sponge Applicators
- Paper Towels & Cotton Buds
- Scalpel or Exacto Knife
Step 2: Layering The Cloud
To make your resin clouds, mix together equal parts of each colorant in each cup, depending on how dark you want your clouds to be. Thoroughly mix the resin with a plastic spoon, scraping the sides of the cup to make sure all the mixture is blended.
Step 3: Creating Your Cloud Shapes
Apply a toothpick-sized bit of each color into each well of your silicone ice tray, filling each area about ½ – ¾ of the way full. Sponge a dollop of resin over each cloud shape in your ice tray with a clean cosmetic sponge, ensuring an even coat that is about ¼” thick.

Step 4: Clean Up the Edges
Wipe away any excess resin from the edges of the silicone tray with a wet cotton bud or paper towel, making sure to leave a border around each cloud shape. You’ll want to avoid wiping over the backsides of your cloud’s shapes too much, but you’ll still want to wipe away any excess resin that has run into the edges of the tray.
Step 5: Adding a Little Atmosphere
After filling your cloud with resin, you may find it helpful to add a little atmosphere by taking another clean cosmetic sponge, spritzing it with isopropyl alcohol, and then dabbing it onto your cloud to give it an ethereal appearance.
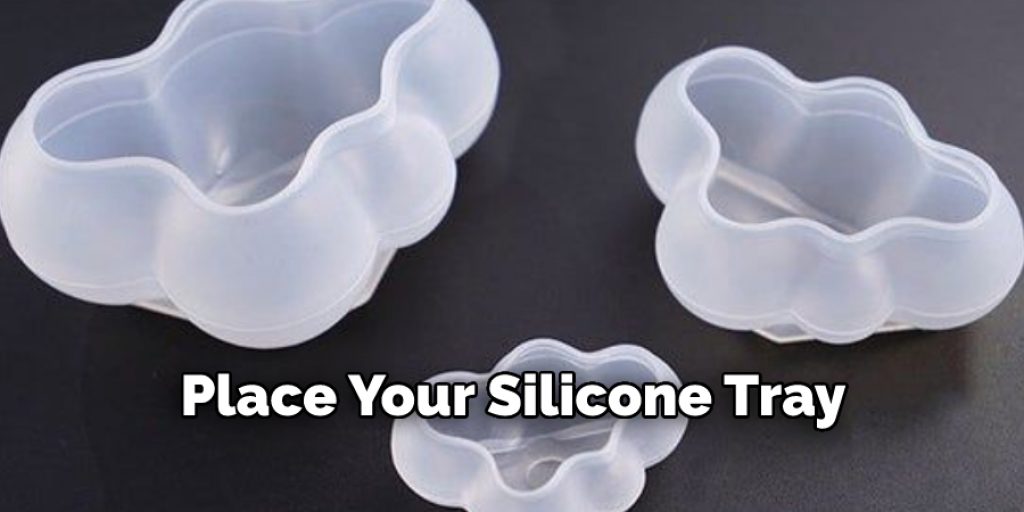
Step 6: Air Drying the Resin Cloud Shapes
Place your silicone tray with the resin-coated clouds on a paper towel or other clean surface and allow them to air dry for 30 minutes to 1 hour. This will ensure that your cloud’s shape is maintained after it’s removed from the silicone tray.
Step 7: Removing the Cloud From The Tray
Once your resin clouds have dried, you can remove them from the silicone tray by gently pushing up on one side of a cloud shape to pop it away from the tray’s surface. If any parts of your cloud’s outline become distorted or messy, you can use a small ball tool or your scalpel to smooth out the imprecise areas.
Step 8: Cleaning Up Cloud Shapes
Some of the resin will have seeped down into the tray’s outlines and between each cloud shape – an effect we want in the finished piece. So, don’t remove any stray pieces of resin that have seeped down. Just wipe any excess resin with a cotton bud or paper towel, then run the silicone tray under warm water to clean off any remaining residue.
Step 9: Making Billowy Clouds
If you want thicker, more prominent clouds, add another layer of graduated cloud shapes and spritz them with isopropyl alcohol to create a billowing effect.
Step 10: Add Featured Clouds
Once your base cloud is complete, take a toothpick or small ball tool and score it in various places for more texture and depth. Don’t be afraid to do some damage to your cloud!
Once you’ve added your texture, take a clean cosmetic sponge and spritz it with isopropyl alcohol. Gently dab this onto the raised areas of your cloud to pick up any remaining resin dust that will help give it more dimension.
Some Helpful Tips and Suggestions:
1. Clouds are best made by brush application. You can use an airbrush, but it’s much harder to achieve the wispy look that clouds often have.
2. Mix the cloud color in a separate container and add about 10% (or less) of your cloud color to the main resin batch. This is because two colors are mixed to make a third color, and sometimes it can be hard to keep track of which areas are which color.
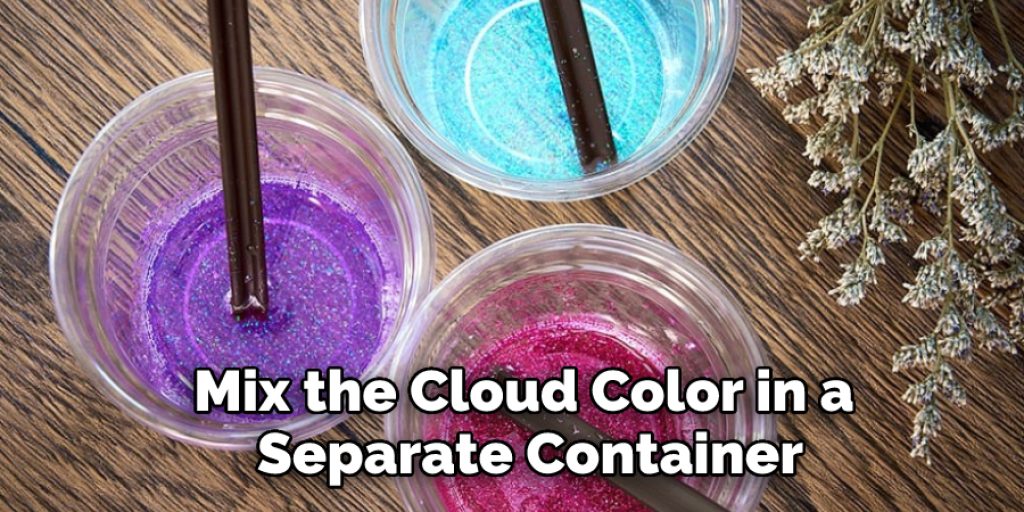
3. Don’t mix the cloud color onto the resin until just before you pour it into your mold; otherwise, the cloud color may sink to the bottom of your container. You don’t need much cloud color; mixing too much will make it harder to achieve a wispy look.
4. Add some cloud color to one area of the mold and let it sit for 5 minutes, then add more to another area and let that sit for 5 minutes. This will give your resin slightly differing colors, making them look more realistic.
5. You can make bubbles in your resin by mixing Bubble-B-Gone into the resin. The bubbles should pop within 12 hours. Another way to create bubbles is to mix some dish soap with water and spray it onto a mold area before pouring the resin.
Can You Put Cotton Wool in Resin?
Yes, you can add cotton wool to the resin. It is used for fine art projects or for decorative purposes in jewelry making. It adds texture and color to your resin creations. However, before doing so, make sure that the cotton wool is pre-treated for any potential chemicals, as it may otherwise react with your resin and create a reaction.
Frequently Asked Questions
What Can I Use to Make Clouds in Resin?
To make clouds in resin, you will need a clear container and some water. Fill the container with water and set it on the stove to boil. Once the water is boiling, turn off the heat and add green tea leaves to the pot. Steep for about 5 minutes or until the leaves are fully immersed in hot water.
Once the leaves have been steeped, pour the mixture into a clear container and let it cool down. Once it has cooled down, you can start adding resin to it to create clouds. Add a small amount of resin to your container and mix it well with your hands. Then start adding more resin until you reach your desired thickness of the cloud. Once you have reached your desired thickness, stop adding resin and let the cloud dry completely before removing it from the container.
Can I Put Resin in a Glass Vase?
No, the resin should not be put in a glass vase because it can damage the vase. Resin is a type of glue that is used to make glass sculptures and ornaments. If the resin is put in a glass vase, it will stick to the glass and make it difficult to remove.
Can You Resin Clothes?
There is no definitive answer to this question as resin clothes are still in the experimental stage. However, there are some companies that are currently selling resin clothes, and they claim that these clothes are durable, stylish, and eco-friendly.
Conclusion:
Clouds are a beautiful addition to any resin artwork. In this blog post, we have shown you how to make clouds in resin. This is a simple process that anyone can do with a little bit of practice. You can create your resin clouds to hang in your home or give them as a gift by following these simple steps.
They are a fun and easy way to add some personality to any room and make it feel like your own. Have you ever made your clouds? If so, we would love to see them! Share pictures of your creations with us on social media or in the comments below.
You May Also Read – how to make resin art panels
Elizabeth Davis
Elizabeth is a creative writer and digital editor based in the United States. She has a passion for the arts and crafts, which she developed from a young age. Elizabeth has always loved experimenting with new mediums and sharing her work with others. When she started blogging, she knew that DIYquickly would be the perfect platform to share her tutorials and tips. She's been writing for the blog from the beginning, and her readers love her helpful advice and easy-to-follow instructions. When she's not writing or editing, Elizabeth enjoys spending time with her family and friends.


