
How to Make Dichroic Glass Without a Kiln
Glass fusing is a technique that allows you to join the pieces of glass and make something more interesting. It’s a melting process where the pieces of glasses are melted at high temperatures and attached together. The best thing about this process is that it can be easily done at home with some DIY methods.
But for this, some essential tools are required. A kiln is one of those essential tools that undertakes the heat and melt the glass pieces together. Honestly, there is no way to melt the glasses without a kiln. So, if you ask how to make dichroic glass without a kiln, I will say there isn’t any.

To make dichroic glass, you need to buy a kiln from a shop or online. There are many different types of kilns, so you need to find one that suits your needs. Once you have a kiln, you can fuse glass in a microwave.
Things You Will Need
- Fusible glass
- Glass cutter
- Heat resistant gloves
- Microwave oven
- Dichroic bits
How to Fuse Glass in a Microwave
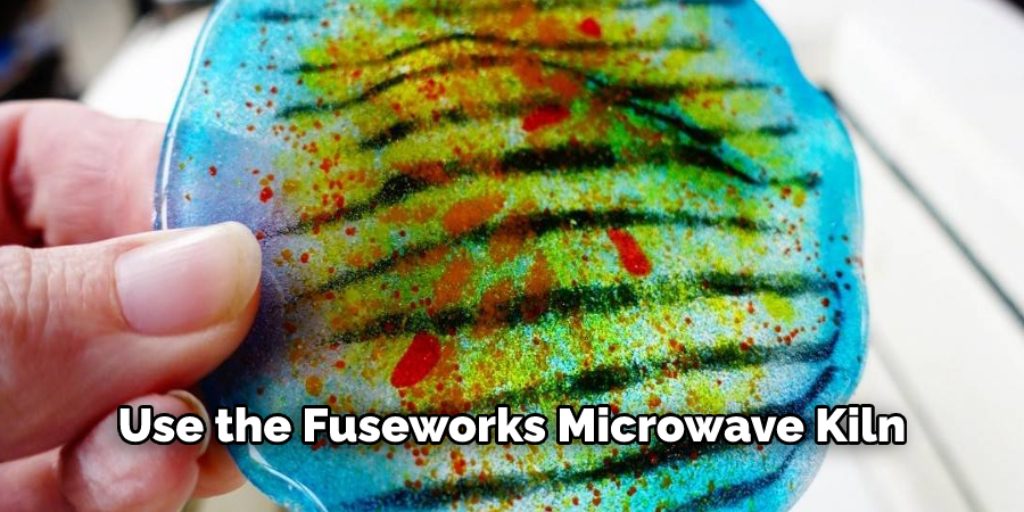
In this case, I am going to use the Fuseworks Microwave Kiln. It offers an innovative way to fuse the glasses in less than 3 minutes glass into the microwave. Let me explain how it works. The cover has a unique, non-toxic coating that allows microwaves to be detected and amplified. So, I am going to use Fusework’s kiln for this project. Put a kiln paper on the base and then place a glass on the surface. Make sure to cut the glass before putting it over the base.
Step 1
First of all, place a clean glass on the base in such a way that the paper’s edge is 1/8 “away at least. For this, I prefer COE-90 fusible glasses. You can also use the 96 or 104 of COE, but it depends on the availability. No matter which glass you choose, make sure not to mix them at the time of fusing.
Step 2
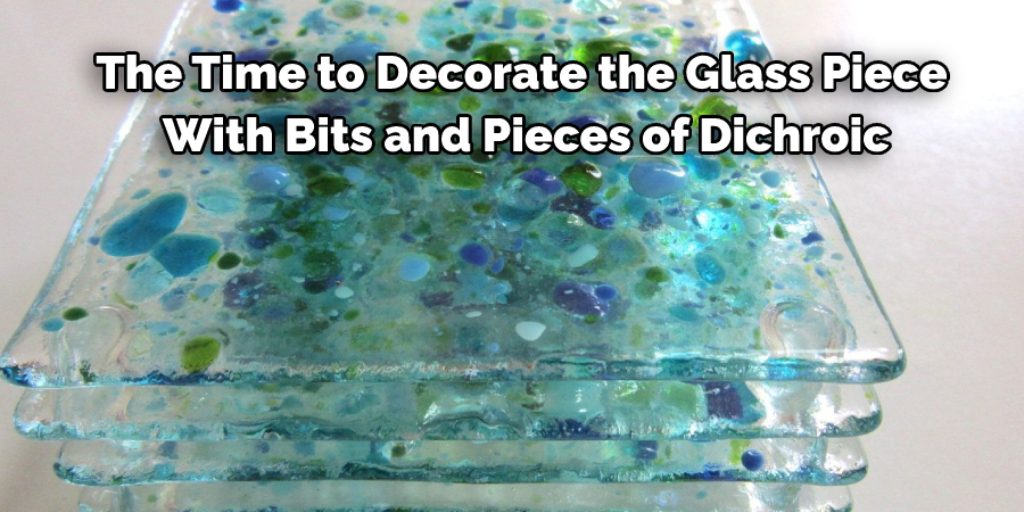
Now is the time to decorate the glass piece with bits and pieces of dichroic. You can also use millefiori or confetti. I will use dichroic bits. When you have the perfect appearance, put the oven base in the microwave with the glass. Place the cover on the frame, close the door by setting the time for two minutes. You will see the glass piece rise. You can watch it by removing the cover once in a while. At the end of two minutes, remove the piece from the oven with caution and allow it to cool in a ventilated area.
Step 3
When the time is over, use your heat resistant hand gloves to lift the lid inside. Your glass should be fused within this time. Now, remove it from the microwave and make it cool for around 30-40 minutes. After making it cool, you can remove your newly made glass piece. That’s it; your glass piece is ready now. You can add as much color as you want and turn them into your preferred shapes.
Frequently Asked Questions

Can You Melt Glass at Home?
No, you cannot melt glass at home. However, if you have a really high temperature, it may be possible to create an object of glass and then heat it to the point where it melts.
To melt glass, you need to use a torch that can reach temperatures of 3000 degrees Fahrenheit. The melting point for glass is 2200 degrees Fahrenheit.
Can You Fuse Glass in a Microwave?
Yes, you can fuse glass in a microwave. It takes about 5 minutes for the glass to be fully fused, and then it will be ready to use.
Fusing Glass in a Microwave
1. Heat the oven on the highest setting for 5 minutes or until it reaches 400 degrees Fahrenheit.
2. Add water to the bottom of your oven pan and then add some ice cubes so that there is a thin layer of water over the entire surface of the pan (this will help keep your food from sticking).
3. Place your glass on top of this layer of water so that half of it is submerged underwater and one side is exposed above water level, forming an “L” shape with your glass as shown below:
4. Place another sheet of aluminum foil on top, ensuring that there are no gaps between the foil and either side of your glass (this will help prevent any steam from escaping):
5. Turn off the oven and place a wet towel over the door opening:
Will a Butane Torch Melt Glass?
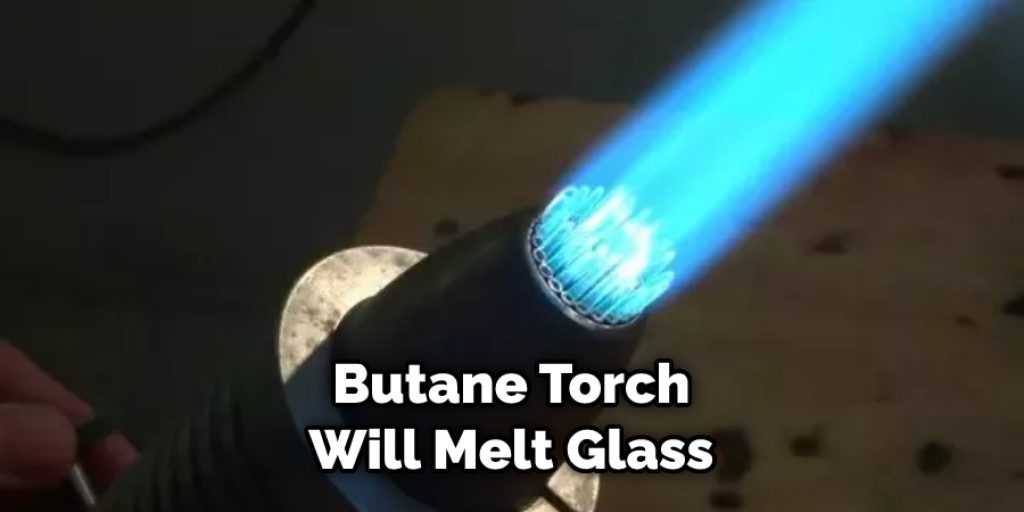
Yes, a butane torch will melt glass. The properties of the fuel and its concentration are what determine whether or not it will be able to do so. Butane has the ability to break down organic compounds into their constituent elements, which are mostly hydrogen and carbon.
When a butane torch heats up, it causes the decomposition of organic materials in the air around it into these two elements, resulting in heat that can melt any material that contains water molecules in its structure.
Can You Melt Cracked Glass Back Together?
Yes, there are many ways to fix broken glass. You can use any of the following:
1. Place a small drop of oil on the top and bottom of the glass and then place it in the microwave for about 45 seconds to melt them together.
2. Place a paper towel or cloth over the area where you broke the glass and place something heavy on top of it like a brick or book so that pressure is applied to both sides of the broken piece. Then leave it for about 30 minutes until you see signs that it has fixed itself together again.
Can You Make Glass Without Fire?
Yes. The ancient Egyptians discovered that they could create a glass-like material when they mixed copper and sand together.
However, it was not until the 18th century that people could make glass without fire. This discovery led to the development of new technologies like glass bottles and windows.
You may read also –
Elizabeth Davis
Elizabeth is a creative writer and digital editor based in the United States. She has a passion for the arts and crafts, which she developed from a young age. Elizabeth has always loved experimenting with new mediums and sharing her work with others. When she started blogging, she knew that DIYquickly would be the perfect platform to share her tutorials and tips. She's been writing for the blog from the beginning, and her readers love her helpful advice and easy-to-follow instructions. When she's not writing or editing, Elizabeth enjoys spending time with her family and friends.


