
How to Make Lawn Stripes
No matter how gorgeous your house look inside, you will have to make sure that everything outside your home is clean and organized. The first thing one will notice while entering your house or just passing by is your lawn. If you are cautious about your home, you will probably have the bushes and other things in your lawn perfectly mowed and shaped. But another thing that will enhance the beauty of your yard is the grass. The best way to make your grass look the finest is by giving them stripes, and here we have with our tips on how to make lawn stripes.
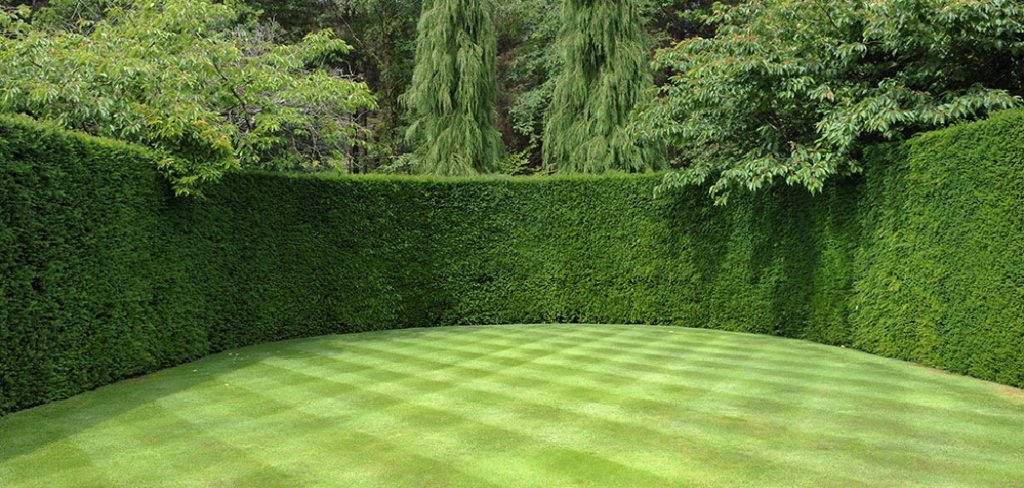
If you take care of your lawn regularly, we believe you will not leave the grasses unattended. While you can still make the grass look good by giving them proper trims but with a bit of design will completely change your lawn’s outlook. The most popular method of grasses is stripes. So, why not learn how to make lawn stripes to give you home a more gorgeous look than it already has! We will be teaching you how to do this while also trying to get a broad overview of the process.
Set the Plan
Before starting anything, you will need to set your plans together. The first thing you have to make sure is that you know how you will do the whole striping thing. For that, take a pen and a paper and make a basic sketch of your lawn. Now set your mind on where and how you want the stripes to be. Once you are done determining, you can get started with the main work of how to make lawn stripes.
Get your Grasses Ready
The next thing you have to do is prepare your lawn. If you have everything in shamble, it is not late to start over. Before anything, get the bushes and trees are your lawn in good shape. You can cut down the dead leaves and branches. It will help you to have a good looking lawn. This is also to help you in mowing. The next thing you should do is look for weeds and remove them from your lawn.
After that, you can start preparing the grass. The first thing you have to do is to see the length of the grass. If you have newly mowed grass, you will need to wait for the grass to have some distance. It would be best if you had some length to work on the striping project. So, you see, the thing will need you to have some patience. And if you have already grown grass, you can start with the work right away.
Get the Perfect Mower
You may thing any mower will do the work, wrong! Sometimes your lawn can be ruined if your mower is not the right one. That is why you need to make sure that you have the perfect mower that can cut the grass as your will.
To make the perfect stripes on your lawn, you can either use a cylinder mower or rotary one. Both of them can do the work properly. Even though we will suggest you go with the cylinder mower as we have seen, other people got the best result with it. The mechanism of the cylinder mower is very simple. It has a cylindrical blade that rotates at high speed and cuts the grass. The cutting mechanism is quite different from the rotary one. As the name suggests, it uses a rotating plate to cut the grass.
Start Creating the stripes
Now that you have the plan, the grass, and the mower ready, you can start learning the primary step of how to make lawn stripes.
Before you can begin, you need to understand the grass and the design properly. Usually, stripes are made by one stripe facing your direction while the other one is facing sidewise. So, you need to draw which stripe will be which one in your plan. After that, you need to align the first stripe with your lawnmower. This stripe will be the base of your mowing work.
The first thing you will do is determine from which side you are going to start the work. We will ask you to cut the side of the lawn beforehand. The side grasses should be trimmed to the proper length of how long the grasses should be.
After you are done preparing the side, you need to get to the actual work.
Take one side of the lawn and start mowing it how you have sketched. Make sure that the mower has a proper set of how long you want the grass to be. You will not want the grass to be way too small. That is why you need to set the setting correctly.
Once you start mowing, make sure you do not stop until you get to the first stripe end. After that, turn 180 degrees and create the other stripe. This time it is going to have the other direction as you have planned.
You keep repeating the same process until you have covered the whole lawn and executed the plan. After that, you are done with how to make lawn stripes.
Future Steps
Now that you have the stripes on your lawn, your lawn will have a new look. You will see how changes the whole transformation of the stripes bring to your home. You will have new things to show to your neighbors and your guests and make them jealous of your organized and perfectly striped lawn.
As for the maintenance, you need to make sure that you do not let the grass go out of control. You know how fast the grasses grow and also the moss and weeds. Keep your lawn clean regularly by taking the weeds out. When your lawn is entirely free of weeds, they will automatically look much better.
As for keeping the stripes checked, you will have to repeat the mowing process once your grass has the right length. Now that you have the whole thing set up, mowing them will not take much effort. Also, you need to make sure that you are cutting in the right direction, and everything will be done in no time.
Final Thoughts
That was all from how to make lawn stripes. At first glance, stripes will seem like something that is tough to achieve. But if you know how to mow the lawn, you will learn how to do the stripes. All you have to do is get the right mower inset and draw your plan correctly. Once you have things set in your mind, you will find creating the stripes is not too hard. And once you are done with the stripes, all you need to do is regularly keep them check, and your lawn will look the finest around neighborhood.
Your content goes here. Edit or remove this text inline or in the module Content settings. You can also style every aspect of this content in the module Design settings and even apply custom CSS to this text in the module Advanced settings.
You may also read now –


