How to Oil Brother Sewing Machine
If your Brother sewing machine is not running as smoothly as it used to or you’re noticing skipped stitches, it might be time for an oil change. This blog post will show you how to oil Brother sewing machine using the correct lubricants and methods. Keep your machine in good condition and running like new with these simple steps!
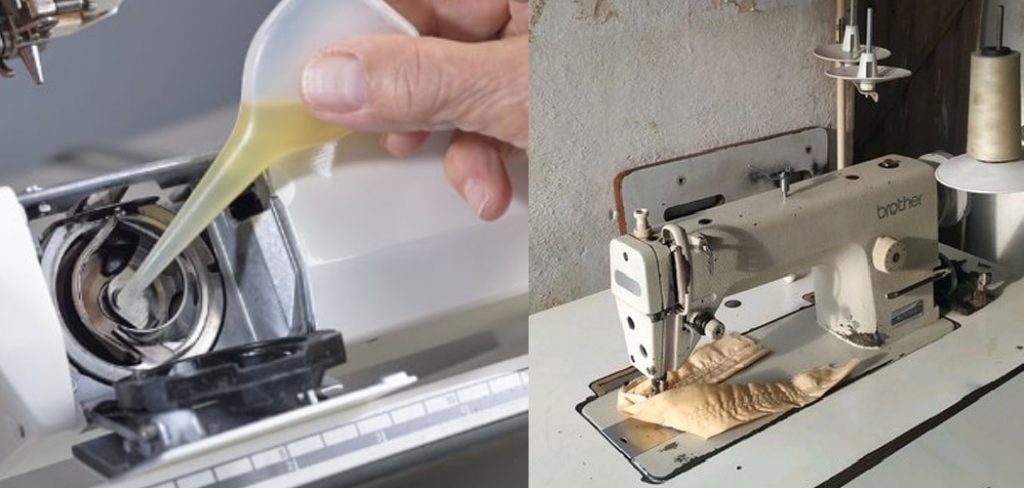
For those of you who sew and want to oil your brother’s sewing machine, it’s an easy process. The first thing you need to do is purchase a can of Singer Sewing Machine Oil from any department store or online retailer. Next, set up the sewing machine on a stable surface and unplug it before opening the top cover. Read on to know more!
10 Ways on How to Oil Brother Sewing Machine
For the most part, oiling is an optional step in almost all sewing machine maintenance. However, you may need to oil your machine more frequently if you sew heavy fabrics like denim or leather. Or, if you’ve noticed that your machine isn’t running quite so smoothly as it used to, more frequent oiling might help. Where do I oil my sewing machine? The good news is that most new machines come with a little guide telling you where to oil your machine.
1. Oil the Shuttle Race
The shuttle race is the part of the machine that moves back and forth under the fabric. To oil, remove the bobbin case and use a small brush or your fingers to apply a light coat of sewing machine oil to the shuttle race. Remove any lint and dirt from the bobbin case with a soft bristle brush.
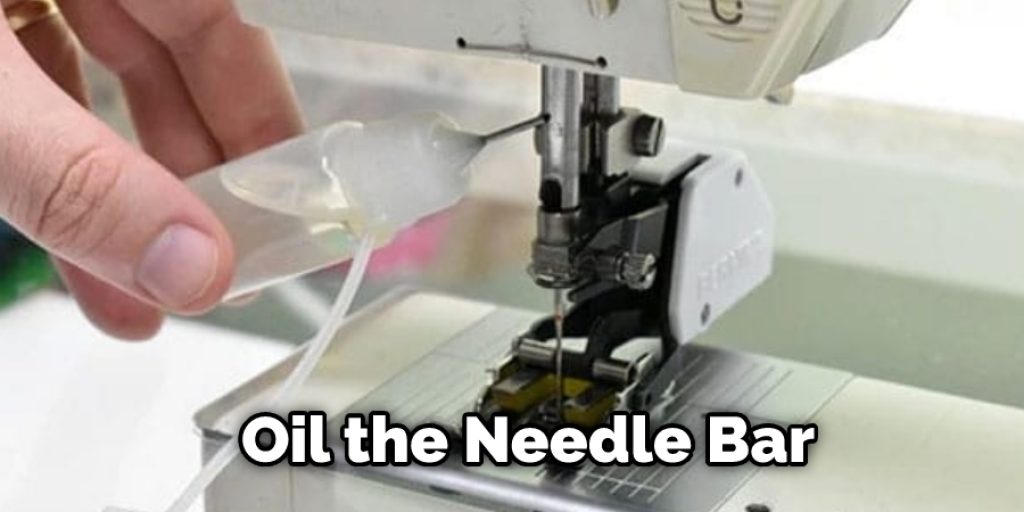
2. Oil the Needle Bar
The needle bar moves up and down to make the fabric move. It’s connected to the presser foot, which you use to lower (“down” or “sew”) or raise (“up” or “lift”) it. To oil, the needle bar, remove the bobbin case, and turn the machine over so you can see the bottom. Look for the small hole that the needle bar goes through, and apply a light coat of oil to both sides of the hole. To oil the presser foot, lower it and then raise it. The top of the presser foot will rise up with it. You’ll see a hole in the top of the presser foot that the needle bar goes through.
3. Oil the Bobbin Case
The bobbin case is located on the left side of your machine, and it’s connected to the shuttle race. It holds the bobbin that spins as your machine sews. To oil, your bobbin case, remove the presser foot and needle. Open the bobbin cover, and remove the bobbin. Use a 1/2 inch strip of sewing machine oil to reach inside the bobbin case and the shuttle race. You can also use a 1/2 inch strip of paper towel or even cotton swab to apply the oil.
Then, use a small brush or fingers to apply a thin coat of oil to the shuttle race. Be very careful not to get any oil on the threading path or the needle plate, as this can cause problems with your machine. If you’re not sure whether the oil has reached all of the surfaces, use a toothpick to apply it in hard-to-reach areas. Then, place a few drops of oil on the lower end of the presser foot screw.
4. Oil the Gear Box
The gearbox is located at the back of your machine, and it contains the gears that drive the needle bar. To oil the gearbox, remove the screw on the right side of your device (or the left side if you’re left-handed).
Once the screw is out, you can remove the cover and apply a small amount of oil to the gears. Be careful not to apply too much, as it will run down and make a mess. And be sure to wipe away any excess before replacing the cover and screw.
5. Oil the Hand Wheel
The handwheel is the large wheel at the top of your machine that you use to turn the machine “on” and “off.” To oil, the handwheel, remove the screw on the right side of your machine (or the left side if you’re left-handed). Carefully remove the cover.
Oil the gears very sparingly with 3-in-1 oil or sewing machine oil, making sure to wipe off any excess that gets on the outside of the machine. For very old machines which are rusted up inside, you might want to use WD-40 instead of regular oil.
6. Oil the Throat Plate
The throat plate is the metal plate at the bottom of your machine that the fabric goes through. To oil the throat plate, remove the screw on the right side of your machine (or the left side if you’re left-handed).
Once the screw is out, you can remove the plate and apply a small amount of oil to the gears. Be careful not to apply too much, as it will run down and make a mess. And be sure to wipe away any excess before replacing the plate and screw.
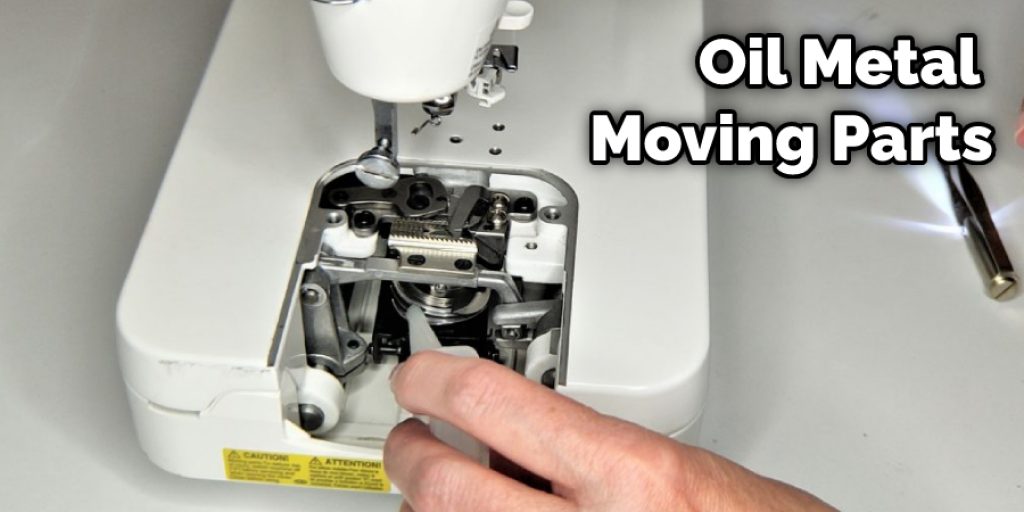
7. Oil Metal Moving Parts
Metal parts like levers, gears and slides can all be oiled with the same method you use to oil your machine’s shuttle race. Take off any covers or plastic parts first, clean them well with rubbing alcohol to remove dirt and dust, then apply a light coat of sewing machine oil. Be very careful not to get any oil on the threading path or on the needle plate.
8. Oil the Motor Shaft
The motor shaft is what moves the gears in your machine. It’s located inside your machine, so you can only reach it with a skinny, long tube or straw-like object called an “oiler.” You can buy oilers at sewing or craft stores.
To use one, remove your bobbin case and the needle plate, then insert the oiler into the hole where the needle bar goes through. Turn the oiler until it comes into contact with the motor shaft, then put a small amount of oil on the shaft.
9. Oil Small Plastic Parts
Small plastic parts can also be oiled using an oiler. Some examples are the tension disc, the screw on the gearbox, and the screws on the throat plate. Just insert the oiler into the hole and turn until it comes into contact with the part you’re oiling. Put a small amount of oil on the part, then wipe away any excess before replacing any covers.
10. Test Your Machine
After oiling, be sure to test your machine to make sure it’s still working properly. Open the bobbin case and drop in a few scraps of fabric or paper towels, then turn your handwheel until your machine sews. Don’t forget to re-oil regularly for best results!

Some Tips and Suggestions
1. If you have never oiled your Brother sewing machine before, take a look at the owner’s manual. There are usually diagrams or pictures illustrating where the oil ports are located on the machine.
2. Before applying any oil to your Brother sewing machine, be sure to unplug it from the power outlet.
3. Refer to your owner’s manual for the type of oil to use. Usually, sewing machine oil or light machine oil will work just fine.
4. Apply a few drops of oil to each port on the machine. Be sure to spread the oil around with a cloth or paper towel.
5. Let the machine sit for a few minutes so that the oil can penetrate the moving parts.
6. Wipe off any excess oil with a clean, dry cloth before plugging the machine back in.
7. You can also use an automotive lubricant or even baby oil on your sewing machine, but be sure to use it sparingly and only on metal parts of the machine. Never use WD-40 on your sewing machine.
8. It is unnecessary to oil your sewing machine more than once a year unless you are using it daily.
Safety Measures and Precautions
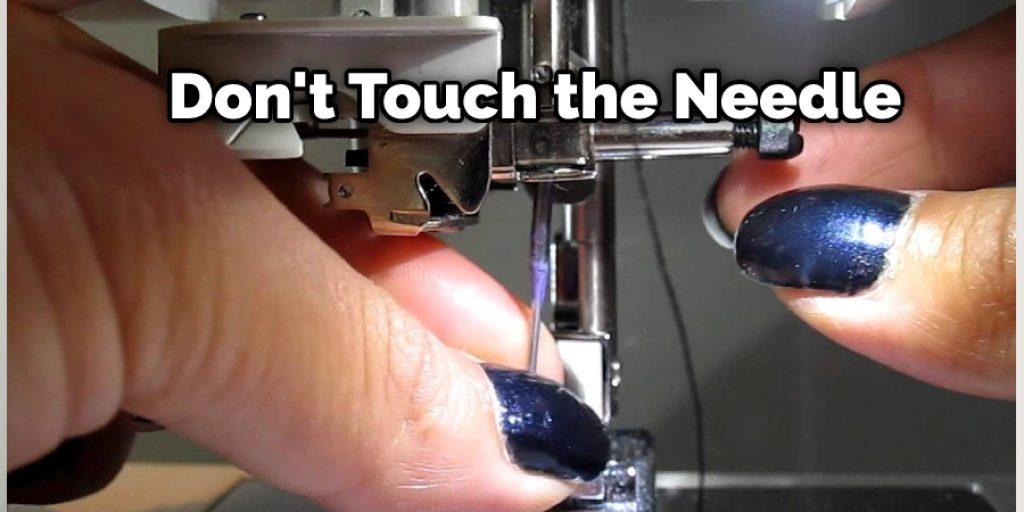
1. Always unplug the sewing machine before beginning any maintenance or oiling procedure.
2. Don’t touch the needle or any moving parts with your fingers.
3. Take precautions against electrical shock by keeping clear of all metal parts which are electrically live.
4. The timing mechanism is particularly fragile and should be handled with special care at all times to avoid entanglement of loose clothing, etc., in the shuttle race or hook race.
5. The hook assembly is particularly delicate. It must be handled with care to avoid unnecessary thread friction under the tension disk, which can cause serious damage.
6. The machine must be oiled with special care to avoid spattering the oil on any electrical terminals or parts (switch, light socket, etc.) since this would eventually lead to severe damage due to short-circuiting.
7. If the thread becomes entangled around the hook assembly during operation, replace the shuttle race at once before removing the thread.
Conclusion
The Brother sewing machine has been around for a while and is still strong. It’s no surprise then that the internet is full of tips on how to oil your beloved machine, from throwing away used motor oil bottles to adding 1/4 cup vegetable shortening with three tablespoons white vinegar in a bowl. It can be hard to know which one will work best for you with so many options out there!
Oil your sewing machine regularly to keep it running smoothly and extend its life. There are many great articles about repairing a variety of problems that might arise with various types of machines and general maintenance information such as oiling your sewing machine correctly and safely.
We hope this blog post on how to oil brother sewing machine has been helpful! Let us know your thoughts in the comments below!