
How to Prime Wood for Acrylic Painting
Painting with acrylics is a lot of fun, but it can be frustrating when the paint won’t stick to the wood and you have to keep reapplying layers. Painting on primed surfaces will make your painting experience easier and more enjoyable by making sure your paint sticks.
To begin, you’ll need prepping materials like sandpaper or steel wool, a water-based primer/sealer for unfinished wood surfaces (or an all-purpose sealant), good quality brushes, and high-quality acrylic paints in colors that match the final color scheme of your project. Read this full blog post to know how to prime wood for acrylic painting.

Reasons Why You Need to Prime Wood for Acrylic Painting:
1. Acrylic paints are, by nature, quick-drying. This means they will scuff and even peel off surfaces if the surface is not primed with something like gesso before painting.
2. Priming wood for acrylic painting makes your finished piece look much better in terms of color vibrancy and depth.
3. It can be tough to paint over raw, unprimed wood because of the ridges and grains on the wood surface.
4. A lack of preparation with gesso will result in a poor quality finished product – one that is likely you will want to re-work or discard altogether!
5. Many people believe they do not need to prime their wood with gesso because it is already smooth and will accept acrylic paint well. This is not true!
6. Without priming your wood with gesso, you may find the finished piece too difficult to frame properly (which can also result in a poor-quality finished product)!
7. If you want to add small pieces of wood or bark to your painting, it is best to apply the acrylic paints over a primed surface so that the overall appearance of your work will not be compromised.
8. If you do not prime your wood with gesso, some colors may have a finished product).
9. Gesso dries very quickly to a matte finish, making it easy to work with and clean up after painting.
10. The water-based formula in gesso is perfect for wood surfaces because the paint will not alter or damage your artwork no matter what medium you use.
10 Ways on How to Prime Wood for Acrylic Painting:
Here we have mentioned some ways how to prime wood for acrylic painting. Be sure to follow these tips to prime wood successfully,
1. Sand With 220 Grit Sandpaper.
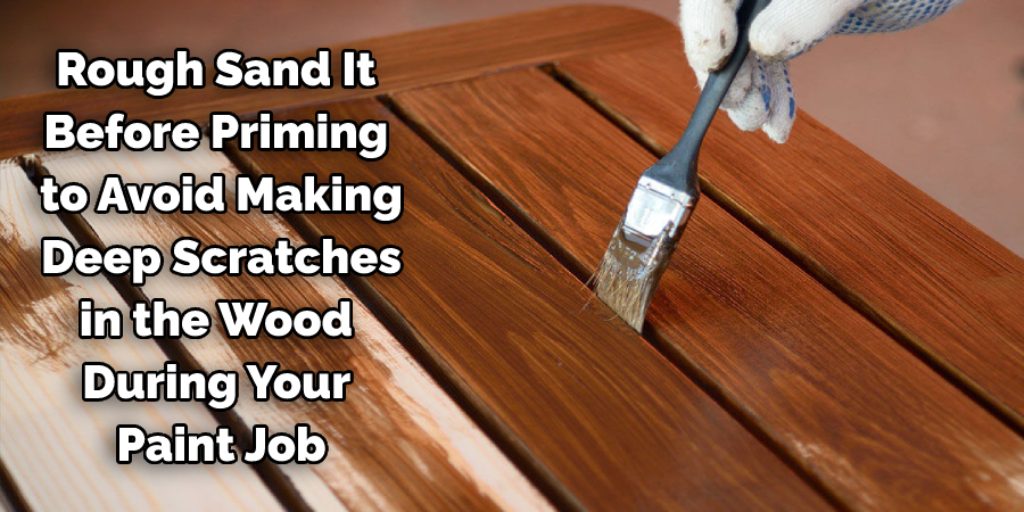
If the wood is rough, you should sand it before priming to avoid making deep scratches in the wood during your paint job. Sand with light, even strokes until all roughness is gone and you have a smooth surface. Do not change the direction of your strokes frequently because this can cause ridges in the wood.
2. Clean off the Dust with a Dry Cloth.
Once sanding is complete, wipe the wood with a clean cloth to remove any dust and dirt particles. And while you’re at it, make sure to wipe down your work area as well. Cleanliness is crucial when painting because any grit on the surface of the wood or anything in the immediate area can cause problems with your paint job.
3. Prime the Wood for Acrylic Painting With an Oil-Based Primer.
Oil-based primers are best because they offer both adhesion and durability to the surface of the wood, which means that your paint will stick better and last longer at the same time. You may or may not need to sand before applying oil-based primer.
4. Clean the Wood with Mineral Spirits.
If you prime with an oil-based primer, then it’s recommended that you clean the wood with mineral spirits after priming and let it dry completely. Mineral spirit is paint thinner, which is made of petroleum distillates (basically, thin oil). So you’ll want to use the mineral spirit when thinning oil-based products such as paint and primer.
5. Apply the Glaze.
The first step of applying the glaze is ensuring the wood is smooth and clean. Next, brush on the stain in the grain direction, then wipe off with a cloth or paper towel. The goal here is to let some of this coat seep into the pores without getting it all over everything else. Let dry for at least four hours before continuing.
6. Apply a Coating of Water-Based Polyurethane.
Water-based polyurethane protects the wood from spills and stains while allowing it to breathe naturally, which helps prevent mildew and warping over time. The coating should be thin enough to allow some of the natural wood to show through.
7. Buff the Coat of Polyurethane With Steel Wool
Buffing with steel wool is an excellent way to make a fine finish, but you must be very careful how much buffing you do because steel wool can cause deep scratches in the wood if you press too hard.
If you want a softer look, more lightly use a cloth to rub in some boiled linseed oil. You can then use a clean rag to wipe off any excess and let it dry for a few hours before you coat the wood with polyurethane.
8. Apply a Coating of Polycrylic.
Polycrylic is a water-based, protective finish that allows the wood to breathe while protecting it from spills and stains. This polyacrylic coating will need to dry for at least 12 hours before applying any additional coats or painting your piece.
9. Remove the Old Dark Stain With Mineral Spirits.
If you want to remove the old stain before painting, you can use mineral spirits to remove it. Apply with a cloth or paper towel until no more residue comes off your cloth. Don’t forget that the soul is flammable, so be careful not to do this in an area with an open flame or heat source.
10. Apply the First Coats of Paint.
Once you’ve applied a total of three coats of primer, paint one coat with a brush and two coats with a roller. Apply in the grain direction to avoid streaking or splotches while keeping an eye on your paint color while it’s still wet so that you can see where any streaks or spots may be.
Tips and Tricks:

1. Find a sturdier grade of wood than you might normally use for a project: think particleboard rather than pine.
2. Be sure the surface is clean and free from dust, dirt, rust, stain, etc. these will prevent adhesion.
3. Sand it down with 220-grit sandpaper until smooth.
4. Apply two coats by brushing, using moderate strokes in the direction of the wood’s grain.
5. Let each coat dry before applying the next one. For this, you must follow the manufacturer’s directions regarding drying time between coats. You can use a hair dryer or heat gun to speed up drying time if desired, making sure never to leave the heat source in one place.
6. Apply a final coat with a foam roller, as this will help assure an even thickness and give you an ultra-smooth finish.
7. Apply it to the substrate of your choice, following the same directions as with wood.
8. If that’s not the look you’re going for, you can use a rag soaked in water to wipe it down and see the pearly sheen of the gesso underneath.
Can You Paint Raw Wood With Acrylic Paint?
People paint other people’s faces all the time. They’re usually called makeup artists and get paid to do it, but anyone can practice doing it at home without prior experience or training.
This is because the skin is usually flat, smooth, and even in color, while wood isn’t any of these things. When you paint on wood that isn’t primed, the finished product will look sloppy and unfinished. To avoid this problem, you must prime wood before painting it with acrylic paint. To know more about how to prime wood for acrylic painting, read this full blog post.
Primer makes raw (unpainted) wood easier to paint on by binding to its surface and filling in pores, grain, and other irregularities. Acrylic paint adheres well to the primer, creating a uniform surface that is suitable for painting on. If using oil paints, you should instead use an oil-based primer like gesso.
Primer is not necessary for painted surfaces but does make the paint adhere better. A coat of sealant or varnish will make acrylic paints stick to a painted surface. However, some colors may become more transparent, especially lighter shades.
What Kind of Wood Can You Paint?
Most types of unfinished wood are compatible with acrylic paints. If you are unsure whether a particular kind of wood is compatible with acrylics, test-paint a small area on the top face of the wood. It is likely compatible if the paint does not change color, distort, or react in any other strange way to the wood’s surface.
If you are using a small piece of furniture that has been painted with gloss enamel or lacquer, you should be able to remove these finishes by sanding until they are no longer shiny. You can then prime and paint the piece in the usual manner. However, if you are using an older piece of furniture that has not been painted properly, it is unlikely that any kind of regular painting method will achieve good results.
Conclusion:
Acrylic paint is water-soluble and can be removed from surfaces with just soap and water. For a more permanent solution, you can use varnish or shellac to seal the surface of your new painting. Remember that acrylic paint dries quickly, so allow sufficient time for drying before applying another layer if needed!
You don’t want your artwork to crack or peel away after work days due to improper priming tips! We hope this article has helped teach you how to prime wood for an acrylic painting project. Please contact us if there are any other questions we haven’t answered here.


