
How to Repair Broken Stone Sculpture
Stone sculpture is a popular medium for art pieces due to its durability and natural beauty. However, stone can be damaged and need repair like any other material. If you are lucky enough to have a broken stone sculpture, several ways to fix it.
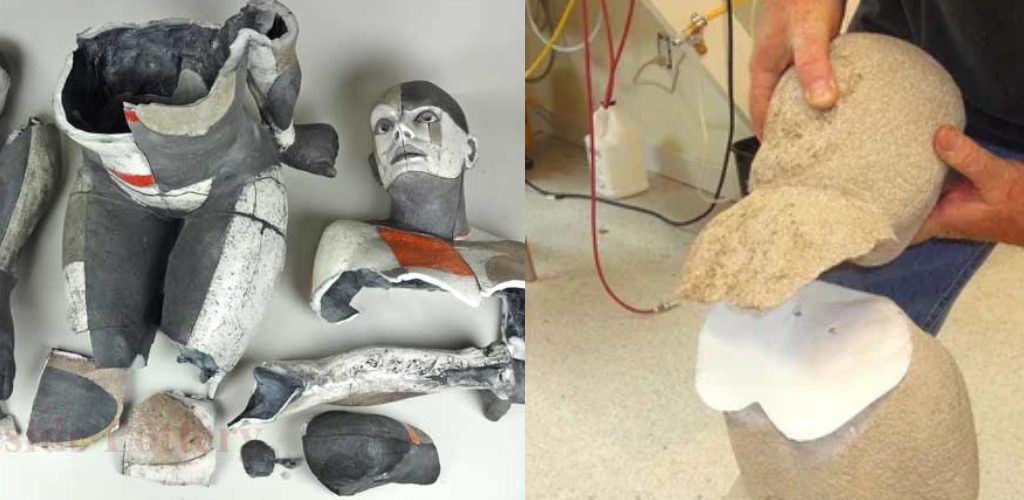
This guide will give you an idea of what is involved in the process and what materials you will need. In this blog post, we’ll outline the steps you need to take on how to repair broken stone sculptures. We’ll also provide some tips on how to prevent your stone sculpture from breaking in the first place. Let’s get started!
Step by Step Guide: How to Repair Broken Stone Sculpture
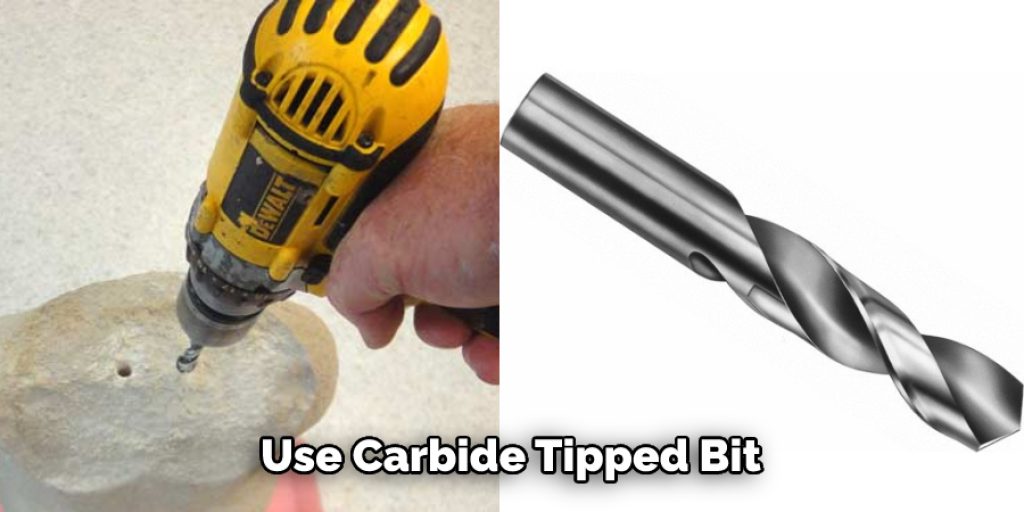
Step 1: Drill Holes Using Carbide Tipped Bit
The first step is to drill holes. Rent or buy a composite carbide-tipped masonry bit for this job. Drill holes in the cracks of the sculpture where it’s still intact, to let water get behind the break area. This will help with chipping out the remaining stone pieces later on without damaging the sculpture’s base. Drill at least one hole on each side of the break.
Step 2: Chip Away Stone Using Chisel
The artist will use a chisel and hammer to break off any remaining pieces of rock around the cracked area. They may need to cut the bottom of the sculpture first to be able to reach all the way in and break off the last bits of stone. The artist must be careful not to damage the sculpture’s base while doing this.
Step 3: Drilling Holes on the Other Broken Part Matching Location and Angle
Mark where the holes on the other broken part should go and drill them at the same angle. If possible, drill through both parts of the crack to ensure there are no weak spots for water to seep through and worsen the problem.
Step 4: Apply Silicone Caulk to All Holes
To seal up any holes or cracks and help prevent water from entering, apply silicone caulk to all holes or cracks, making sure the caulk goes into the hole or crack, not just on top.
Step 5: Accurately Drilling Holes on Other Side of Crack
After you put caulk on one side of a crack, you need to drill holes on the other side of the crack. The holes need to be in the same places and at the same angles as the holes you drilled on the first side. This way, when you put the two sides back together, there will be a solid object connecting them and water won’t be able to get in between.
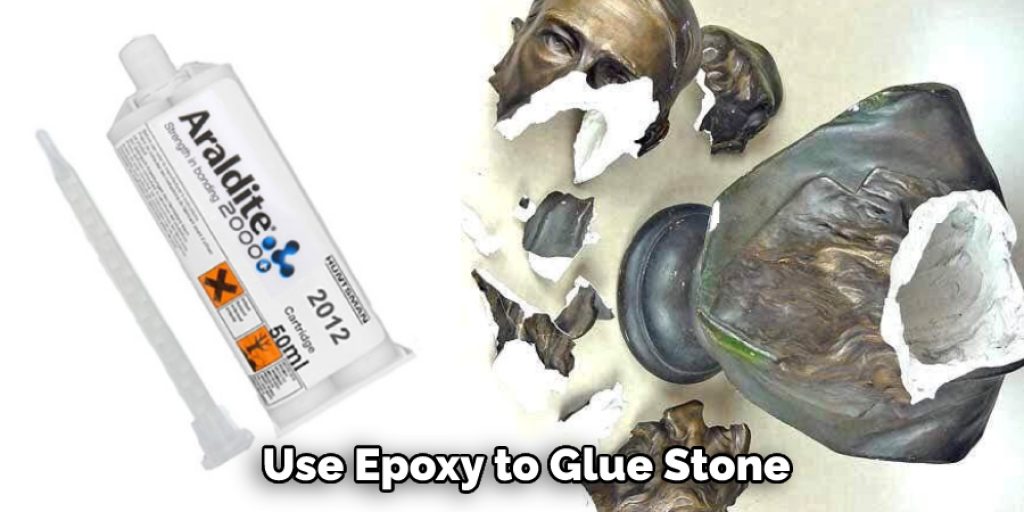
Step 6: Use Epoxy to Glue Stone Pieces Back Together
Use epoxy, available at home improvement stores, on the cracked stone pieces. Apply it on both sides of the crack, on the inside and outside of both parts. Be careful not to get it on your clothes or any other surface.
Step 7: Cleaning and Cutting Metal Rod
Please take out the metal rod and wipe it off with a cloth to make sure there is no excess epoxy on it. Next, cut the correct length of the metal rod using a hacksaw to fit your stone sculpture.
Step 8: Assembling Sculpture and Rods
Insert metal rods into the holes on either side of the cracks. If there are no holes, insert one rod through both pieces making sure it is lined up with the holes from the previous step.
Step 9: Filling Gaps and Cracks with Epoxy
Apply a bit of epoxy to any gaps or cracks, using the same kind you applied before. You can use a wooden stick or another tool to get it into smaller areas. If excess epoxy comes from the drilled holes, wipe it off with a rag. Let it dry for at least 24 hours before touching it.
Step 10: Cleaning Sculpture Using Acetone
Use a soft cloth and acetone to wipe down the entire surface of your stone sculpture. Wipe off any excess epoxy that may have come from the gaps or holes, and any remaining dust on the surface.
Step 11: Painting to Match Colors
Use a matching spray paint and apply at least two coats, allowing it to dry in between each time. Let dry for another 24 hours before touching and spraying the other side of your stone sculpture if there is any damage on that side as well.

Step 12: Repair Is Complete
Once your painting is dry, and the epoxy has dried, you can go ahead and fix any damage to your stone sculpture. This includes cutting off any excess pieces of metal rod sticking out using a hacksaw. It’s recommended to keep it this way just in case any weak spots may break again if you decide to move it around.
That’s it! You now know how to repair stone sculptures. Good luck, and send us photos of your finished product!
You Can Check It Out to Set Up an Air Stone
Some Tips and Suggestions
Here are some tips and suggestions on how to repair broken stone sculptures.
1. Don’t work on the sculpture if you are in a hurry or under time pressure.
2. Work on more than one piece at a time, especially if it is larger pieces that are broken.
3. Keep your hands clean while repairing the sculpture with adhesives to avoid getting them stuck together or smudging the surface of the statue.
4. If you need to glue the stone with a liquid adhesive, try using a disposable medicine dropper or a plastic squeeze bottle. This will make it easier to control the amount of adhesive applied and reduce spills on your work surface.
5. When adhering two surfaces together, be sure they are as clean as possible as well as dry.
6. Use a good quality adhesive that is designed for the repair of stone and metal sculptures.
7. Use an adhesive that matches the color of your stone if possible; however, glues come in a wide variety of colors, and it may be challenging to match the color exactly. If this is a problem, try using a light-colored adhesive if possible.
How to Troubleshoot a Charcoal Grill?
Charcoal grills are ideal for cooking outdoors during family gatherings or outdoor barbeques. However, you must know how to troubleshoot a charcoal grill before what could potentially be an expensive mistake. Here are some steps that you can follow to troubleshoot your charcoal grill.
1. Dial Gauge
– The dial gauge is the essential part of a grill; it indicates how much heat is being produced by the fuel source. If the heat reading on the dial gauge is not within 100-500 degrees, there could be an issue with airflow or ventilation. You may need to remove some of the ashes or coals to get an accurate reading.
2. Air supply/ventilation
– The air supply route is vital towards proper airflow, resulting in achieving the best cooking temperature. If the air supply, also known as venturi tubes, is clogged or obstructed, you will not receive the proper amount of airflow needed. The vents in the lid and bottom need to be open for proper ventilation. If these do not seem to work, then you may need to replace them or clean out any obstructions that might be present.
3. Clean ashes
– After cooking, wait for the grill to cool down before removing ashes from the containment area, as removing hot ashes might result in injury. To remove the ash, you will need a metal container to hold it and a piece of wood; make sure that the ash is not too deep or loose before attempting to move it. You will want to remove all of the ash at least once a month for best results.
4. Grease removal
– To minimize flare-ups, one must remove the excess grease from the bottom of the grills to ensure proper airflow. If you have a removable drip pan underneath your grill, this is an easy process, but it may be more difficult if you do not have a drip pan. Also, make sure that you are using something safe like an aluminum pan to avoid any of the hot greases from spilling.
5. Handle loose parts
– If the handle or lid is not tight, this may cause an issue when trying to open and close your lid. The best way to solve this problem is by removing the screws on these areas and tightening them with a screwdriver for better results.
You Can Check It Out to Remove Paint From Stone
Conclusion
There are various ways to repair a broken stone sculpture. To repair a fractured stone sculpture, you need the following tools and materials. A chisel, hammer, steel wool or sandpaper for cleaning out any cracks in the surface of the stone, epoxy adhesive to glue pieces together and filling gaps between sections.
The best approach depends on the type of break and how much damage has occurred in the surrounding area. If you’re unsure how to do this yourself, we recommend hiring an expert who can handle it with care and precision. We hope this blog post on how to repair broken stone sculpture has been helpful. Let us know if we’ve helped answer your question about fixing a broken stone sculpture!


