
How to Square Up a Fabric Panel
Puckered seams, misaligned cuts, there can be numerous obstacles like this when we are working with your fabrics. You may have encountered these obstacles several times as I do. Even after several tries, we usually fail to make the fabric panels square. But even after failing several times, we must make it square at any means. We only know why it is so important because this technique belongs to those who work with the sewing toolbox. And with this in mind, I have also searched how to square up a fabric panel and prepared some simple and easy guidelines for you.
When you have got the right tools, every project will become more convenient, and you will love to do that. But you have to know the exact way of using the tool. Otherwise, your convenience will become wasted within no time. This is what exactly happens with the beginners. You may have prepared everything for the next design, but all of a sudden, you couldn’t finish because you were unable to square up the fabric panel. Have you ever wondered this could happen? You can’t step forward only because you are making your way to fold the fabric panels. That is literally annoying, isn’t it? Honestly, I have also faced this situation. But don’t worry; you won’t have to struggle like me. I am here to end this annoying situation with some simple tactics of mine. So, let’s dive in!
Supplies
You are going to need these supplies before diving into the deep.
- Rotary cutter
- A ½ inch cutting mat
- 1-inch gridlines
- And a 6-inch x 12-inch quilter ruler
How to Square Up A Fabric Panel?
If you have gathered all the above supplies, let’s get started.
I had started by cutting half a yard of the regular 44″ WOF (stoffe width) quilting cotton (18″x44).” So, you can also use something like ours. Or you can simply switch to your preferred fabric. It’s up to you what you are going to choose. However, now follow these simple steps.
Step 1
Fold the fabric into half so that it becomes 18 x 22-inch diameter. Then fold this half again so that it becomes centerfold and parallel with the upper surface.
Step 2
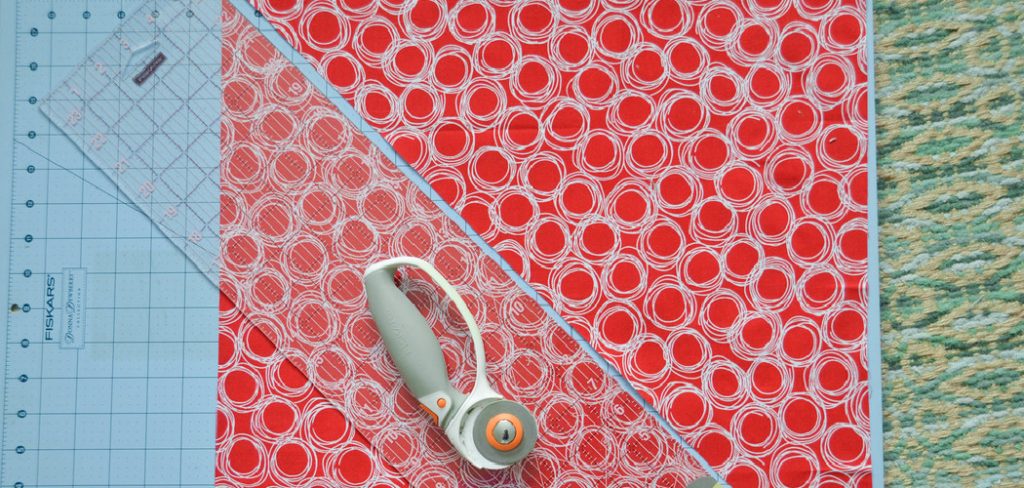
Now, position the fabric on a cutting mat. Make sure to keep the centerfold portion aligned with the horizontal gridline. Then align the ruler close to the ragged edges next to the vertical gridline. This is the initial stage of making the fabric panel square. If you have completed this process, we should dive deep.
Step 3
Maintain the fabric close to the inner layer as closely as possible. The vertical marks on the ruler would conform to the patterns of the board. This makes sure the cut is precise. You may also see rule markings on the cutting board. Use a cutting mat or set of rulers to align your fabric. With cutting mats, you can easily align your fabric with just one hand. After cutting, simply flip the mat over and use it as a ruler.
Step 4
Now take the rotary cutter and use it to slice off the edges. Make sure to keep your fabric double folded because we are going to need it in the next step. Now it’s time to find the center of your fabric. Take the ribbon and measure out about 22 inches (this will depend on how wide you want your bow). Do this on both sides.
Step 5
Ensure that the newly trimmed end is still double-folded, and the upright grid on the cutting plate stays in line. You can tap that edge or use pattern weights for additional security. Now, you will get a fresh new square shape cloth. Roll it out from the end of the cloth to the west. Please note that I have used12 squares on each side. If your ruler is different, make sure to use your eyeballs—no matters what and where you use the ruler, just take the exact measurement from each side.
Step 6
Make sure to align the ruler perfectly with the grid by maintaining 12-inch measurements, at least. Once you confirm this alignment, set the ruler according to the previous step. Step 8 Mark the first quarter-inch on your pattern with a dot. This will be one of the measurements on your ruler, which you must align when measuring the other side. Measure 12 inches away from your first dot to mark another dot.
Step 7
Now take the rotary cutter again and slice the edges by maintaining 12″ space. The piece has to be folded to 6 “x around 22” so that it remains perfect in height, but larger in width, the end of the work should be 12’x around 22 M and fold it back to the left. Now, align the edges in which you are going to be cut with the horizontal gridline.
Step 8
Now follow, the previous instruction and cut out the fabric by keeping 12-inch measurement. I have just told you in the previous section.
Step 9
You’ve got a fresh square finish already. For this purpose, place the ruler with a vertical rim between the jelly ends. Trim off the edges using a rotary cutter. Thus, you will get your fine shaped square fabric piece. 5. Cutting on the Fold If you need a fabric piece with a double thickness, you have to cut it on the fold. You can use any kind of fabric or paper for this purpose. Fold your fabric in half, as if you are folding a letter.
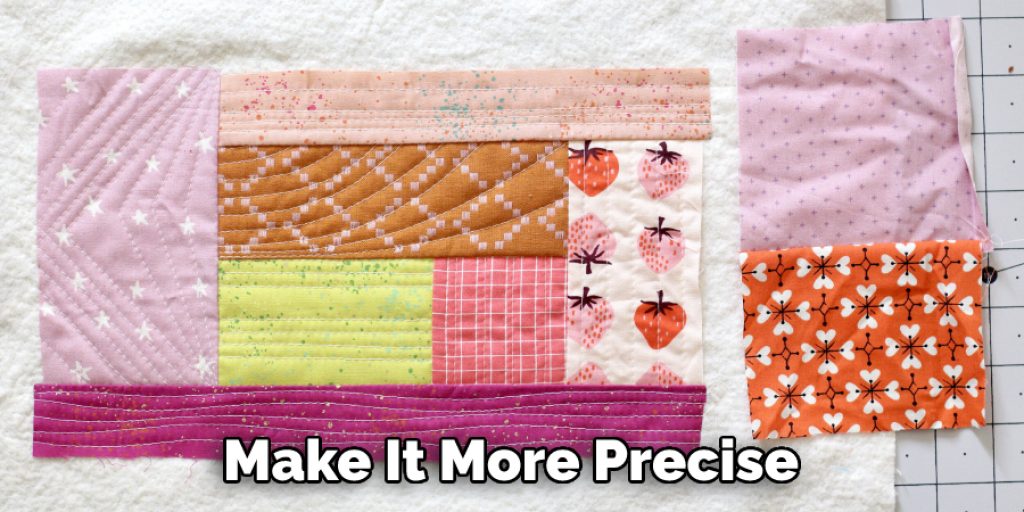
Now that your fabric is now squared cut, you can use it for different purposes. If you have got any residual parts at the edges, don’t forget to trim it with the rotary cutter again. It will allow the square shape fabric a perfect look. Make sure that your fabric has a uniform shape. If you want to make it more precise, you can use the rotary cutter once again. Now that your fabric is squared cut, you can use it for different purposes.
You Can Check It Out To Fix Puckered Fabric
Conclusion
So, how to square up a fabric panel? Have you got your answer? Did I solve your problem, or are you still confused? Look, I have provided the simplest ways to get through the problem and concentrate on your DIY project as early as possible. Hopefully, you have understood the facts. If you are still confused, or you have something better to offer, feel free to comment us through the section you will see below.


