
How to Texture Concrete Patio
Introduction
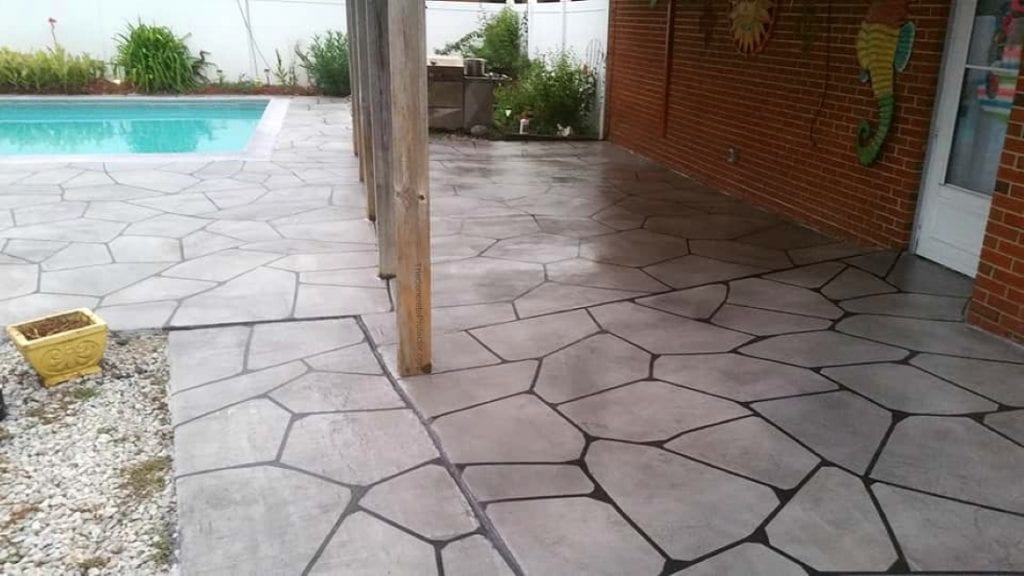
Proper texture and coating can give your patio floor an enhanced look. In fact, it also extends the lifespan of the patio floor. So, if you have completed making your own patio or a pool deck, you must apply some texture coating on it. But do you know how to texture the concrete patio? If not, here is a short guide that will help you. First of all, you need to create a surface layer over the concrete patio. In order to do this, you need to prepare a mixture of sand and Portland cement.
It is tricky, but I will show you some simple techniques for accomplishing the entire process like a breeze. So, leave all your works for a couple of minutes and concentrate on this article. I will give you the best solution to do a screenshot on your PC, laptop, or tablet. First of all, know that there are various ways to take a screenshot. And all these methods depend on your OS and the type of device you have.
Required Materials for Texturing Concrete Patio
- Sandpaper or grinder fine grit (150 to 180).
- Paint roller and paint tray.
- Texturing Acrylic Coating.
- Small bucket of water.
Methods on How to Texture Concrete Patio
Method One:
Step One: Prepare Your Work Area
Prepare your work area by covering it with a tarp if needed. Clean the surface of any dirt, grease, and oil; use an abrasive cleaner like TSP or trisodium phosphate mixed according to package directions and rinse thoroughly when finished cleaning the surface. Start at the top of the wall and work down; apply the first coat of paint evenly using a brush or roller. Let the paint dry for two hours, then apply the second coat.

Remove loose debris from cracks in the concrete using a putty knife or chisel before treating cracks where possible. Mask off areas you don’t want to be treated before applying sealant as some treatments are not good at bonding over certain surfaces such as metal, for instance. Apply the sealant according to the directions on the container. Use a small trowel or brush to apply the sealant into cracks that are 3/8-inch wide or less. For cracks wider than this, you can use a caulk gun to apply the sealant.
Step Two: Apply the Sealant
Apply the sealant using a paint roller and work in small sections to avoid lap marks or product pooling. Allow an hour of drying time between coats before texturing. Lightly sand a medium grit (150-180) sandpaper to provide texture; scrape low spots if needed as well. Once both coats of sealant are applied, apply two coats of a quality floor paint in the color of your choice.
Step Three: Paint on the Texturing Acrylic Coating
Paint on the Texturing Acrylic Coating sparingly, working in thin layers from one side of the surface at a time, across it until you are just short of completing coverage on that side. Continue this process again until all surfaces have been coated twice.
Wait 15 minutes for the initial coat to dry, then lightly wet brush over the entire surface with water from your bucket by dipping your bristles into the water and pulling them across the surface of the deck.
Step Four: Allow Time
Allow 15 minutes for the second coat to dry, then sand lightly with a very fine (400-600) grit sandpaper until surfaces are uniformly rough.
Step Five: Apply Primer
Apply primer or latex paint in the desired color if desired; wait 24 hours to apply final finish coats if required by manufacturer’s instructions. This process will only work on clean concrete that has been properly sealed and cured according to manufacturers’ guidelines. You can use this process for any type of outdoor hardscape, including sidewalks, driveways, stairs, patios, etcetera.
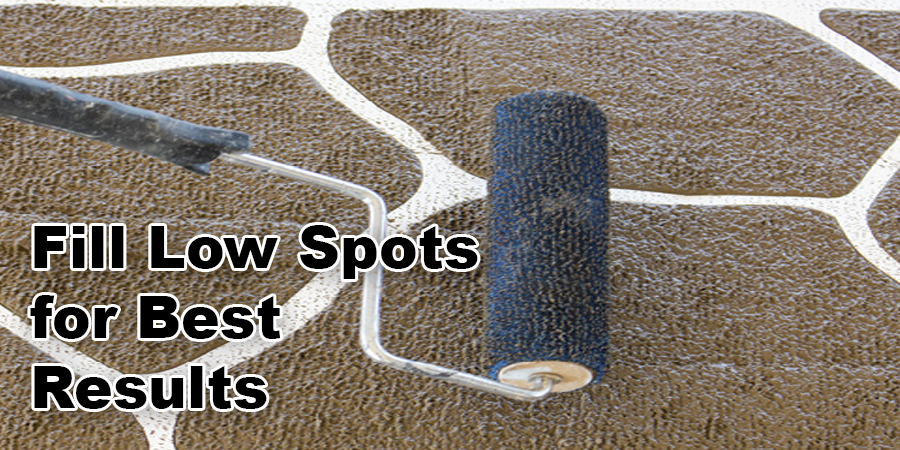
Step Six: Fill Low Spots
For best results before texturing, you should fill low spots such as seams between slabs, depressions where dirt collects, and cracks that have been filled with foam insulation or caulking. You can use a garden hose to fill these areas and then let the water soak in for about 30 minutes before starting texturing.
Step Seven: Avoid Damaging Your Tools
To avoid damaging your tools when starting from scratch on an old concrete surface, try using a utility knife to cut out any protrusions such as seams between slabs and depressions where dirt collects; this will allow you to start fresh without having to remove those bumps by hand first.
Method Two:
First of all, you have to clean the surface properly to remove the oils, grease, or other dirt particles. In this case, you can use a scarifier or a shot blaster. This a messy job, so it is recommended to wear a mask and protective clothing.
Once you have cleaned the surface, check it properly. Make sure that none of the dust particles are left behind. If everything is okay, then you have to apply a concrete spray product on the surface.
This type of product is easily available in the market. After buying them, you have to mix them with liquid resin and then spray the mix on the surface. This adhesive-like texture will stick with the surface so that the color and texture stick with the surface appropriately.
Now, start applying your desired color evenly. You have to apply several coats on the surface to acquire your desired finish on it. After accomplishing the entire surface, let the color and texture dry overnight. In the morning, you will get your desired finish and texture on your patio. That’s it; this is the end of the process. It is a bit tricky but simple too.
Final Thoughts
The desired color on the patio should be applied unevenly. This will give a realistic effect on the texture and looks of your concrete surface. You can use any color you want as per your taste or need, but make sure that it is not too dark because, at present, there are no such texturing products available in the market which will help with this task.
But if you have some experience in painting, then follow these steps, mix colors accordingly and apply them on the curing concrete surface for different textures like sandstone, marble, etc.
You may read also – How to Texture Over Wallpaper


