
How to Use Hem Tape on a Dress
Do you really want to learn about an effective process of how to use hem tape on a dress? If your reply is in the positive, then you need to read the entire article because this is the one that you might be looking for a while. Please try to have faith in us as we are not bluffing!
In order to use hem tape on a dress correctly, you must follow some basic steps and remember some helpful tips. If you don’t do these things, you probably won’t get the result you want.
Not only that, but we also need to maintain some essential safety hacks to have our work done flawlessly by avoiding unwanted messes and disasters. In most cases, we are not aware of these points and thus create disasters for ourselves.
We have found a method that will help you achieve your goal. We believe that you will understand the technique after reading the whole article.
An Overall Overview of the Topic
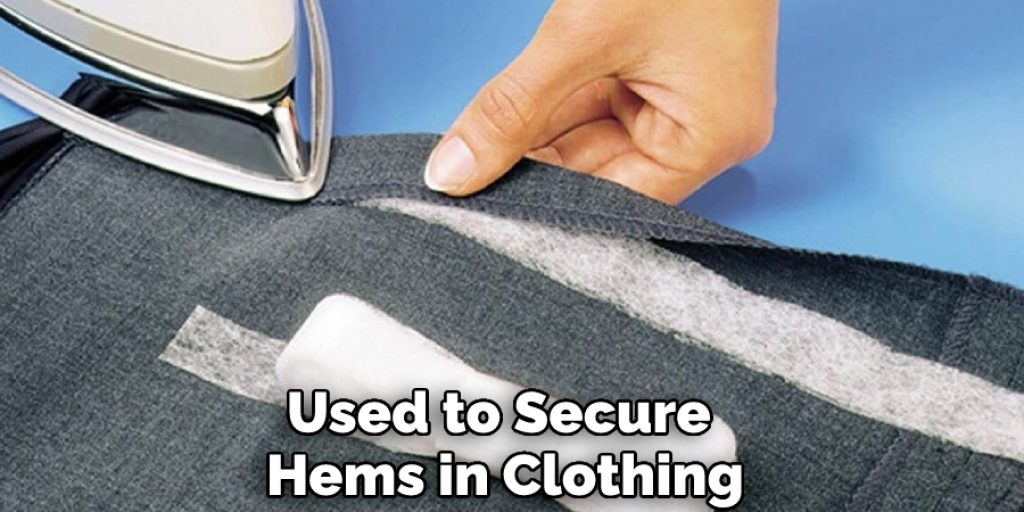
Trimming tape is a precious creation. Making sure about a sew utilizes a twofold sided meager, portion of webbing with a warmth initiated stick. It arrives in a move of tape and can stick texture on the two sides.
It’s good that you’re in a hurry and have to make a quick repair with stitches. Measure the spot to trim, position the tape in the middle of the piece of clothing and the stitch, and press the installation. Fixes are used to cover your fabric’s raw edges, but you may also restore a piece of clothing by shorten it.
The Process of How to Use Hem Tape on a Dress
1. Ensure your texture or piece of clothing is pre-washed and prepared to acknowledge the fixing tape. Abstain from utilizing cleanser for the main application will influence the holding paste, and the tape would not stick as immovably.
On the off chance that you are utilizing trimming tape to abbreviate some jeans or a skirt, measure your necessary length and afterward include at any rate 1/4 inch for crease remittance on the sew. For pants, remember to wash them first if they recoil.
2. The brink can be left crude or on the off danger that you have a stitching machine, gotten accomplished with a crisscross fasten. Pinking shears reduce the brink in a crisscross instance, diminishing fraying. The trimming tape will work admirably in fixing the texture edges and limiting fraying in many textures.
3. Reduce the amount of tape you use to fix clothes. If it is a small hole or tear, measure the area to be fixed and cut the tape. Press the fixing zone and the tape between the seam and the wrong side of the clothing article. The sewing tape is equivalent to the two sides.
4. If you need to trim a piece of clothing, first squeeze it according to the guidelines. If you need to trim a large area, press and stitch in small sections. Be sure to use a hot iron and a cotton pressing cloth if your clothing is delicate or made of synthetic materials. You don’t want to melt your fabric!
5. Practice on a chunk to get the iron heat and the feel, just as tape inclusion all proper. Hold for a brief timeframe and afterward discharge. Try not to press, time and again; this is a press and shipping movement. Utilize a squeezing material for fragile textures.
If the trim on your check is coming off, it means the iron wasn’t hot enough. Be careful not to let the sewing web touch the iron, because it will stick. The paste from the sewing web is hard to remove.
When you’re ready to start the mending process, use tape to attach the fabric together. Be sure to keep the tape clean and flat, and iron on both sides of the fabric to avoid wrinkles or tucks.
6. Fixing tape is a type of tape that can be used to sew fabric together. It is strong and provides a flat surface to sew on. Fixing tape can be tricky to use at first, but once you get the hang of it, it can be a useful addition to your sewing kit. It works well and may be the perfect solution for any small repair jobs when you are away from your sewing machine.
We have now reached the end of the article. By this point, you should have learned all the important details about how to use hem tape on a dress. This means that you can now do the entire task by yourself, simply by using the information you have learned.
We suggest that you read the article again carefully and follow the steps we discussed earlier.
If you want to do your work correctly, you need to follow all the safety precautions perfectly. If you can do that, then nobody can stop you.
Then why are you still waiting to start? It is the perfect time to give it a try to achieve your most desired outcome. So let’s get started with the steps to attain the result that you were seeking for a longer span of time.
Frequently Asked Questions
Is Hem Tape Permanent?
Hem Tape is a temporary adhesive bandage that is used to secure hemostats, sutures, and other medical devices in place. Hem Tape is not permanent and can be removed by the patient or doctor.
Can You Wash Clothes With Hem Tape?
Hem tape is not meant to be washed with clothes. It is designed to be used on the skin only and should not come in contact with other fabrics or surfaces.
Does Hemming Tape Last?
Hemming tape is a type of adhesive that is used to secure hems in clothing. It is often used to hem pants, skirts, and other garments. The main benefit of using hemming tape is that it is easy to use and it does not require any special skills or tools. You can simply apply the adhesive to the hems of your clothes and then wait for it to dry.
Hemming tape is a type of adhesive that is resistant to water and weather conditions. This means that it can be used in wet or humid environments without worrying about the adhesive deteriorating.
Do You Need to Hem Velvet?
There is no need to hem velvet if it is clean and pressed. However, if the velvet has been worn or stained, then you will need to hem it. Hemming velvet can be done with a machine or by hand.
You may read also –
1. How to Hem a Dress Without Sewing or Cutting
2. How to Hem Curtains Without a Sewing Machine?
Elizabeth Davis
Elizabeth is a creative writer and digital editor based in the United States. She has a passion for the arts and crafts, which she developed from a young age. Elizabeth has always loved experimenting with new mediums and sharing her work with others. When she started blogging, she knew that DIYquickly would be the perfect platform to share her tutorials and tips. She's been writing for the blog from the beginning, and her readers love her helpful advice and easy-to-follow instructions. When she's not writing or editing, Elizabeth enjoys spending time with her family and friends.


