How to Build a Spring House
Spring houses are an essential part of homesteading and provide a clean supply of water for livestock and other animals, garden irrigation, washing clothes and dishes, and more – all without expensive equipment or extensive plumbing.
Building a spring house is easy if you understand the basics of how it works and have access to the right materials. In this blog post, we’ll explore exactly how to build a spring house so that you can add this handy feature to your property or update an existing one. So let’s get started!
What Is Stored in a Spring House?
A spring house is typically used to store a variety of foods, including eggs, milk, butter, cheese, and other dairy products. In addition to food, it can also be used to store a variety of beverages, such as wine, beer, and cider.
In some cases, the springhouse may also be used for preserving vegetables or fruits such as apples or pears. It is important that these items are stored in an environment that is cool and moist because this will help keep them safe from spoilage or contamination.
The temperature within the springhouse should remain between 40-60 degrees Fahrenheit (4-15 Celsius). A springhouse may also contain jars and crocks for storing jams, jellies, and pickles which can then be enjoyed throughout the year.
Finally, a spring house may contain tools and supplies related to food preparation, such as knives, cutting boards, and strainers. All of these items help make a living off the land easier because they allow people to store a variety of healthy foods which can be enjoyed all year round.
With the right set up, a springhouse can provide an excellent way for people to preserve their own homemade foods while also providing them with easy access to refrigeration in case of emergency situations. It is one of the oldest methods of food storage and has been used by many different cultures around the world for centuries.
By following traditional practices and using modern materials, it is now possible for anyone to build their very own springhouse at home. With careful planning and preparation, a springhouse can become an invaluable part of any homestead.
10 Methods How to Build a Spring House
1. Location
The first step in building a spring house is to choose the perfect location. The spring house should be built near a source of water, such as a spring, creek, or river. It should also be located in an area that receives plenty of sunlight.
The location should also be far enough away from any potential hazards, such as power lines or trees. If possible, the spring house should be built on a slight incline to ensure that water flows away from it. To prevent flooding, a perimeter should be built around the spring house to divert water away from it.
2. Foundation
Once you have chosen the perfect location for your spring house, you will need to prepare the foundation. The foundation should be made of sturdy materials, such as concrete or stone.
It should be at least two feet deep and wide enough to support the weight of the spring house. It’s important to make sure the foundation is level and stable, so use a spirit level to check before you begin construction.

While some spring houses are built directly into the ground, it is best to elevate them slightly – this will help keep the water from running off. If you decide to build the spring house directly into the ground, be sure to dig a trench around it so that water can pool and not evaporate.
3. Walls
The walls of the spring house should be made of thick, insulated materials. This will help to keep the inside of the spring house cool in the summer and warm in the winter. The walls can be made of wood, straw, or clay. If using wood, make sure to use pressure-treated lumber, as this will help prevent rot and mold from forming.
Make sure the walls are sealed properly to prevent water from seeping in and damaging the structure. While building the walls, use a level and make sure they are even and plumb. Though this may seem tedious, it will help ensure that the walls are structurally sound.
4. Roof
The roof of the spring house should be sloped so that it can shed rainwater and snow easily. It should also be made of sturdy materials, such as metal or shingles. Make sure that the roof is securely attached to the walls and foundation of the spring house. A ridge cap should be installed along the top of the roof to prevent leaks.
Once the roof is securely in place, check for any gaps or cracks that need to be sealed. This will ensure that the spring house stays dry and leak-proof. While a flat roof is an option, adding a slight slope will help to make sure that the spring house stays dry and free from leaks.
5. Floor
The floor of the spring house can be made from dirt, gravel, or concrete. It is important to make sure that the floor is level so that water does not pool inside the spring house. If you are using dirt, it is recommended to use at least 8 inches of soil as a base and then add gravel on top of that.

When choosing concrete as a flooring material, it is important to use a mix that has been designed for below-grade applications and also ensure proper drainage. However, if the spring house is large enough to accommodate more than one person inside, it may be wise to use concrete as the floor material.
6. Door and Windows
The door and windows of the spring house should be located on the south-facing side so that they can receive plenty of sunlight during the day. The door and windows should also be made of sturdy materials, such as wood or metal.
Additionally, they should be able to open and close easily and securely. Consider using storm windows or shutters to reduce the chance of the spring house becoming too hot during warm days. Lastly, make sure the door and windows have appropriate seals to keep out moisture and insects.
7. Furnishings
The furnishings inside the spring house should be simple and functional. A table and chairs are all that is needed for eating and relaxing. A bed can also be included for sleeping. Shelves can be used for storing food and supplies. It is important to choose furniture that will stand up to dampness, such as wicker or plastic. If the spring house is used for extended periods of time, mosquito netting or a screen window may be necessary to keep out pests.
8. Lighting
Lighting inside the spring house can be provided by candles, oil lamps, or electric lights. It is important to make sure that there is plenty of light so that people can see what they are doing inside the spring house. Candles and oil lamps should be positioned in such a way that they are not at risk of tipping over or causing a fire.
Electric lights should also be fixed in a secure location and out of reach of running water. The lights should also be waterproof to avoid any accidents. Once the lighting is set up, the spring house can be used for its intended purpose.

9. Ventilation
Ventilation is important in a spring house so that air can circulate and prevent mold from growing inside. There should be at least one window or door that can be opened to provide ventilation. A chimney can also be included to help ventilate the space.
Additionally, it can be helpful to add a fan or other air circulation device to promote airflow. This is especially important in an enclosed space like a spring house since there is less airflow. With proper ventilation, the air inside the spring house should stay fresh and clear of any mold growth.
10. Insulation
Insulation helps to keep the inside of the springhouse cool in the summer months and warm in the winter months. Straw bales, wool, or cotton batting can be used as insulation. Make sure to fill any gaps or cracks between the walls and roof with insulation material.

This will help keep water out and maintain a consistent temperature inside the springhouse. Once the insulation is in place, seal it with a waterproof barrier to protect it from moisture.
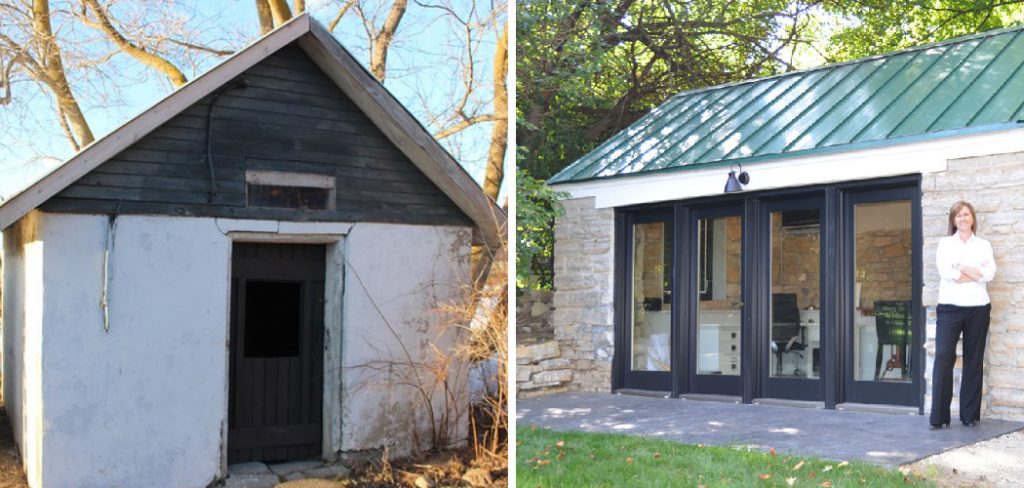
Conclusion
All in all, building a spring house is certainly a project worth diving into. Not only will it be a great learning experience to understand the different pieces that need to come together, but after the work is done, you will be rewarded with an impressive structure that can help cool multiple buildings at once.
Learning how to build a spring house takes knowledge and attention to detail and requires reliable sources of information if you hope to get the most out of your project.
Elizabeth Davis
Elizabeth is a creative writer and digital editor based in the United States. She has a passion for the arts and crafts, which she developed from a young age. Elizabeth has always loved experimenting with new mediums and sharing her work with others. When she started blogging, she knew that DIYquickly would be the perfect platform to share her tutorials and tips. She's been writing for the blog from the beginning, and her readers love her helpful advice and easy-to-follow instructions. When she's not writing or editing, Elizabeth enjoys spending time with her family and friends.