
How to Fix a Wavy Zipper
Zipper teeth are usually straight, but now there is a new design: the wavy zipper. This design has been around for about 20 years, and it’s finally making it to mainstream fashion.

Wavy zippers have four waves of teeth that come together at one point at the bottom, where they meet with two rows of toothless fabric on either side. Thus, the top row matches up with one set of teeth from the other side, and the bottom row follows suit as well. But sometimes, the zippers which are not wavy can get bent. For this reason, today, we will discuss a process on how to fix a wavy zipper.
Procedure on How to Fix a Wavy Zipper
Zippers can cease up in all sorts of ways. The most typical is when the teeth separate and get caught on clothing, preventing closure. If you’ve ever experienced that frustration before, or if your zipper has ended up stuck at the top or bottom of its track and doesn’t budge, don’t panic; there are plenty of simple sewing techniques that can fix it right up.
We’ll look at three today: replacing a zipper slider, replacing the zipper pull, and repairing the stop-slider–the mechanism that keeps zippers from separating too far down.
First, check the zipper to see which parts are broken or missing by moving the slider up and down. Most of the time, it’s only one part that’s broken or missing. If more than one part is ruined, though, you’ll have to replace the entire zipper–something we’ll cover in a different article.
Zippers come in two parts: pull and slider. The main or top zipper is meant to do its job even when both pieces are attached–a needle-and-thread fix isn’t necessary for this kind of zipper because replacing both pieces together will work just as well as replacing them separately would. Zipper sliders can be purchased from most sewing supply stores. They’re inexpensive and easy to install yourself; if you’ve never done any sewing before, do not be intimidated by this fix.
Replacing The Zipper
First off, let’s talk about replacing a zipper slider: this is the most common fix because it’s easy to do and only involves two steps. It might also be your best bet if you need to get back out there in no time; sliders are cheap and can usually be found at any fabric store. For some garments, though–especially more tailored clothes like suits or coats–you may have to replace complete zippers, especially if they’re tailor-made for that specific garment.
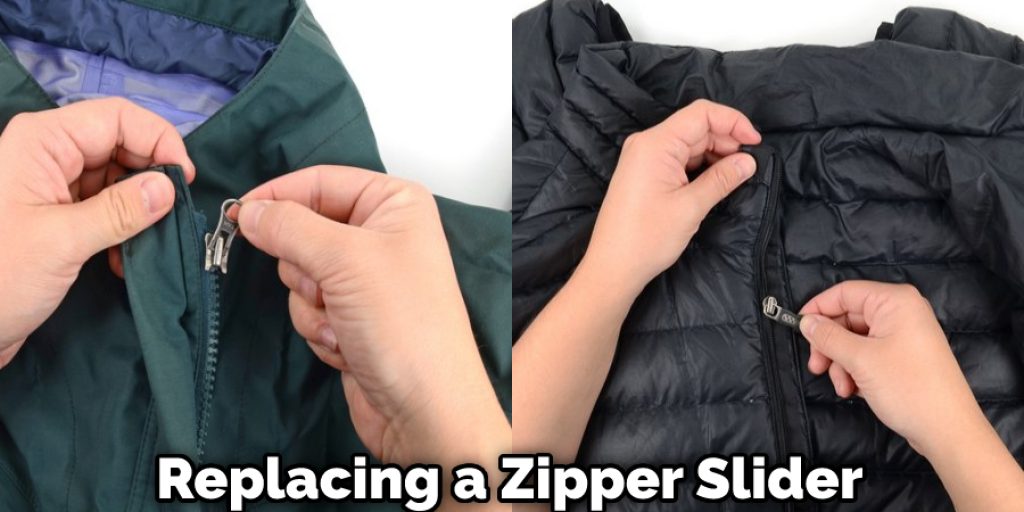
We’ll start with the top seam zipper (the kind that runs across the top of pants) since most people are probably familiar with these. Open up your zipper and lay it flat on a table so you can see how everything works. The little metal teeth that slide back and forth to zipping or unzip are the parts we’ll be replacing. They’re held in place by a zipper pull on one end and a slider on the other.
You’ll need to use needle-nosed pliers to grab hold of your new zipper slider, then use your fingers to press down gently on the old pull while you guide the new one through its hole. Make sure the new slider is in the right place below where it connects to the fabric, or it won’t work properly! Repeat these steps for the bottom half of your zipper.
The most important thing I can say about repairing a stop-slider is to ensure the slider is locked in place before you move on! If it’s not, the zipper won’t function properly. Unfortunately, this doesn’t always happen when replacing a broken zipper–it depends on how old your garment is and whether or not whoever replaced the zipper previously was careful with their work.
This is where sewing comes in: for garments that are more tailored (like suits and coats), we’ll replace both ends of a top seam zipper rather than just one piece like we did above. Of course, the two pieces will slide together just like they do on regular zippers, so this really isn’t any different from replacing a single piece–you’ll have an extra step at the end, but you’ll still save yourself a lot of cash over replacing the entire zipper. Just make sure to lock the bottom slider in place before sewing everything back up!
How to Fix a Broken Zipper?
To fix a broken zipper, you may have to replace just one part–the broken slider or pull–or both together. This is especially true for pants zippers and other garments with multiple pieces; most of the time, though, you’ll probably only need to repair one piece. Here’s a quick rundown of all three parts that might get ruined:

Slider:
The little metal teeth on your zipper are what allow it to zip and unzip properly. They attach at each end to a zipper pull on top and stop-slider on the bottom, which prevents it from separating too far down.
Sometimes sliders can be hard to locate, so if you live in an area where both parts are available separately (or if you’re really lazy), buying a new slider may be your best bet.
Pull:
The little metal tab at the top of your zipper is called the pull; this is what you’ll grab with your fingers when unzipping or zipping up your garment.
Damaged pulls can easily become bent out of shape and should be replaced soon. Squeezing the plastic covering that covers the zipper coils can straighten them out.
How to Prevent Wavy Zippers?
The following tips will help you to prevent wavy zippers in the future:
Don’t use leather or plastic-coated zippers for evening clothes with a tight waistline. Zipper teeth should slide easily in both directions without any resistance. This is how your dressmaker expresses an opinion on the quality of a used zipper. Never try to pull a zipper if it sticks.
It means that the slider is stuck at the bottom tape and needs to be moved up. Otherwise, there will be breaks and distortions along the whole length of a zip fastening, and all efforts to repair it will be useless. Instead, use only branded products from reputable manufacturers. Compare price, quality, availability of spare parts, and after-sales service of different suppliers before buying your next product.
Frequently Asked Questions
What Is the Strongest Zipper?
There are many different types of zippers, but the strongest zipper is a coil zipper.
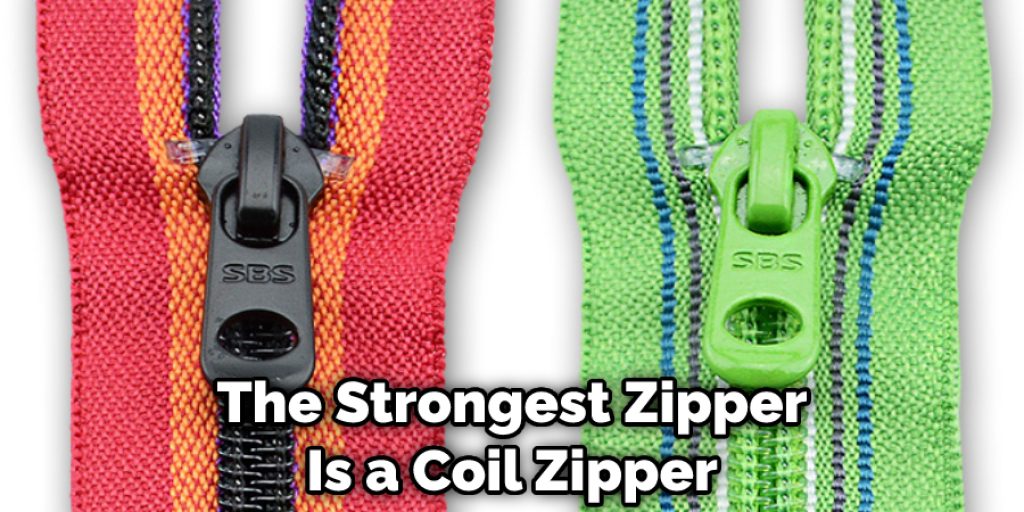
A coil zipper is made from a series of interconnected metal coils that can be slid in and out to make or break a connection between two pieces of fabric.
The reason why this type of zipper is stronger than others is that it doesn’t have any weak points where something could break and cause the whole thing to come undone. It’s made of one long piece of metal that can’t be torn or broken apart.
The chain is also less likely to get tangled than other types of zippers, which makes it perfect for things like coats and jackets. If you’ve ever tried to zip up a coat with a lot of fabric on the inside, you know how frustrating it can be when the zipper gets tangled.
What Is the Commonest Defect in a Zipper?
The commonest defect in a zipper is that the teeth get stuck together. This can happen when there is not enough tension on the zipper to keep it closed or if the fabric is thick and there isn’t enough space for the teeth to move around easily.
This type of defect usually happens because of wear and tear over time as well as improper care. The best way to prevent this problem from happening is by washing your clothes inside out and using only cold water.
Why Is My Zipper Buckling?
If the zipper is still in good condition, then there are some other reasons why it might be buckling. The most common cause of a zipper not opening or closing properly is the pull tab being misaligned or broken.
If you can open and close the zipper easily, there may be a problem with the zipper’s slider bar.
Conclusion
Lastly, we hope that the process and relevant information stated here will surely help you fix the wavy zipper. thank you and have a good day!
So in this article, you know about How to Fix a Wavy Zipper.
You may read also: How to Sew Zipper on Homemade Bag with a Lining
Nancy Behan
Nancy is an embroidery artist, fashion blogger and a full time editor at DIY quickly. Nancy edits the fashion section on DIY quickly, focusing on the embroidery and cross stitch articles, alongside with fabric and other costume design elements. She graduated from the University of Michigan with a Bachelor of Arts in Art History. She loves to work on her own projects, read books and watch romantic movies in her spare time.


