How to Install Heated Floors Under Tile
Heated floors provide a comfortable, luxurious feeling for your home. They offer even, consistent warmth throughout the entire space and can be installed in any area as long as you have access to an outlet. Installing heated floors under the tile is relatively easy but requires some planning and tools.
When it comes to installing heated floors, tile is the most popular option due to its durability, aesthetic appeal, and insulation properties. Tile can be installed over top of a heating mat or wire system designed specifically for radiant heat. You will need to plan ahead as there are specific variations in installation depending on the type of tile you choose. In this blog post, You will learn in detail how to install heated floors under tile.
Step-by-Step Processes for How to Install Heated Floors Under Tile
Step 1: Inspect the Subfloor
Before installing heated floors under tile, it is important to inspect the subfloor for any moisture or other issues that could interfere with the installation. The subfloor should be clean and dry before installing a heating system. If necessary, use an industrial fan to dry out any wet areas.
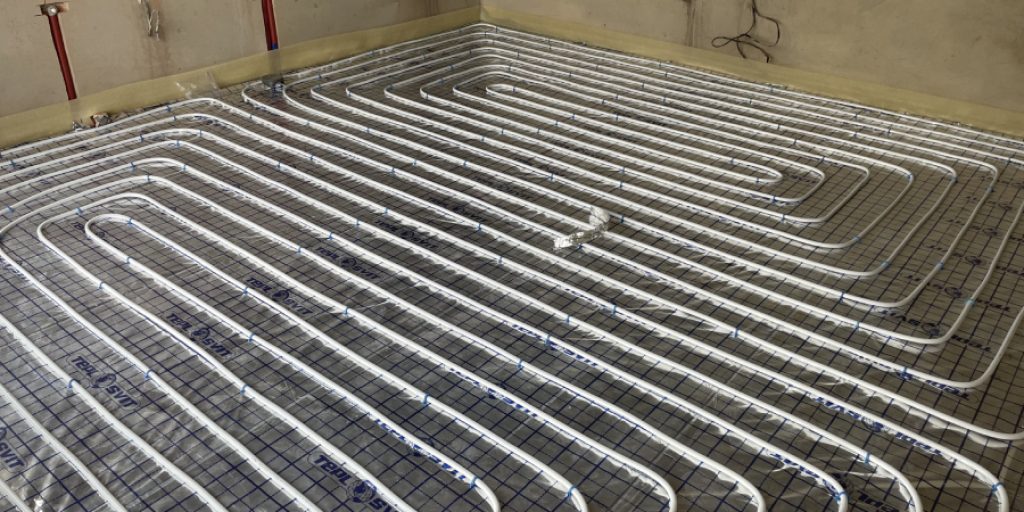
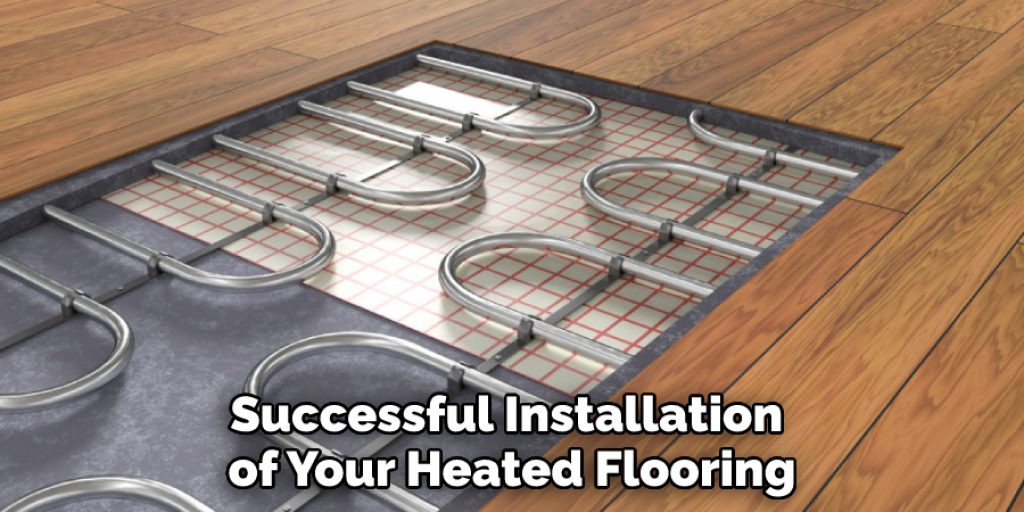
Step 2: Lay Down Mats
The mats are the heated flooring system that will be placed beneath the tile. Place the mats on top of the subfloor, ensuring they are evenly spaced and flat. Use an adhesive to secure them in place. Connect the wires from each mat together and attach them to a thermostat. Make sure all of the connections are tight and secure.
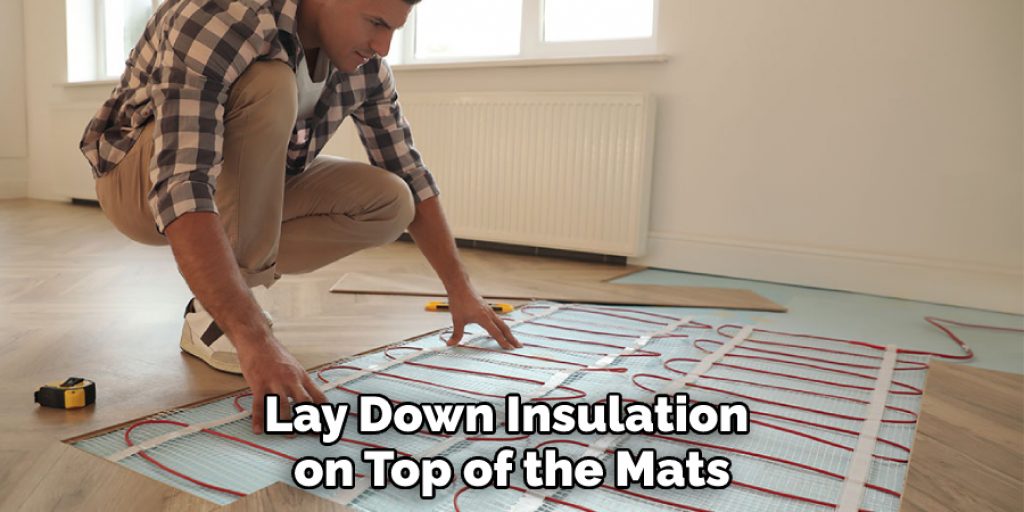
Step 3: Install Insulation
Lay down insulation on top of the mats, making sure to cover them completely. The insulation will help keep the heat in and prevent energy loss. Use tile spacers to ensure that the tiles are even and well-spaced. This will also prevent any potential damage to the heated flooring system.
Step 4: Install Tile
Lay down the tile on top of the spacers, making sure they are all facing the same direction and spaced properly. Use an adhesive to secure the tiles in place. Run a zip tie around the perimeter of the mats to ensure they are properly secured in place. This will prevent any shifting or movement of the heated flooring system.
Step 5: Install Trim Pieces
Place trim pieces along all edges of the tile, covering any exposed edges or wiring. Connect the thermostat to a power source and ensure it works properly. This will ensure that the heated flooring system will be able to turn on and off as needed.
Step 6: Test System
Test the system by turning it on and ensuring the heat is distributed properly. Adjust the thermostat if needed to ensure that you are getting the desired temperature. Once all of these steps have been completed, your heated floors are ready for use.
Safety Tips for How to Install Heated Floors Under Tile
- Make sure to check the temperature of your heated flooring before you begin the installation. The temperature should never exceed 80ºF (27ºC).
- Always wear protective gear such as gloves, goggles, and a respirator or dust mask when working with power tools or materials related to heating systems.
- Be aware of the hazards of electricity, and never attempt to work on electrical wiring without first turning off the circuit breaker.
- Make sure to read all instructions regarding installing, using, and maintaining your heated flooring before starting any installation.
- Check that all the components are compatible with each other, including temperature sensors, thermostats, heating mats, cables, and other accessories.
- When installing heated flooring, be sure to leave sufficient space between the heating system and any combustible materials, such as carpets or furniture.
- Make sure that all connections are secure and follow the manufacturer’s guidelines when connecting the heating system to a power source.
- Follow all local building codes and ensure all necessary permits are obtained before installation.
By adhering to these safety tips, you can ensure a safe and successful installation of your heated flooring.
How Long Will It Take to Install Heated Floors Under Tile?
Installing heated floors under tile can be a time-consuming job requiring an experienced contractor’s skills. Depending on the size of your room and the complexity of the installation, it could take anywhere from a few hours to several days for it to be completed.
The first step is to install insulation boards. This will help to keep the floor warm and prevent any moisture from seeping through. After that, a layer of concrete must be poured over the insulation boards to create a flat surface for the heated floors. It is important to allow this layer of concrete to dry before proceeding with the next steps. Next, flexible heating cables are laid down over the concrete layer. The cables are then connected to a thermostat, which will keep the temperature of your heated floors at the desired level. A layer of self-leveling compound is spread over the heating cables and allowed to dry before tiling can begin.
What Maintenance Measures Should You Take to Ensure Your Heated Floors Last for a Long Time?
Once you have your heated floor installed, there are some important maintenance measures you can take to ensure it lasts for a long time. For instance:
- Inspect the thermostat regularly and test the temperature settings.
- Check for any cracks or chips in the tile or grout lines and address them immediately.
- Ensure the floor is covered with a protective layer, such as rugs or mats, to avoid dirt and dust getting into the system.
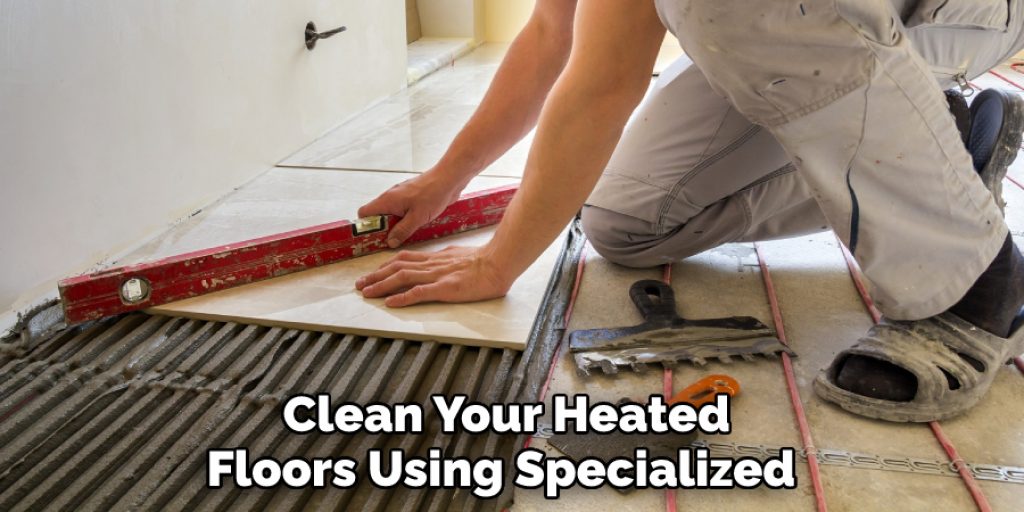
- Clean your heated floors using specialized cleaning agents that are specifically designed for the material used in your flooring.
- Ensure any insulation layers underneath the heated floor are in good condition and free of moisture or water damage.
- Check the wiring and connections regularly for any developed faults or damage.
- Replace the thermostat battery every few years to ensure it works correctly.
By taking these steps, you can be sure that your heated floors will last for many years and provide you with a comfortable living environment.
How Can You Troubleshoot Any Issues With Your Heated Floor After Installation?
Once you have installed your heated floor successfully, checking for any potential issues is important. A few common problems with heated floors include not heating up properly or uneven temperatures across the floor. If these issues arise, troubleshooting should be done before calling a technician.
The first step in troubleshooting is to inspect the entire system. Check to see if all of your wiring is connected properly and make sure there are no loose connections or exposed wires. If everything looks okay, then you should check for any other potential issues such as a faulty thermostat, broken heating element, or air pockets in the tile. If these steps do not solve the problem, then it is best to call a professional. Many heated floor systems come with warranties, so contact the manufacturer if possible. Heating contractors are also available to help troubleshoot any issues you may have and provide advice for repair or replacement of components.
How Should You Clean and Care for Your Heated Floors After Installation?
After the installation of your heated floor is complete, proper maintenance and care are essential for ensuring that it continues to function optimally. In order to keep your floors looking their best and ensure they last, there are a few simple steps you should take when caring for them. First, it’s important to remember not to use any type of cleaning product that contains abrasive materials, such as steel wool, scouring pads or any other material that may scratch the surface. If a cleaner is necessary to remove dirt and grime from your heated floor, opt for a nonabrasive cleaner specifically designed for tile floors.

After applying the cleaner according to the manufacturer’s instructions, use a damp mop to remove any residue and finish off with a dry cloth. Additionally, avoid placing heavy furniture or appliances directly on top of your heated tiles as this may cause them to become damaged or crack. If you do need to move something heavy, use a dolly or some type of padding underneath the item in order to protect your flooring. Finally, when it comes time to replace your heated tiles, make sure you select ones that have been specifically designed for use with an electric floor heating system so that they’re compatible.
Conclusion
In conclusion, installing heated floors under tile can be a great way to upgrade your home and add an extra layer of comfort in colder months. It does require some time and effort, but with the right materials, good planning, and proper installation techniques, it is possible for any homeowner to install their own heated floors. Not only will you save money by doing it yourself, but you will also be able to customize the look and feel of your heated floors.

With these tips in mind and a bit of patience, your home can become a warm and comfortable escape from the cold winter months. I hope this article has been beneficial for learning how to install heated floors under tile. Make Sure the precautionary measures are followed chronologically.
Angela Ervin
Angela is the executive editor of DIY quickly. She began her career as an interior designer before applying her strategic and creative passion to lifestyle and home. She has close to 15 years of experience in creative writing and online content strategy for housekeeping, home decorations as well as other niche efforts. She loves her job and has the privilege of working with an extraordinary team. She lives with her husband, two sons, and daughter in Petersburg. When she's not busy working she spent time with her family.