How to Paint a Checkerboard Floor
Are you looking to give your home a fresh, updated look? Painting your floor is an easy and relatively inexpensive way to revamp any room in the house. But if you want to really make a statement with your floors, why not try painting them with a classic checkerboard pattern for an eye-catching addition of color and design? With just some paint supplies and our step-by-step guide to paint a checkerboard floor, anyone can transform their room easily!
Painting a checkerboard floor is simpler than it looks – all you need are the right supplies and materials, some time, and some patience. Here, we’re going to show you how to paint a checkerboard floor. Whether you’re looking for a traditional black-and-white chessboard or something more creative like an alternating pastel palette, follow along as we explore exactly how easy it is to give your floors an iconic makeover!
Why May You Want to Paint a Checkerboard Floor?
1 . To Add a Unique Touch to Your Home
A checkerboard floor can be a fun and interesting addition to any room in your home. It adds an element of playfulness and creativity, making the space feel more inviting and unique. Also make sure to pick the right colors that complement your existing decor and add a pop of color.
2. To Create a Focal Point
A checkerboard floor can serve as an eye-catching focal point in any room. It draws the viewer’s attention and creates visual interest. You can choose to make the floor the main attraction or use it to highlight another feature in the room, such as a statement piece of furniture.
3. To Add Visual Depth and Dimension
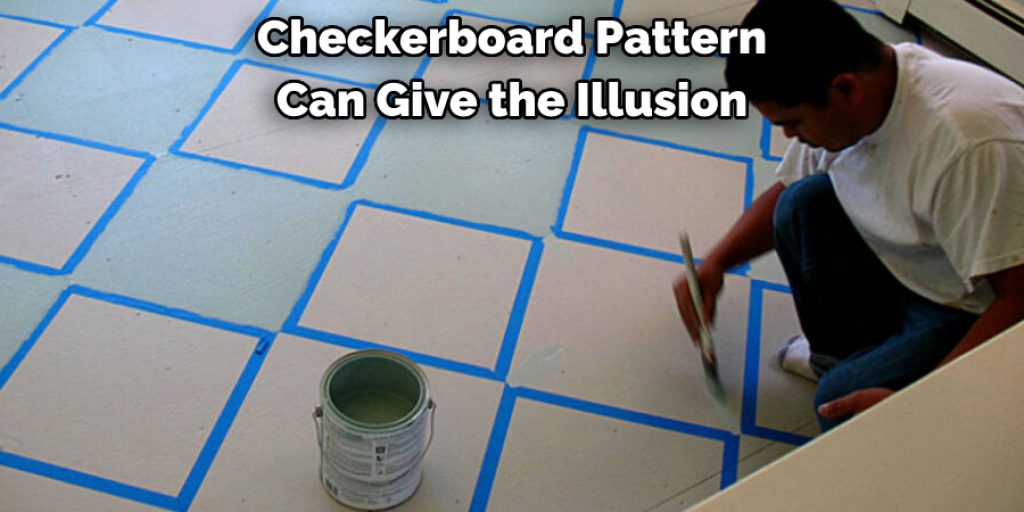
A checkerboard pattern can give the illusion of depth and dimension, making a room seem larger and more spacious. This is especially useful in smaller rooms where you want to create the feeling of open space.
4. To Bring Traditional Charm
Checkerboard patterns have been used in home decor for centuries, and they bring a sense of traditional charm to any space. By painting a checkerboard floor, you can add a touch of history and nostalgia to your home.
5. To Personalize Your Space
A painted checkerboard floor is a great way to express your personal style and creativity. You can choose from a variety of colors and patterns to suit your unique taste and create a one-of-a-kind look for your home.
How to Paint a Checkerboard Floor in 5 Easy Steps
Step 1: Gather All The Tools
The very first step is to gather all the required tools and materials that you will need to paint a checkerboard floor. This includes:
- Painter’s tape
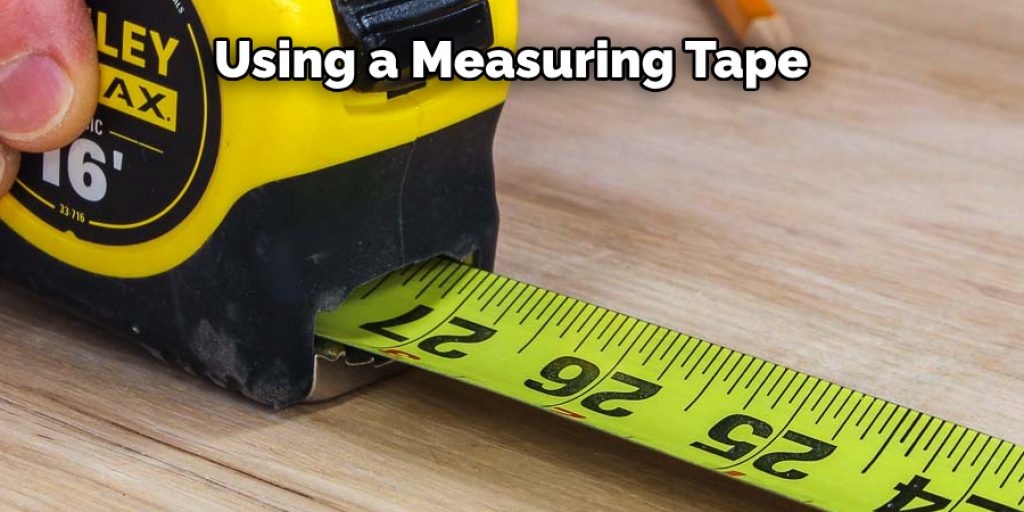
- Measuring tape
- Chalk line
- Paint rollers and trays
- Drop cloths or plastic sheets
- Sandpaper (optional)
- Primer (optional)
Make sure you have everything on hand before starting the project.
Step 2: Prepare the Floor
Before you start painting, it is important to properly prepare the floor. If your current flooring is smooth and in good condition, then you can skip this step. However, if there are any cracks or uneven areas on the floor, it is recommended to sand them down and fill them with wood filler before starting.
Step 3: Measure and Mark the Floor
Using a measuring tape, measure the length and width of your floor. Divide both measurements by two to determine the size of each square. For example, if your floor measures 10 feet by 10 feet, each square should be 5 feet by 5 feet. Once you have determined the size of each square, use a chalk line to mark the lines on the floor.
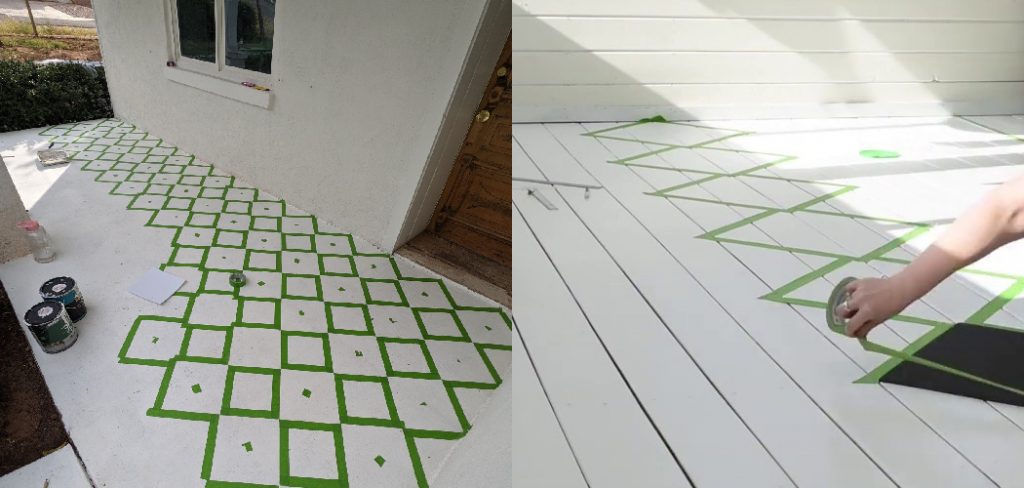
Step 4: Tape Off The Checkerboard Pattern
Using painter’s tape, carefully tape off the checkerboard pattern on your floor. Make sure to press down firmly on the edges of the tape to prevent any paint from seeping through. You can also use a credit card or ruler to smooth out any air bubbles and ensure that the tape is securely in place.
Step 5: Paint the Floor
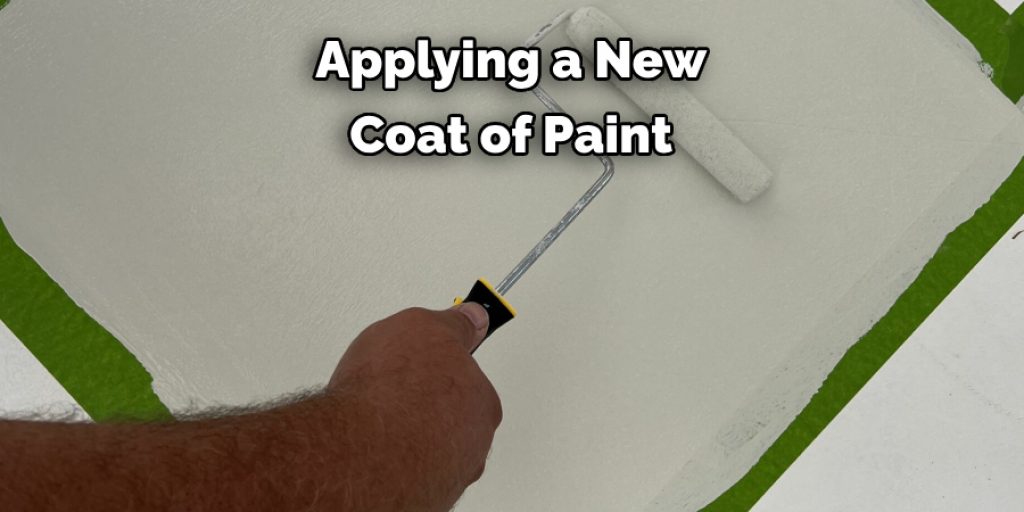
Now comes the fun part – painting! Start by applying a coat of primer if desired, and then use a paint roller to apply your chosen color to every other square. Let it dry completely before removing the painter’s tape. Once the first set of squares is dried, repeat the process with another color on the remaining squares. If needed, you can apply a second coat of paint for a more vibrant finish.
And there you have it! In just 5 easy steps, you can transform your plain floor into a stunning checkerboard masterpiece. Remember to take your time and follow the steps carefully for best results.
Some Extra Tips to Paint a Checkerboard Floor
1 . Do Not Rush the Process
It may be tempting to try and finish painting your checkerboard floor as quickly as possible, but you should resist this urge. Taking the time to properly prepare, paint, and seal your floor will result in a more professional-looking finish that will last longer.
2 . Use High-Quality Materials
Investing in high-quality materials can make all the difference when it comes to painting your checkerboard floor. High-quality paint and sealant will not only provide a better finish, but they will also last longer and require less maintenance.
3 . Measure Twice, Paint Once
To ensure that your checkerboard pattern is symmetrical and evenly spaced, it’s important to measure out your grid before you start painting. This may take some time, but it will save you from having to repaint your floor later.

4 . Use Painter’s Tape
Painter’s tape is an essential tool when painting a checkerboard floor. It allows you to create clean, crisp lines and prevents any bleeding of paint between the squares.
5 . Try Different Color Combinations
While the classic black and white checkerboard pattern is always a popular choice, don’t be afraid to experiment with different color combinations. You can create a more modern look by using shades of grey or navy blue, or even add pops of color for a fun and unique twist.
6 . Don’t Forget to Seal
Sealing your painted floor is crucial for protection against scratches, scuffs, and spills. Be sure to use a sealant specifically designed for floors and follow the manufacturer’s instructions for the best results.
7 . Maintenance Is Key
To keep your newly painted checkerboard floor looking its best, regular maintenance is key. This includes sweeping or vacuuming regularly, wiping up spills immediately, and avoiding harsh chemicals that could damage the paint or sealant.
Frequently Asked Questions
What Precautions Should I Take Before Painting?
Before painting a checkerboard floor, it is important to prepare the surface properly. This includes thoroughly cleaning and sanding the surface, as well as filling any cracks or holes with wood filler. It is also recommended to prime the surface before painting to ensure proper adhesion of the paint.
What Type of Paint Should I Use?
When painting a checkerboard floor, it is important to use high-quality paint that is specifically designed for floors. This type of paint will be more durable and able to withstand heavy foot traffic. It is also recommended to use an oil-based or enamel paint for the best results.
How Do I Create a Checkerboard Pattern?
To create a checkerboard pattern on your floor, you will need to measure and mark a grid on the surface. Use painter’s tape to create the lines for your pattern, making sure they are evenly spaced and straight. Once the lines are in place, you can begin painting each square with alternating colors.
How Many Coats of Paint Do I Need?
The number of coats needed will depend on the type and quality of paint used, as well as the color and condition of the surface. In general, it is recommended to apply at least two coats of paint for a checkerboard floor to ensure even coverage and durability.
How Do I Keep My Checkerboard Floor Looking Clean?
To keep your newly painted checkerboard floor looking clean and fresh, it is important to regularly clean and maintain it. Use a mild cleaner and a soft mop to avoid scratching the surface. It is also recommended to touch up any scuffs or chips in the paint as needed.
Can I Paint Over an Existing Checkerboard Floor?
If you already have a checkerboard floor that needs a fresh coat of paint, it is possible to paint over it. However, it is important to properly clean and prepare the surface before applying a new coat of paint. This may also require additional coats of paint to achieve an even finish. Overall, it is recommended to strip the old paint off completely for the best results.
Conclusion
After exploring the methods for painting a checkerboard floor, it is now time to be creative and give the floor its own unique flair. Get some inspiration online, consult with an expert, or come up with something completely original! With a little bit of imagination, your checkerboard can make a bold statement about your sensibilities as a decorator.
Now you know how to paint a checkerboard floor! Whether you’re after a classic look that pays tribute to the game of checkers or something one-of-a-kind that will have your guests marveling at its complexity, you can make it happen. Now is the time to choose your colors, determine what shapes and sizes you want for each square on the board, and decide whether you plan to use stencils or freehand every stroke of the brush.
Angela Ervin
Angela is the executive editor of DIY quickly. She began her career as an interior designer before applying her strategic and creative passion to lifestyle and home. She has close to 15 years of experience in creative writing and online content strategy for housekeeping, home decorations as well as other niche efforts. She loves her job and has the privilege of working with an extraordinary team. She lives with her husband, two sons, and daughter in Petersburg. When she's not busy working she spent time with her family.