How to Remove Sewn On Patches
It is quite natural that when we buy new clothes, they come with patches. These patches are a wn patch that can be removed from the clothes. And you can trademark the commonly. Sometimes these patches are placed like a sticker, which can be quickly taken off. But when the patches are sewn in the clothes, it becomes difficult for us to remove them also stitch this patch on other fabrics.
Processes on How To Remove Sewn On Patches
Process One
- Gather Materials Needed for the Process. The materials needed will depend on what type of sewing is done and if there are any threads, staples, line-height: 25px;” end, or pins that need to be removed from the area where you want to remove the patch. For example, in some cases, all that might be needed is a sharp object like a Xacto blade or scissors.
If it’s not obvious, then ask someone at your local hardware store that sells sewing supplies whether they do this kind of thing regularly to recommend specific items for purchase; threading needles and removing small pieces will also come up during their discussion.
- Remove any threads or staples holding your patch to the garment before moving on to other materials and tools needed for this process. If you have a sewing needle with thread, remove any threads holding your patch to the garment before moving on to other materials and tools needed for this process.
In most cases, it’s easiest to allow these small strips of fabric to run through one side of the needle and then pull them out from behind; in some instances, though, they may be attached by staples which can also be removed if need be using a Xacto blade (be sure not to cut yourself).
- Pry Off Any Pins: Pry off any pins that might still hold the piece onto the garment after removing all of its stitching; again, a Xacto blade should work here, too but use caution because sometimes there’s a small piece of the garment’s fabric that also comes up with this tactic.
- Cut Off Any Threads and Staples: Cut off any threads or staples still left in place, holding your patch to the garment using a Xacto blade. Again, be careful not to cut yourself because it can happen if you’re not paying attention during this process.
- Apply Acetone (Nail Polish Remover): To apply acetone as simply as possible, use cotton balls dipped into the liquid, which should work well on smaller patches; soak them for about 30 seconds before swiping over where they were applied until all traces of glue is gone from a said area(s). For larger patches, consider pouring some acetone onto a bowl and dipping the cotton ball in there instead.
- Remove any Pieces of Glue That Didn’t Come Off: With some acetone still wet on your finger, apply it to areas where glue remains and rub until all traces of adhesive are gone.
- Rubbing Alcohol or Soap for Stubborn Areas: Rubbing alcohol is not a good choice if you’re looking to remove sewn patches from clothing because they can corrode stitching; soap should do better in this situation, though, so use that one instead when rubbing stubborn glues away from the place(s). Use dishwashing detergent when doing this technique, just like with other stains, for best results.
Process One:
Step One: First, you must locate the patch and then asses the stitching that is made to attach the patch. Sometimes the company uses regular stitching, and sometimes, they use a double sewing system. So it would be best to get a clear idea of the pattern before removing it.
Step Two: Now, you will need a seam reaper. This will be your excellent tool for the entire process. You must take the seam reaper and insert it along the patch thread. You should remember the seam reaper should not disrupt the fabric. Once you insert the seam reaper, this tool’s sharp edge will cut the thread, and you will get a loose end.
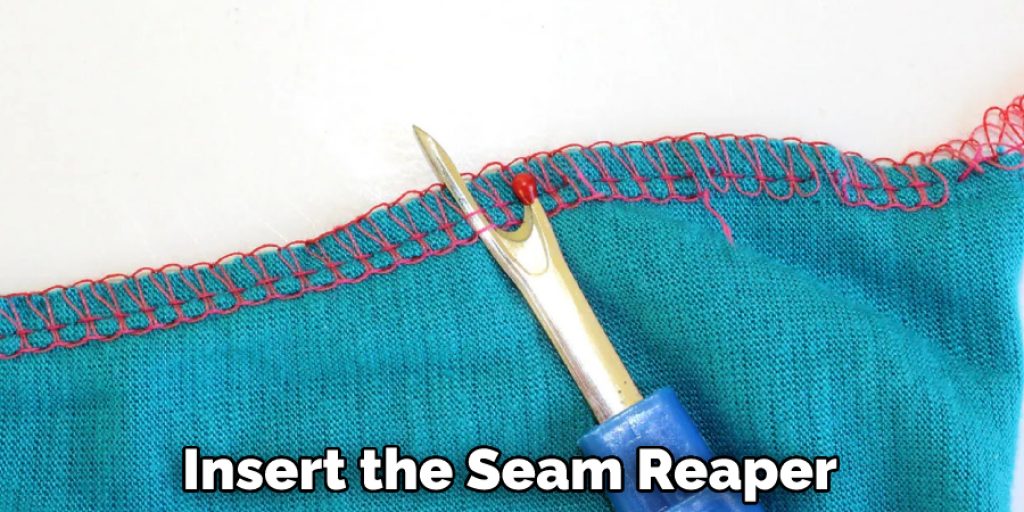
Step Three: In this manner, you have to keep inserting the seam reaper around the stitch and pulling out the threads. You will get many loose threads, and gradually the patch will start to come off. You must not insert the sharp edge too hard. This will make small holes in the fabric. Once you have completed the patch-free, you must cut to take a scissor and then cut the knots responsible for keeping the patch hanging to the cloth.
Step Four: You must take a pair of tweezers and remove the residual threads attached to the fabric. You should always take out all the hanging lines because they might damage the quality of the material. In this manner, the sewn patch can be removed from the clothes. And you can also stitch this patch on other fabrics.
Conclusion
Lastly, we highly suggest you follow the safety guidelines while using chemicals for removing sewn patches. Thank you, and have a good day.
Nancy Behan
Nancy is an embroidery artist, fashion blogger and a full time editor at DIY quickly. Nancy edits the fashion section on DIY quickly, focusing on the embroidery and cross stitch articles, alongside with fabric and other costume design elements. She graduated from the University of Michigan with a Bachelor of Arts in Art History. She loves to work on her own projects, read books and watch romantic movies in her spare time.