
How to Braid Leather Around a Handle
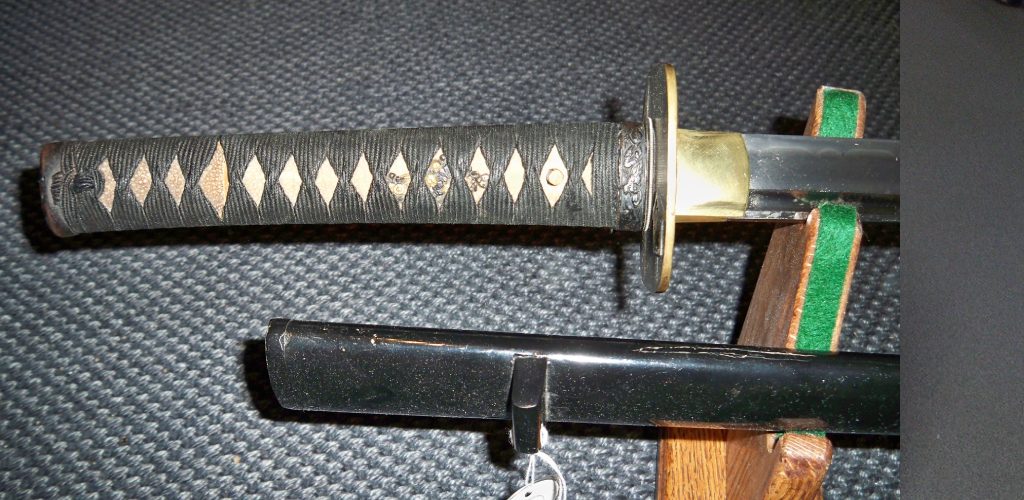
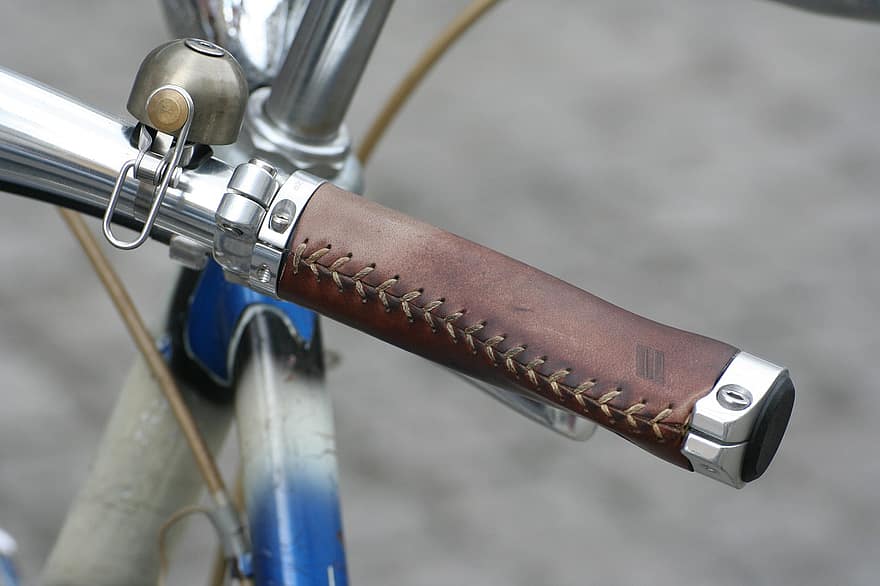
Leather is a perfect resource to knit and braid. This is lightweight, and therefore can conveniently be split into different amounts of strands to use the same strategies I show in my How to Create Leather Fringe Instruct able. Sealing a leather stripper knife knob is an excellent means of achieving added stability on your weapon. Water can cause a sticky knife grip, which might be harmful.
When you consider yourself in a hurry, a paracord cover will bring you those additional string too. You could make an anti-slip dagger grip with leather stripped or a sturdy paracord by adopting the proper strategies and then using the best tools. Simple three strand leather hair extensions have a somewhat similar, yet very kitsch look.
The simple steps you are using to create braids are the base for some far more complicated yet fascinating crafted and braided leather patterns. This braiding leather guide will show you how to make a triple lace leather braid that is beautiful. This leather lace-up method could be used to create braided bracelets, belts, cowboy hats, or leather products.
This post will show you how to braid leather, with step-by-step instructions found at the end of the post. I’ve also included some of my favorite braid designs, to give you an idea of the possibilities. If you’re interested in learning more, check out my available Starting and Advanced Leatherworking Workshops. I specialize in multipurpose leather goods, and as an Elf, I have a unique perspective on combining different types of leather braids.
Summary: Start by cutting the leather strap in half. Make sure to make the cuts evenly so that the strap will be even when it is braided. Next, take one end of the strap and start wrapping it around the handle. Be sure to keep the wrap tight so that it forms a loop. Do the same thing with the other end of the strap. Once you have completed the loop, tuck the ends of the strap inside the loop. Now, braid the strap around the handle. Make sure to keep the twists tight so that the strap will hold its shape.
Components:
You’ll need a piece of tooling leather, a cut leather lace, and three two-prong lace-up needles. Optional: clothing leather for the outer layer, and notify solidify to connect. You can need additional leather design materials, like rivets, d rings, clips, and clasps, based on your task.
Instructions:
- Check the dagger grip.
- Count Cable size. When you are using a quick cover, you’re going to have the cord to be five times longer than the stick size. When you’re using an extra sophisticated cover, you will need a cording foot per each inch of a knife grip.
- Split stripping of your rope or leather. Choose a sharp knife or tools to shorten a leather strap to the size you like.
- Moisten a rope in hot water or strip it. Moisten the lace 30 minutes away in hot water. Water and soak leather allows it much more durable and makes it possible to curl across your knife.
- Position the scraping rope or a whole leather night in the freezer.
- Fasten the dagger across the rope twice. Carrying the string taut, tie it gently across the stick close to the blade. Position your thumbnail on the surface of the line to protect as you relate it in position.
- Tie a string to the knife knob at the edge. When you have the stick covered, tie a knot at the base of your rope to secure the covering in position.
Different Strategies:
A few of the effective means to start leather braids is to begin to use one of the fringe slicing strategies I ‘m talking about in my How to Build Leather Fringe Instruct-able, and afterward braid the cutting pieces over. This is a great idea to build a braid, as it ensures that the separate parts are connected with one edge of the braid and would not have to be kept in place by some other ending process.
Choose how wide and thick you want your braid to be, then follow these instructions to create a simple three-strand braid. Keep in mind that braiding will use up some of the leather, so plan accordingly. A general rule of thumb is that braiding will result in a loss of about 1/4 inch in length for every inch of width. So, if you want a 9-inch braid, you’ll need to start with a 12-inch strip of leather.
Braiding also induces a slippage in thickness that differs with the size of the material, but a braid as something I have shrunk in size around 1/4. Split a three twisted ribbon to create the simple braid, then figure out how to keep the upper end in position so that you can weave comfortably. I suggest using a binding clip and afterward loop the ends around this one.
Just create your braid the direction you’d like a regular braid, by alternating sides getting a stripe from outside and moving it into the center. Do not allow your strips to fall inside out, ensure the part of the piece still faces backward.
The three-strand trick braid looks like a regular braid, but it is actually two braids that are tied together at the ends. This makes it look more complicated than it is and also means that you don’t have to worry about how to finish off either side. This is a nice braid to have in your collection, especially for making small items like wristbands.
Three-strand braid:
Focus on splitting three strands out of a leather sheet as you had for the three-strand braid, but keep them attached at both sides, to create this braid. When you use thick or rigid leather, punching a hole at the start of every split is a smart option to help them move over one another quite effortlessly.
Consider taking your braids and lace as shown in initially drag the center point of the upper right sheet over the middle sheet and then drag all the way left underneath the left-hand stripe. You’ve necessarily made the start of a braid, but while the lower part of the fibers is linked, they’re also crossed, and you have to detach them.
To do so, take the leather’s lower right corner, tuck it away and pass it in between two strands that have become widest to the right. Bring it out all the time and turn it, so the part of the grain faces up afterward. You’re trying to make that which makes it look complicated, with plenty of knots in the threads. Don’t worry, anyway. Then folded the leather’s lower right-hand corner up and then move that through the gap with the far left and middle threads.
Once more, you’re going to make something chaotic, but under disorder, I say, there is harmony. Continuing to work from beginning to end, unfasten every piece with your fingers so that the braid puts smooth. It only starts looking like a braid! Then repeat the cycle to resume the braid all again.
The braid could be a little complicated at the end because there isn’t much space to thread the fibers. The basic 3-strand braid has all sorts of variants. The braids’ framework starts to look a little like the knitting as you attach more threads, and you can build several full pieces with fascinating designs.
I won’t dig too deeply into the field of the number of co-strand braids now, but if you’re curious to know further, the guide Leather Braiding is an excellent tool for all sorts of stitching braid combinations.
Four-strand braid:
Nonetheless, I would like to give you a 4-strand braid, since there’s something even more convenient about braids that have an even amount of strings compared to a variable amount. You could have them as braces that move via fastenings as they have openings in the center position of the braid, which can function as buckle tongues gaps!
The braid on the four strands is nearly as easy as the three strands. Just begin with four cut slices rather than 3, for this braid. Begin by passing the two adjacent stripes, right over left, to create the twist. Then take some far-left piece over the right-field strip. Next, move another far-right line underneath the left edge of the middle and over the further left stripe.
Start braiding the rest of the hair in the same pattern. You will still put the strand in the middle on the left side by moving over, and then the strand in the middle on the right side by moving under. Just like with a three-strand braid, hold the side of the braid up, and keep the pressure on your hands even as you braid so that the braid is nice and even.
To offer you more idea of the range of braids you could make, here’s one of my preference designs: the four-strand braid. The completed braid does have an excellent and completely different impact from a typical braid. This is exceptionally effective in areas where you can see all edges of the braid since the circular braid feels decent from either perspective. The four-strand braid can minimize your elastic straps’ initial position by around 1/3, so you’ll have to keep that in mind while designing your braid.
Circular braid:
To better shield, the rope from the braid, the minimum thickness of the straps must be approximately the same as that of rope diameter. E.g., when your cable is 2 “long, you’ll have to use 1/2” broad lace-up pieces. You begin the four-strand braid, as you’ve seen above, adding four lace-up ends around a core loop center with their grain ends pointing downwards. One great place of doing this is to tie thread across the lace covers.
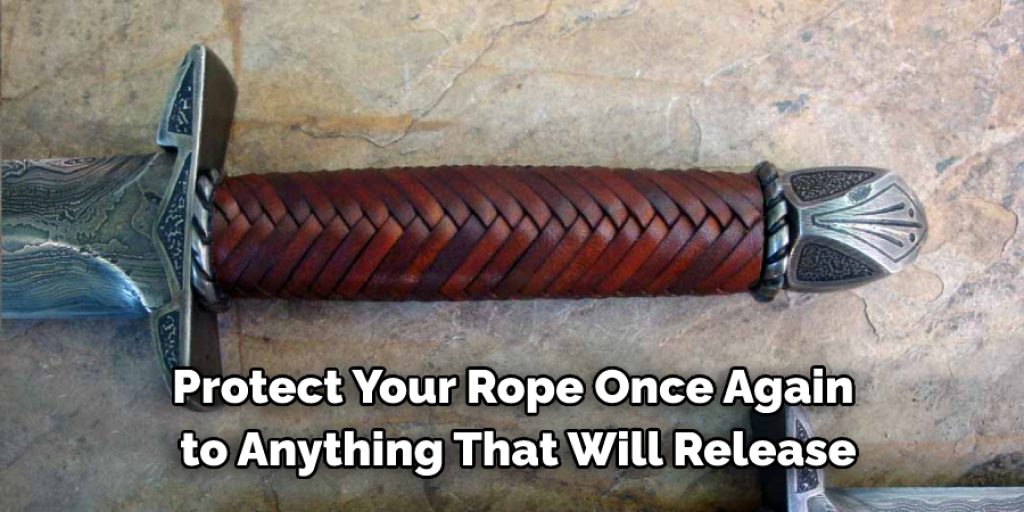
Protect your rope once again to anything that will release your paws to braid. The cord is positioned, so two strands remain to the front and others in the rear. Begin by moving its front left stripe across the front right, to create the braid. After that, try taking another far-left piece and carry it to the left across the rear of the rope, underneath the much further-right piece over the next part, so it rests in the center of this.
Gently pull and strengthen the threads across the cord so that the braid starts to shape. And doing the same on the right: bring some far-right piece (the upper strand) and put it towards the rear of the string, right underneath the far left piece, and right within the next piece, so it rests in the center of the line. Pull the braid strings to close.
You essentially every time take the highest piece from alternative sides and roll it up it all around the rear of the cord to other edge or under the for another highest part, as you’ll see. Continue focusing on making the remainder of the braid in this layout. Just have the laceration grain edges pointing out and not make them screw up.
Finishing Portion:
Whenever you need a free-hanging braid to be integrated into your design, you have to develop a way to complete the braid edge so it won’t detach. There are a couple of multiple methods to do that. Almost everything is a bit difficult, but again when you can figure out a way to integrate braiding it into the task in which both finishes are obscured from within seams, it will make life easier.
You may either hold the braid strands free at the ends or cover the braid so you do not see the loose threads if you’d like to do a dangling braid. If you’re ok with seeing lace-up finishes, you can tie a thread or even another part of knotting around the later part of the braid more or less the thing you will also at the end of a hair braid with a top knot.
If you use layering or a leather strap there, you’ll have to stitch or tie down the lace-up pieces around. Even so, it may sound a little more skilled, to cap the braid finishes with a more significant portion of the leather. If you’d like to build a rounded bottom, and one part bent over there to produce a stable closure, you could do so using a two piece cover.
Attach adhesive first from the separate braid threads, or poke gaps in them, and tie them around. Sliced either one two leather bits to create the top up you would like to make. When you use any part, fix the cap over the edge of the braid, paste the straps, and then choose one of the punched techniques that we have experienced to hit into all three levels.
You Can Check It Out to: Make a Leather Get Back Whip
Conclusion:
When you’re creating a 2-piece caps, stitch the cap’s top side, stick it over the braid, and punch the other gaps. I’ve presented you with several distinct braid combinations, which I think will bring you a clear understanding of the leather braiding and woven options. Perhaps one of my significant parts about such strategies is that they generate slight pattern differences, which bring a variety of significant appeal to a picture.
I’ve seen several incredibly inventive variations of such designs, and you’ll get some good ideas from simple browsing the web if you have made some braids or have decided to attach one from your design. When you are searching for even more straightforward leatherwork guidance to enable you to achieve your leather initiatives, verify my available early part, and advanced Leather practical lessons.
You May Read Also


