How to Make a Center Console Out of Wood
Search for a wood-made center console? Be your ideal place. It could have been used as a center console, like in vehicles, as wood is a noticeable element. The layouts which fit your interior vehicle style can be personalized to your center console. The working area of the car or truck should be cozy and well-designed. A center console is a great addition to make it comfortable and stylish. You can have a custom center console made with different materials, colors, and features.
It helped me understand why I likely won’t get the console I would like with the correct functionality and complete configuration, probably won’t get the console I would like? And then my maker soul’s sensation brought me to the thought of building my center console with a simple to search for stuff, the wood. I can make whatever I want, in any direction I choose to go, and the wood is a very cheap material with unlimited resources.
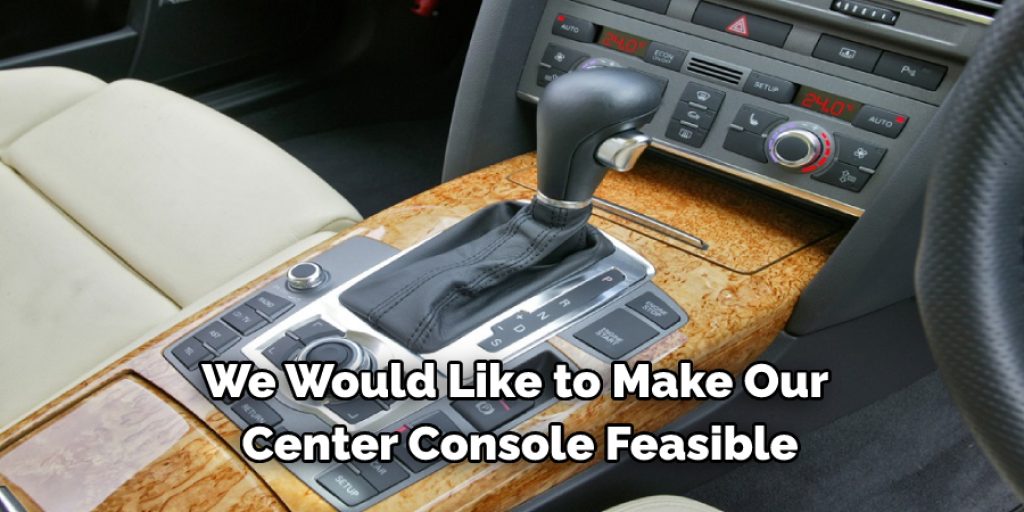
There have been three critical targets I would like with my creation: initially, it ought to be inexpensive. Secondly, it must be easily accessible resources, and finally, it must be artistic and enjoyable. Including me, we would like to make our center console feasible. Let me assist you in sorting out this creative formation. Among the key things I would like with my production is that it must be cheap. As you know, the economy is getting challenging these days, so we need to save our money wherever possible.
What You Require to Manage this Lesson
- Carton package
- Marker
- Cutting machine for cardboard
- A garment in Black Canvass
- 1 Dense Foam
- Forming the Rocket Shift
- Red Rocker Flips
- 3 in 1 Cig, voltmeter, USB adapter
- Saw package
- Cutting Instrument Oscillating
- Tape
- Stapler
As far as the textile, you choose another paint that fits your style, but I strongly recommend the cloth style canvass since it is sturdy and inexpensive than most other dollar stores. You can select the kind of paint you like that suits your vehicle’s interiors. You can either get a regular paint spray or even use a brush to apply the paint on the textile.
Instructions:
Method 1:

Look for Fixing Points: You have to come up with a way to get your center console safely installed. Please ensure you get the install correctly installed, which involves where to position the device safely. Here in this stage, because we do not like to risk your driving adherence, you must learn the lengths because you want for your ease. Ensure that the product is placed in a position where you can see it without moving your hands while driving. Ensure that the console is firmly secured to the center console.
You will be innovative through your own in this stage, that’s also my best thing because it is the base of our innovation. With creative talent and categorized into different, we can create a unique layout of our DIY. We are using our cardboard as our Center Console prototype. As a temporary layout, you can sketch from scrap to fulfill this move.
This involves a lot of testing except have pleasure with that as well; use a marker to check the edge on both edges of the console, such as the base on paint it straight into the cardboard case. It is cutting the box’s marked sections by using a packaging knife for the personalized form you have made.
Construct a Wooden Framework: You were cutting all of the wood’s sides and the gaps and patterns for the personalized center console you have, using a wood workpieces. Temporary arrange all of the materials you split and attempt to merge in along with all the parts to complete the console for correct wooden alignment.
We are now planning on making all of the woodlands with the bolts. One point you must consider, this isn’t supposed to be exceptionally ideal as we’re covering it with padding and cloth even then. All of the holes on either end shouldn’t be damaged as this isn’t the final number. To complete these stages, let us add all the buttons and attachments on to the woods.
Use these dimensions of every bit of wood to outline the foam and slice it merely wider than the base, so the material sticks out over the side. Put the adhesive on the wooden and place the padding and push it down to firmly establish the components. Do that with certain parts of the wood.
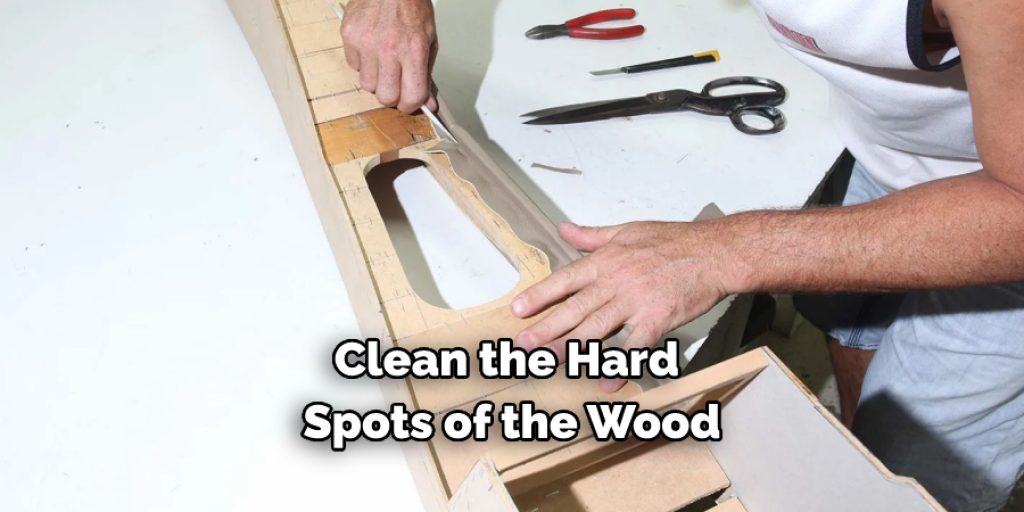
Then placed the stencil on the product, slice it with each side with a 3 to the 4-inches gap. Until applying the canvas to the content, clean the hard spots of the wood with sandpaper. To keep it strong, staple the surface to your product and lock each corner. On all products, continue the cycle.
You are now prepared to mount the hardware to the center console once you’ve done placing the canvass, and eventually, you’re able to deliver the finished version onto the vehicle. And now we get it, we use our personalized wooden console, while at the same moment, with no trouble, a more straightforward central console.
It makes me realize as I created this DIY, that easy is much more. Who might say this final design is more inexpensive than we assumed and wonderful? You also can do so without problems with your favorite style and customization.
Method 2:
By knowing the easy measures described, pick the components at your closest supermarket, build and develop them. The console is more significant than your usual bit of paper, but Rob glued several bits around for the model. If the form is shaped, it is moved to 3 mm MDF and sliced out from a jigsaw.
Apart from mild jump-ups on front and rear, the lower part of the console is smooth. These are purposely done to build a tidy, sleek line as it sticks to the end of the spaced-out path.
Spreader frames were made from 45×18 millimeters wood, then attached, and fastened in position with PVA wood putty. Remember how well the upper (primary) blocker lies 6 mm underneath the back edge — this would fit the later inserted filler board. For the dual-DIN headboard, the console has to be broad in front and narrower at the back to match here between positions, so that the spreader blockers change in size to produce the right pullback.
If the spreader blockers have established the console’s model, the upper gap is covered using several 12 mm MDF pieces. Mind the bottom framework spreader in front of the workplace. This frame, including some in front and some so at the rear, perched alongside the path, sustaining the console. They’re not entirely in line with the console’s rim, causing it to rest across the channel curves.
Whenever the adhesive is set, to verify the perfect fit, fall the console in position. For a good, snug fit, so do not be concerned once it requires any flexing. Remember the smooth finish, which was created between the console lower and the tube line.
That’s why making the cardboard and padding coating the tube correct (got better with the leather-protected level surface) was significant. At this point, some ridges in the tunnel’s surface are visible. This will be settled for the gear shift on a teardrop-formed opening that fits the consoles taper.
Identifying the appropriate scale for trim-out is complicated — too large, and it can appear large and inconvenient, too short, so during assembly, you probably wouldn’t be able to slide the console over its gear shift. You can attach fiberglass under it for extra durability, which might enable the framework amazingly-rigid. The pattern used during the gate and ground boards was transferred over to fullbacks of the console; further cardboard and wooden models became made.
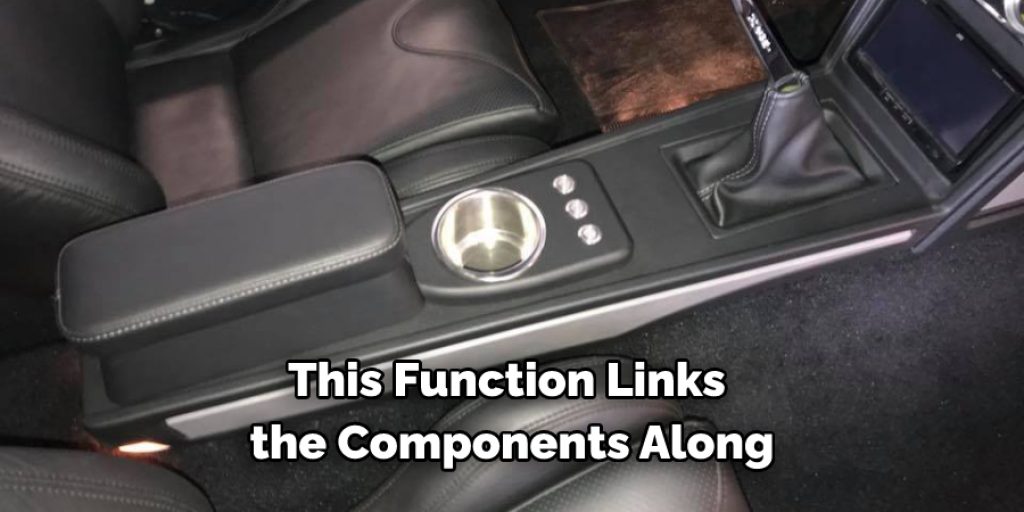
The components in the layout were simplified and thin-out due to the compact shape of the system. The strips holding the steel toggle-head nuts, though, are just the same size used in the door inserts and door frames. This function links the components along. Every board’s outlines were cleaned smoothly until the trimming mess started, because as leather would reveal some flaws.
Like with the gates and ground, the unit’s side panels were coated with 5 mm higher-density foam. A sharp knife is used to trim the extra material off. This must be performed very carefully because any irregularities will still surface in the leather after rolled around the lip. Higher-density foam is not coated with the long bob stripe, which the button-head screws would be inserted onto afterward.
The console information and outlines fit in perfectly with the rest of the surface. As its console forward firmly tucked underneath the dashboard, and the back closes it against back seat quail, it doesn’t go and also doesn’t have to be locked in position.
Tightening hooks might be placed underneath the top cover board for a smaller unit that would be kept removed and retained in position by straps or trim ties. The use of 18mm-thick blocks around the upper makes it easy to put a total load on the console’s armrest portion.
You may read also –
Elizabeth Davis
Elizabeth is a creative writer and digital editor based in the United States. She has a passion for the arts and crafts, which she developed from a young age. Elizabeth has always loved experimenting with new mediums and sharing her work with others. When she started blogging, she knew that DIYquickly would be the perfect platform to share her tutorials and tips. She's been writing for the blog from the beginning, and her readers love her helpful advice and easy-to-follow instructions. When she's not writing or editing, Elizabeth enjoys spending time with her family and friends.