
How to Make a Helmet Out of Paper

A paper helmet is a great way to keep your head safe while you are out and about. You can make one in just minutes with this step-by-step tutorial! Paper helmets are great for pretend play and can be made with paper, glue, and scissors. The first step in making a paper helmet is selecting an appropriate size piece of heavy construction paper.
Cut two strips down the length of the sheet, and the long strip on one side should be about 2 inches wide and 4 inches tall. There are many variations on how you can create this type of helmet, so please see this full blog post below for instructions on how to make a helmet out of paper that suits your needs best!
7 Creative Ideas To Make a Helmet Out of Paper:
1. Magnum Paper Helmet:
Fold a square sheet of paper in half diagonally to make a triangle. Unfold and fold each corner to the center point, alternating from one side to the other as you work your way out. Repeat on the other side, folding all four corners into the center point.
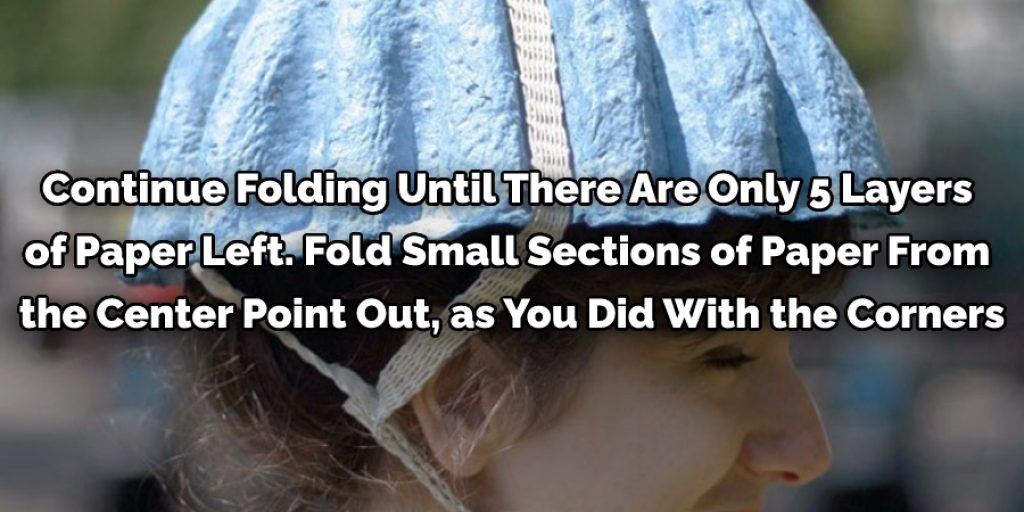
Keep folding until there are only five layers of paper left. From the center point, fold small sections of paper outwards, as you did with the corners. Fold and unfold each section two times on alternate sides. Repeat on the other side. To finish, tuck each flap into the pockets created by your folds.
2. Translucent Paper Helmet:
Cut a square piece of paper in half diagonally to make two triangles. Fold each triangle corner into the center point and unfold. Fold each side into the center again and unfold. Repeat with the other three sides, alternating from one side to another as you work your way out.
When folding is complete, crease each flap into the center. Fold each flap back out to reveal the crease underneath. Crease the flaps down, tucking them under each layer of paper beneath it.
3. Ninja Paper Helmet:
Fold a square sheet of paper in half diagonally to make a triangle, and unfold and fold each corner into the center. Fold down each flap so half of the paper is folded in and half of it is folded out. Tuck the loose ends into your pocket to finish.
4. Viking Paper Helmet:
Fold a square sheet of paper in half diagonally to make a triangle, and unfold and fold each corner into the center. Unfold and fold each corner into the center once more. Fold down the flaps and tuck them under the other layers to finish.
5. Cowboy Paper Helmet:
For this paper helmet, first fold a square sheet of paper in half diagonally to make a triangle, unfold and fold each corner to the center point, alternating from one side to the other as you work your way out. Then, repeat with the other three corners, folding all four into the center point. To finish, tuck each flap into the pockets that were created by your folds.
6. Paper Helmet Swords:
This helmet has an extra-special feature; it comes with matching paper swords. Unfold two opposite corners of your square sheet of paper to make a rectangle, then refold them into the center (so they’re double thickness).
Fold the resulting flap back out, so the inside is now on the outside. Repeat with the other side, so both are folded out. Finally, pinch the corners to make a kite shape and tuck them into each other as you would a paper airplane.
7. Police Paper Helmet:
To make a paper snowflake, start with a square sheet of paper. Fold the paper diagonally to make a triangle, then unfold it. Next, fold each triangle corner into the center point, alternating from one side to the other. Repeat on the other side, folding all four corners into the center point. Your paper snowflake is now complete!
Continue folding until there are only five layers of paper left. Next, fold small sections of paper from the center point out, as you did with the corners. Fold and unfold each section two times on alternate sides. Repeat on the other side. To finish, tuck each flap into the pockets that were created by your folds.
Instructions: How to Make a Helmet Out of Paper
Step 1:
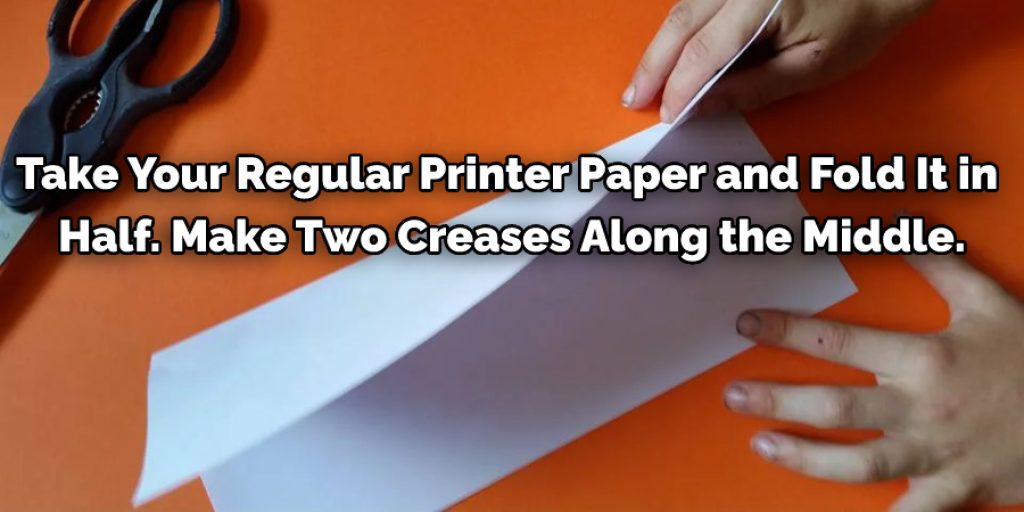
Take your regular printer paper and fold it in half. Make two creases along the middle. The creases should run parallel to the long edge of the paper. You will have a rectangle. If your paper is colored on one side, fold it so that the color shows on the inside of your helmet.
Step 2:
Unfold your rectangle and cut off a strip about 1/2 inch deep along with one of its short edges. The strip should be about two inches wide.
Step 3:
Open your rectangle like a V, so that it’s unfolded. You will now have the shape of the top of the helmet, but much larger than you need. Fold it in half widthwise, so that one side is slightly wider than the other. The color or pattern on your paper should now be inside your helmet.
Step 4:
Fold up along all four sides until they meet in the center. Crease well, then unfold.
Step 5:
Cut off two more strips about 1/2 inch deep and 2 inches wide (or as long as you like). These will become the sides of your helmet.
Step 6:
Now you will have the shape of the bottom part of the helmet, but much larger than you need. Fold up until all four sides meet in the center, then fold down along these folds. You’ve made a diamond-shaped wedge that is slightly smaller than half your original piece of paper. Crease very well.
Step 7:
If you want to make a paper helmet, first cut out a lens from your paper. It should be about 5 inches in diameter. Then fold up the bottom half-inch or so around the edge and tape any loose ends together. Finally, insert the lens into the helmet.
Step 8:
Lastly, Fold down along the creases you made earlier, as shown. A bit of practice will help you create a neat point at the top of your helmet. Then, put your paper into a plastic bag and spray it with a coat of paint or sealer to make the helmet more durable.
Conclusion:
The steps to making a helmet out of paper are relatively simple and can be done in just minutes. Once you’ve completed the project, it’s time to enjoy your new headgear for all sorts of fun activities! Remember that no matter what type of activity you engage in, safety always comes first.
With this easy-to-follow tutorial on how to make a helmet from paper, there is never an excuse not to protect yourself while having some good old-fashioned family fun outdoors! Paper helmets are an inexpensive way to keep your head safe.
Follow these steps, and you can make a paper helmet in minutes! We hope you have enjoyed this post about how to make a helmet out of paper. Remember, knowledge is power, so keep learning and stay safe!
You May also read – How to Make a Spiderman Mask Out Of Paper
Elizabeth Davis
Elizabeth is a creative writer and digital editor based in the United States. She has a passion for the arts and crafts, which she developed from a young age. Elizabeth has always loved experimenting with new mediums and sharing her work with others. When she started blogging, she knew that DIYquickly would be the perfect platform to share her tutorials and tips. She's been writing for the blog from the beginning, and her readers love her helpful advice and easy-to-follow instructions. When she's not writing or editing, Elizabeth enjoys spending time with her family and friends.


