
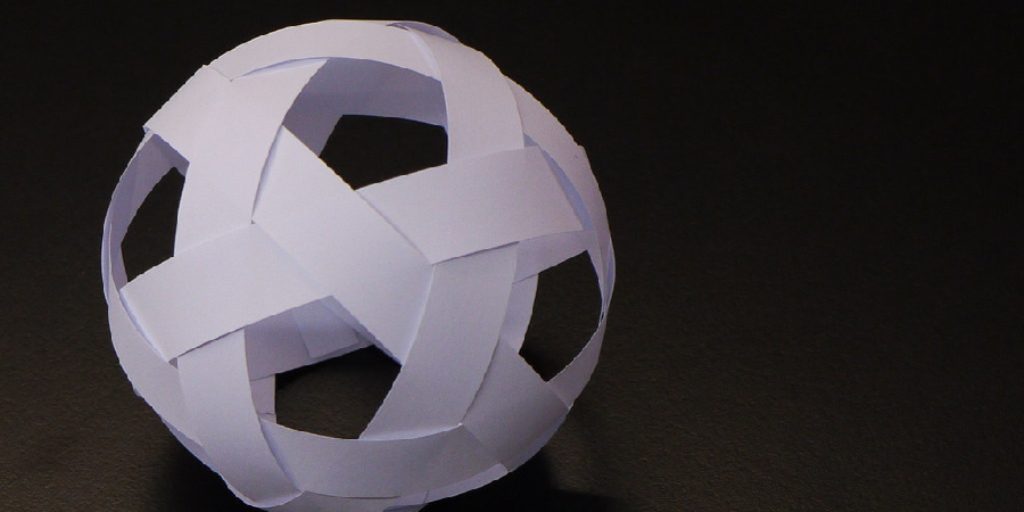
How to Make a Half Sphere Out of Paper
Introduction:
Paper is a thin material made of wood pulp, rags, or other fibrous substances pressed together into sheets. It comes in many forms, including toilet paper, printer paper, notebook paper, envelopes, business cards, and the list goes on.
Some of these papers are considered more important than others due to their use. In this article, I will discuss how to make a half sphere out of paper. So let us get started.
Summary:
Step One: Cut a 12-inch circle out of paper
Step Two: Draw a half sphere on the inside of the circle
Step Three: Tape the circle to the top of the half sphere
Step Four: Cut out the excess paper from around the circle and the half sphere
Step Five: Remove the tape
Stepwise Guide on How to Make a Half Sphere Out of Paper:
Step 1:
To make a half sphere, you will need at least two sheets of A4-sized paper, a ruler, a pencil, scissors, and a stapler. If you are using a pre-made saucer as your template, you will need approximately 55cm of paper.
Step 2:
Fold each piece of paper into four equal parts along its diagonal line, then unfold to get eight identical triangle shapes. The final size should be about 10 cm across at the base.
Using your ruler, measure slightly under six inches from the inner corner of one triangle and draw a light line across it with your pencil. Repeat for all triangles so that you have eight lines intersecting each other at an angle just below 6 inches.
Step 3: Staple all the lines together at an intersection point.
Step 4:
Fold the paper along each line, but this time, make sure to fold it over slightly so that there’s a tiny gap between the folded parts. Unfold once fully. This will create eight flaps that you’ll need to staple together.
Step 5:
Now, take another sheet of A4-sized paper and cut out a circle with a diameter of around 24 inches (if using a pre-made saucer as a template). You can always use your own judgment to decide on the size depending on how big or small you wish your ds to be.
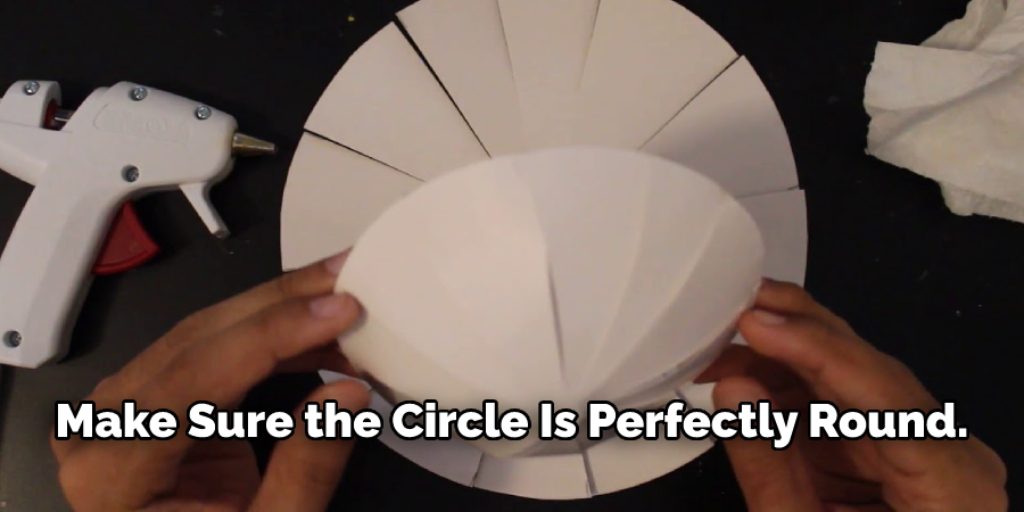
Just remember that its circumference should not exceed 7 feet for this method to work best. Make sure the circle is perfectly round. If it’s not, you can use scissors to cut out the little pieces of paper sticking out.
Step 6:
Wrap this circular piece around the top half of your previous structure and staple it together.
Step 7:
Take the bottom part of the saucer, which you created in step 3 and fold again along its diagonal lines, but make sure that each line is folded into itself – no gaps. Unfold once fully. This will create eight flaps that you’ll also need to staple together.
Precautions While Making a Half Sphere Out of Paper:
1. It is essential that when you make this half-sphere, you use a ruler and a pencil with a sharp point to prick out the paper to get it right.
2. Prepare a chopping board and a paperweight before making this half-sphere to hold down the paper while it’s drying in between, pricking it out from one side to another side until you finish all around.
3. After completing the circling, put some pressure on the paper from the top by holding your hand over it for few minutes so that when you take off your hand after some time, it holds itself up instead of going down flat again.
4. In addition, I have used 2 pieces of paper for making this half-sphere which gives more strength or tightness to this half sphere.
How to Make a Full Sphere Out of Paper?
Things you need :
- Paper ( I used printer paper)
- Pen/Pencil to make drawing
- Scissors
Step 1:
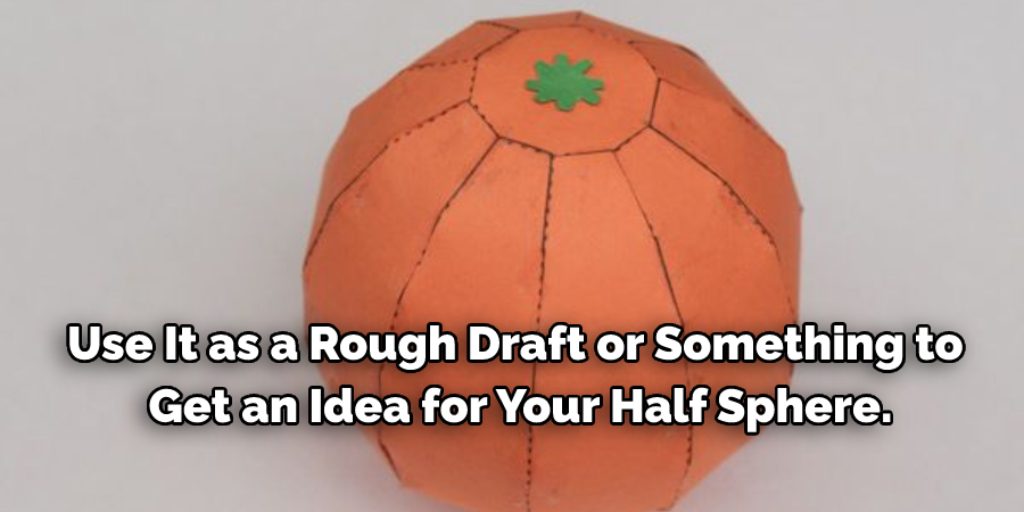
Draw out the template on a piece of paper. Use it as a rough draft or something to get an idea for your half sphere. First, draw two ellipses near the top(for your eyes).
Then take another sheet of paper and put it under the one you’re working on, then overlap them horizontally over each other by about 6 inches. Line up where they meet in the middle, then tape together using that line as your guide. Next, take some measurements so you can use them while making your dome at home.
– Height of the template should be around 8 inches (20 cm)
– Width of the template should be around 6 inches (15 cm). If your paper is larger then that’s fine. Just use a ruler or something to get your accurate width.
Step 2:
Your half sphere will have two sides, so fold one side over the top line to guide where to cut. Then tape it directly across from it along with along the bottom.
You’ll notice in this step how I’ve used small pieces of tape instead of long ones, which is mostly for stability since you don’t want your whole dome falling by doing incorrectly. I’ve used two pieces of tape and not one because it’s more stable, and you will get a cleaner fold-over.
Step 3:
I’ve cut another line into the paper to create a crease at an angle; this will allow us to make a half sphere with less of an oval shape.
Again, the little folds on the top and bottom prevent wrinkles when we’re placing them together since there will be uneven pressure from one side pushing into the other.
Step 4:
Take another sheet of paper and align it with what you’ve made so far. Note how there’s only one way they can go together: to ensure that they fit properly without too much or too little overlap when we tape them together.
I didn’t take pictures of the next step, but it should be self-explanatory. What you’ll want to do now is tuck each corner into the other half-sphere.
Before moving on to the next step, ensure that it sits flush against your template because it will determine if things line up correctly later on.
Step 5:
The last step! Now all you have to do is tape down each edge along the entire perimeter, don’t worry about the top and bottom since paper clips will cover those parts.
Conclusion:
I hope this article has been beneficial for learning how to make a half sphere out of paper. Follow the precautions while performing the process. Thank you and have a nice day!
Elizabeth Davis
Elizabeth is a creative writer and digital editor based in the United States. She has a passion for the arts and crafts, which she developed from a young age. Elizabeth has always loved experimenting with new mediums and sharing her work with others. When she started blogging, she knew that DIYquickly would be the perfect platform to share her tutorials and tips. She's been writing for the blog from the beginning, and her readers love her helpful advice and easy-to-follow instructions. When she's not writing or editing, Elizabeth enjoys spending time with her family and friends.


